Flutter Widget 预览器
学习如何使用 Flutter Widget 预览器,在全应用之外实时查看 widget 渲染效果。
本指南将介绍如何使用 Flutter Widget 预览器。
概览
#利用 Flutter Widget Previewer,你可以在 IDE 或浏览器中,独立于完整应用,实时渲染、检查和迭代单个 UI 组件。
以下将介绍如何打开预览器、预览 widget、搜索和筛选预览结果,以及自定义预览配置。
打开预览器
#IDE
#Android Studio、IntelliJ 和 Visual Studio Code 在启动时会自动启动 Flutter Widget Previewer。
Android Studio 与 Intellij
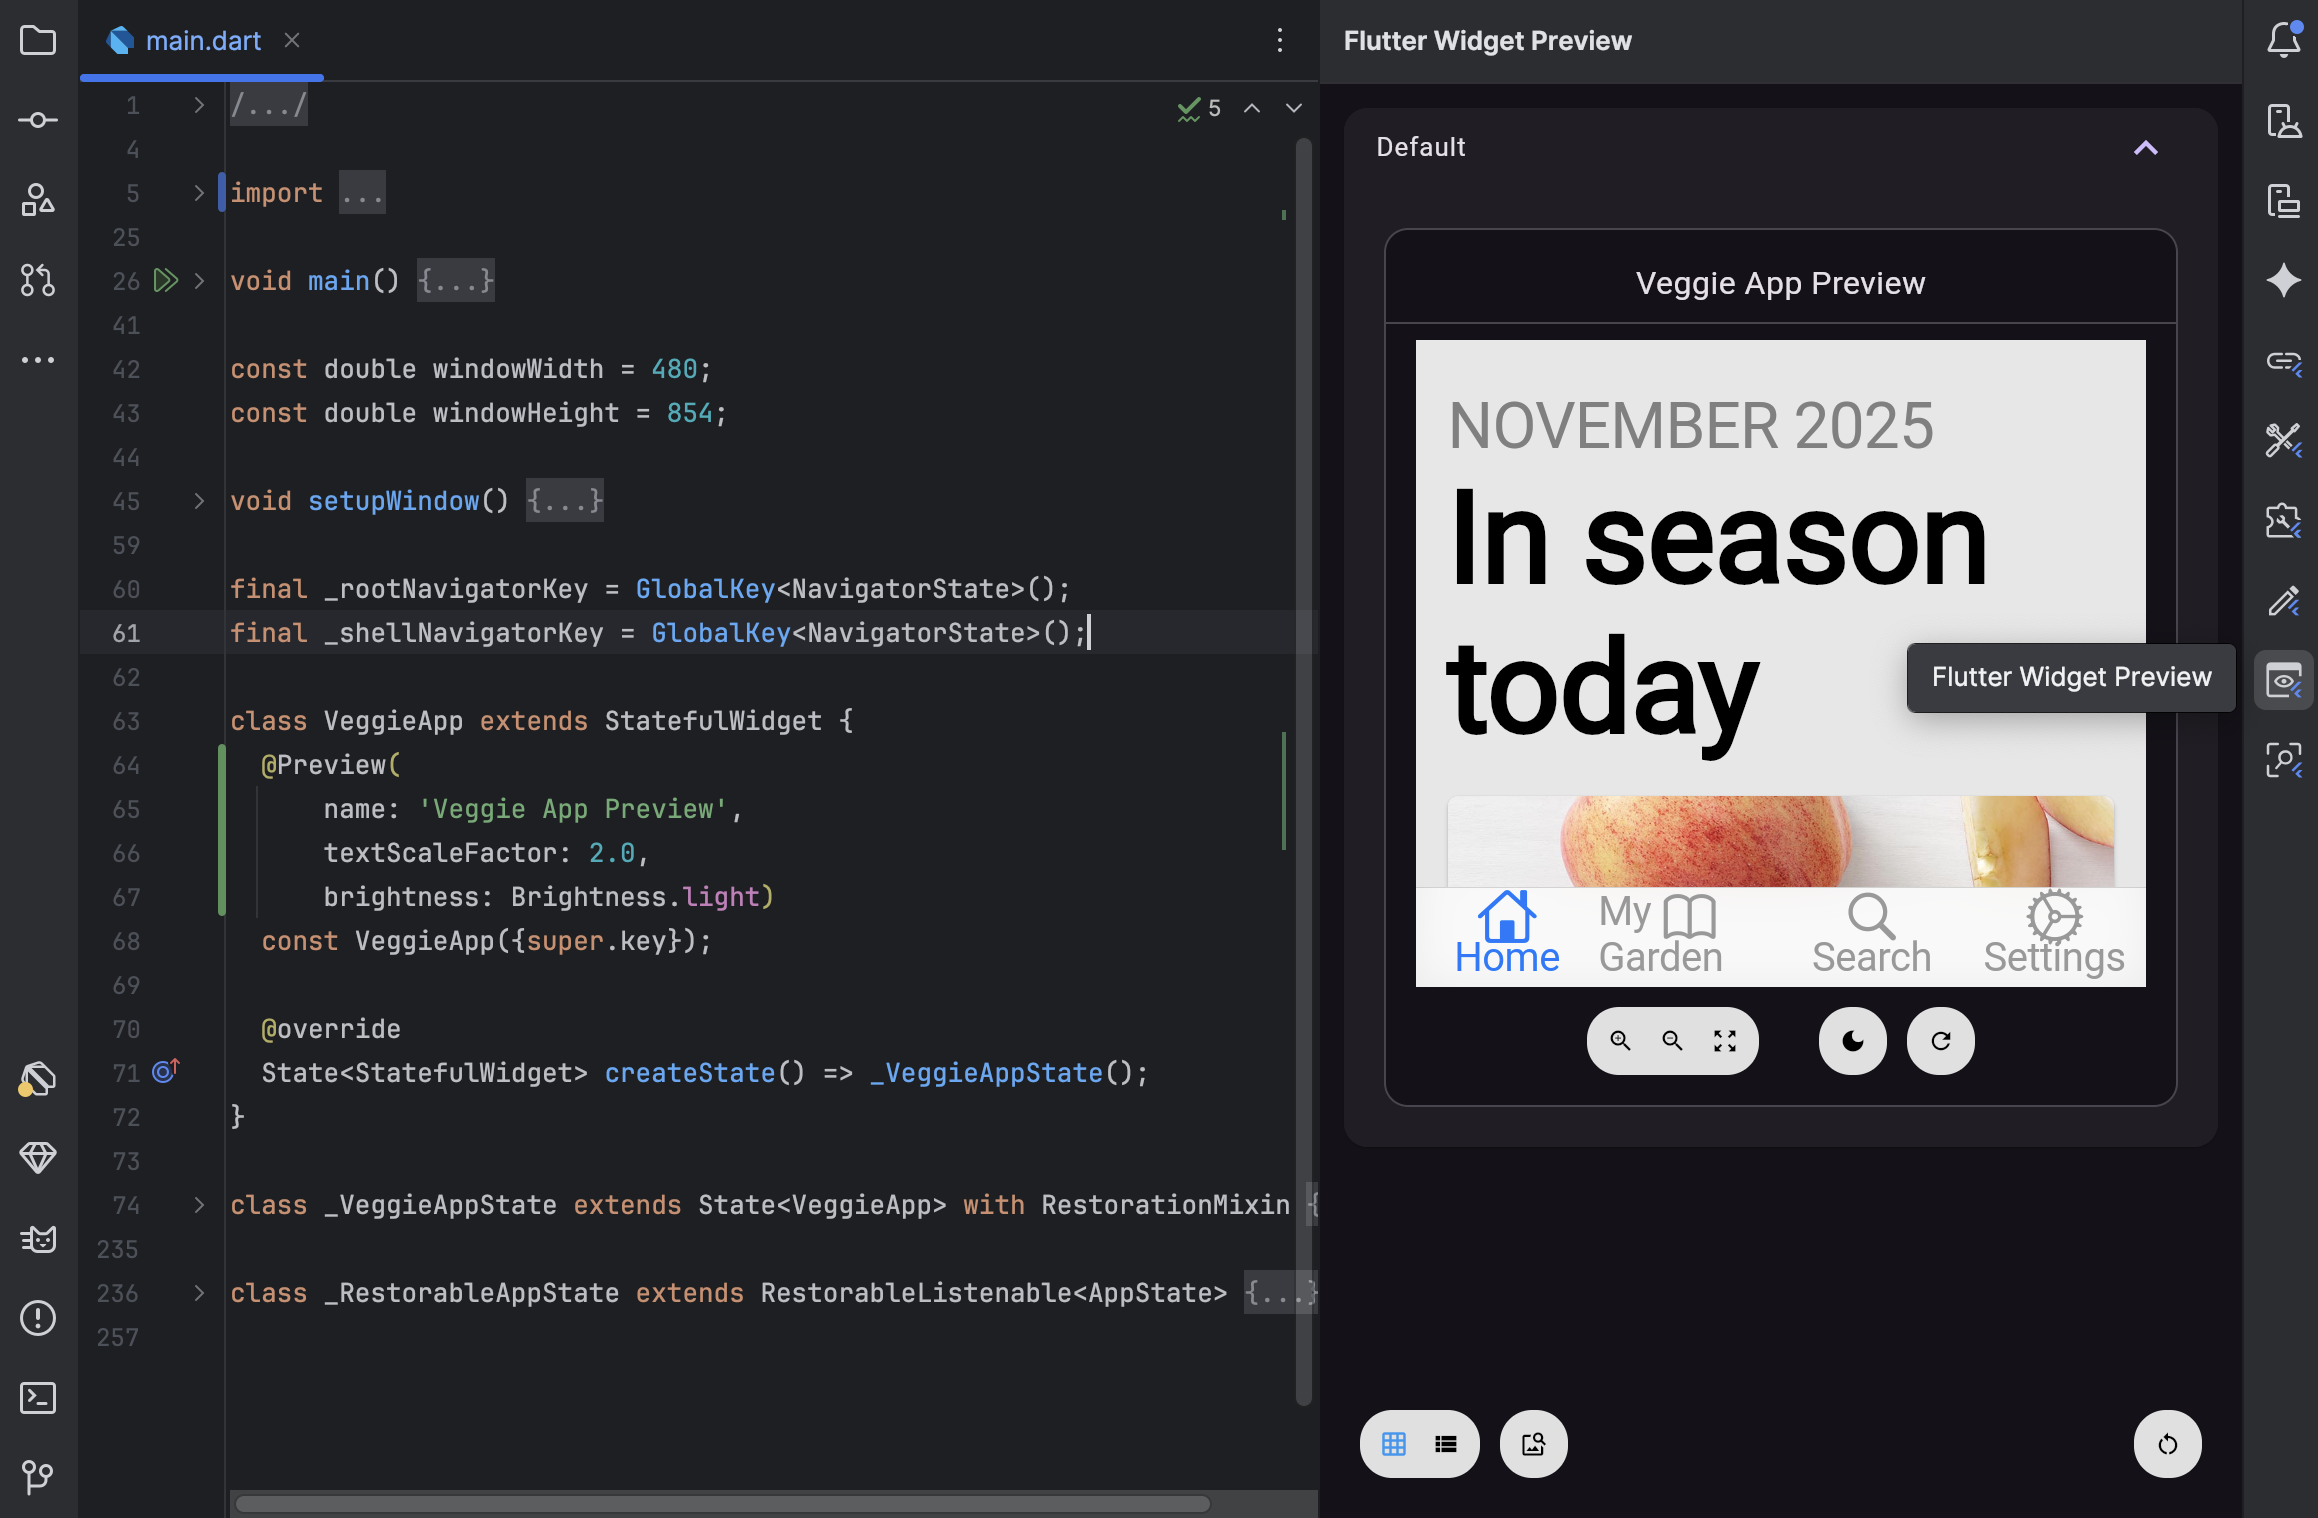
#要在 Android Studio 或 IntelliJ 中打开 Widget 预览器,请在侧边栏打开 "Flutter Widget Preview" 标签页:
Visual Studio Code
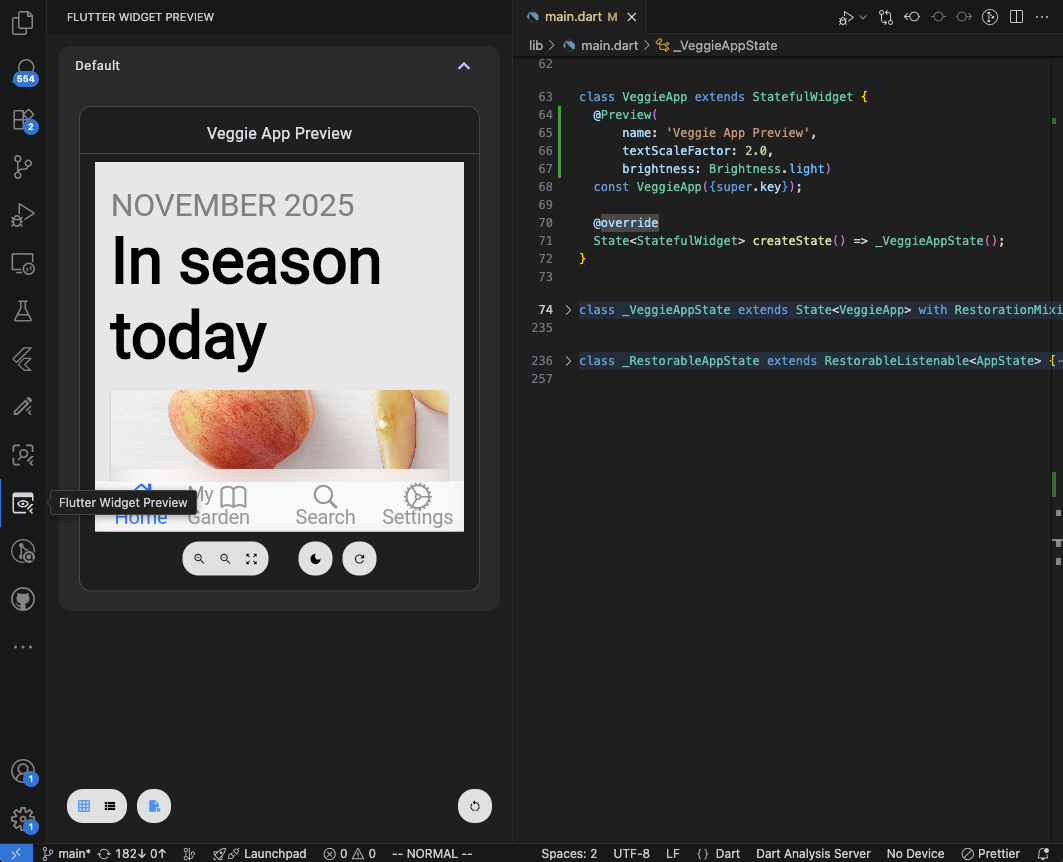
#要在 Visual Studio Code 中打开 Widget 预览器,请在侧边栏打开 "Flutter Widget Preview" 标签页:
命令行
#要在终端中启动 Flutter Widget Previewer,请先导航至 Flutter 项目的根目录,然后运行以下命令:
flutter widget-preview start
This launches a local server and opens a real-time preview environment in your browser.
To optimize startup times, the previewer automatically caches project builds
in a .widget_preview/ folder in your project root.
预览 widget
#
启动预览器后,要查看 widget,必须使用
package:flutter/widget_previews.dart 中定义的 @Preview
注解。该注解可应用于:
-
返回
Widget或WidgetBuilder的 顶层函数。 -
类内返回
Widget或WidgetBuilder的 静态方法。 -
无必需参数的 公共 Widget 构造函数和工厂。
以下是使用 @Preview 注解预览 Text widget 的基本示例:
import 'package:flutter/widget_previews.dart';
import 'package:flutter/material.dart'; // For Material widgets
@Preview(name: 'My Sample Text')
Widget mySampleText() {
return const Text('Hello, World!');
}
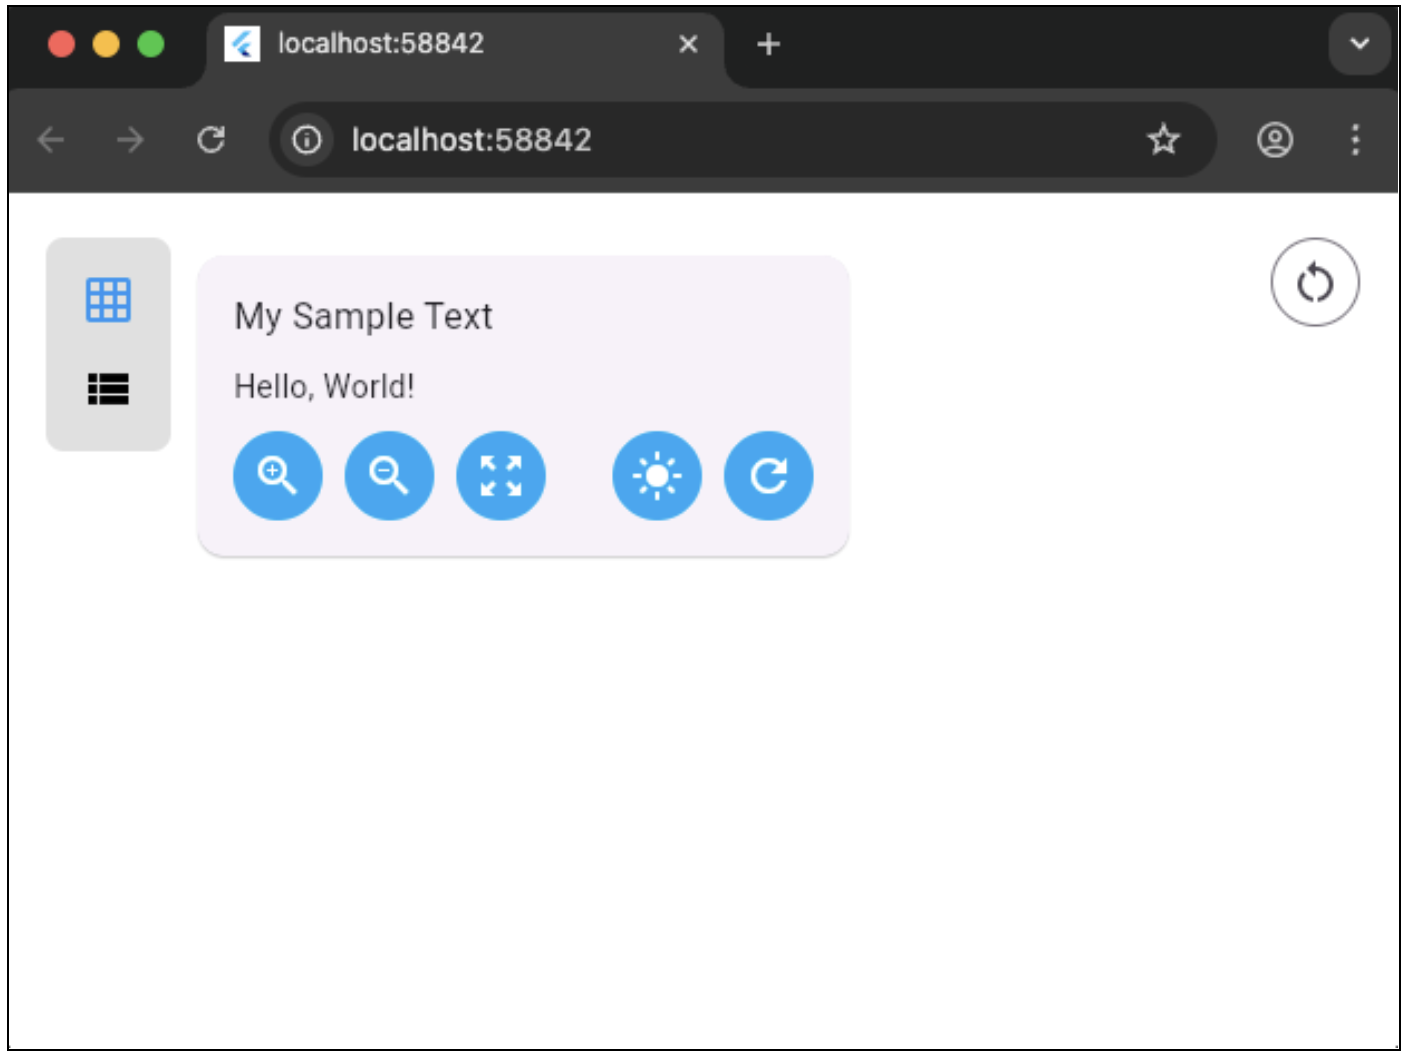
每个预览实例提供多种控件,用于与预览中的 widget 交互。从左到右:
-
Zoom in(放大): 放大预览中的 widget。
-
Zoom out(缩小): 减小预览中的放大倍数。
-
Reset zoom(重置缩放): 将 widget 预览恢复为默认缩放级别。
-
Toggle between light and dark mode(切换浅色/深色模式): 在浅色与深色配色方案之间切换预览主题。
-
Perform a hot restart for the individual preview(对单个预览执行热重启): 仅重启该 widget 预览,可快速应用更改而无需重启整个应用。
若已修改全局状态(例如静态初始化器已更改),可使用右下角的按钮让整个 widget 预览器热重启。
Search and filter previews
#The Widget Previewer environment includes search and filtering capabilities to help navigate projects with many annotated previews.
Search bar and filtering criteria
#Use the search bar at the top of the environment to filter previews in real-time. Click the filter dropdown next to the search field to choose which criteria to match against:
-
Preview name: Filters by the descriptive name set in the
@Previewannotation. -
Group name: Filters by the group name specified in the
@Preview(group: ...)parameter. - Containing script: Filters by the URI of the Dart file containing the preview.
- Containing package: Filters by the package name containing the preview.
For example, the parameters in the following preview annotation match against
the Preview name ('Submit Button') and Group name
('Form Controls') filters:
@Preview(name: 'Submit Button', group: 'Form Controls')
Widget submitButtonPreview() => const SubmitButton();
Filter previews by selected file in IDEs
#When viewing previews within an IDE, the widget previewer can also filter previews based on the currently selected file:
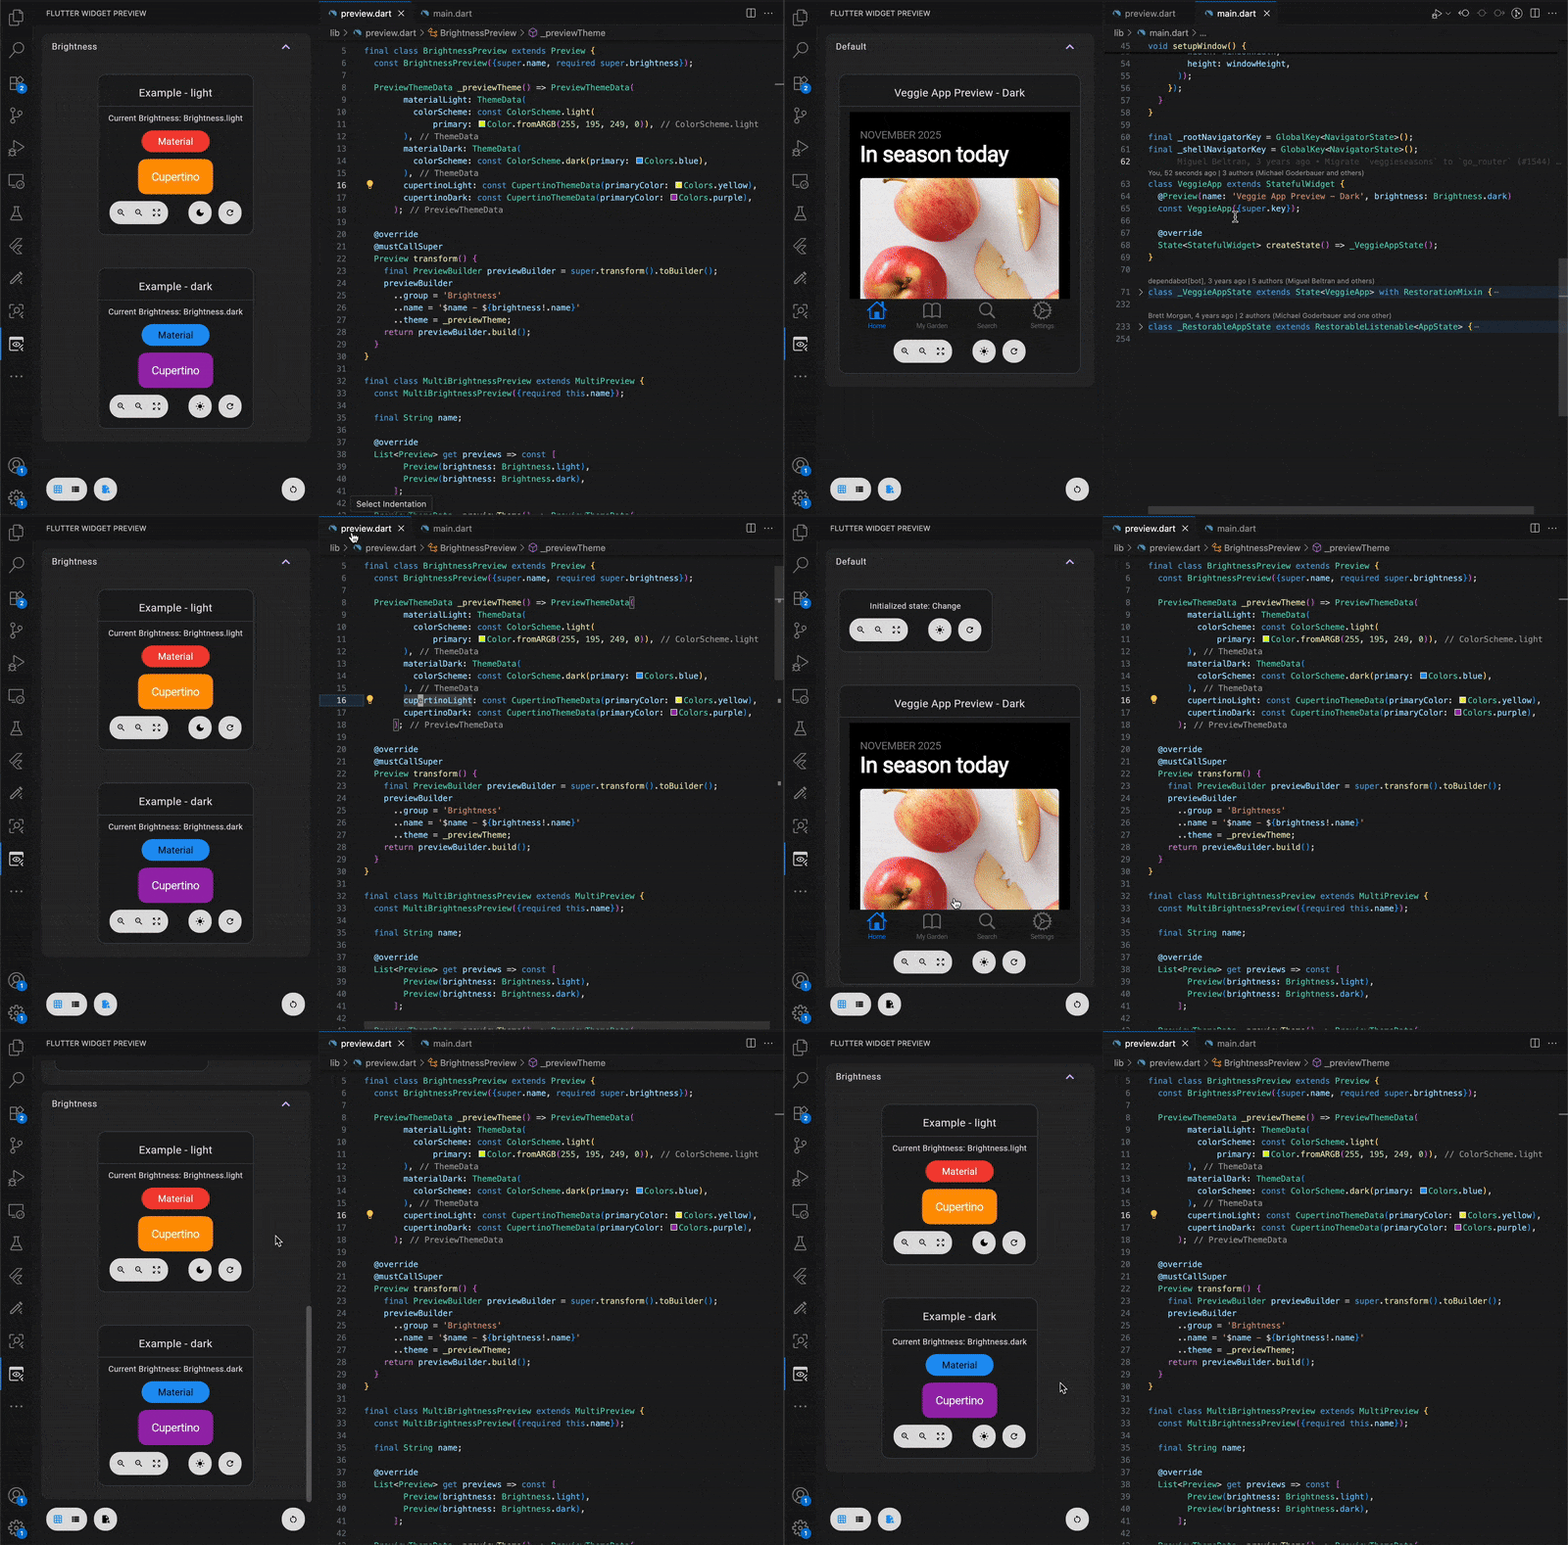
To toggle this behavior, select the Filter previews by selected file option at the bottom of the environment.
自定义预览
#
@Preview
注解提供多个参数,可用于自定义预览:
-
name:预览的描述性名称。 -
group:在 widget 预览器中将相关预览分组在一起的名称。 -
size:使用Size对象施加的人工尺寸约束。 -
textScaleFactor:自定义字体缩放。 -
wrapper:将预览 widget 包裹在特定 widget 树中的函数(例如通过InheritedWidget向 widget 树注入应用状态)。 -
theme:一个返回PreviewThemeData实例的函数,用于提供自定义和通用的主题数据,并支持顺序主题分层来满足复杂的矩阵测试需求。 -
brightness:初始主题亮度。 -
localizations:应用本地化配置的函数。
创建自定义预览注解
#
为减少使用一组通用属性定义预览所需的样板代码,可扩展 Preview
注解类,为项目创建定制的自定义预览注解。
以下示例提供主题数据的自定义预览注解:
final class MyCustomPreview extends Preview {
const MyCustomPreview({
super.name,
super.group,
super.size,
super.textScaleFactor,
super.wrapper,
super.brightness,
super.localizations,
}) : super(theme: MyCustomPreview.themeBuilder);
static PreviewThemeData themeBuilder() {
return PreviewThemeData(
materialLight: ThemeData.light(),
materialDark: ThemeData.dark(),
);
}
}
扩展 Preview
注解类还可重写 Preview.transform()
方法。
widget 预览器会调用此方法,在运行时修改预览,从而实现 const 上下文中无法实现的预览配置:
final class TransformativePreview extends Preview {
const TransformativePreview({
super.name,
super.group,
super.size,
super.textScaleFactor,
super.wrapper,
super.brightness,
super.localizations,
});
// Note: this is no longer public or static as it's injected
// at runtime when transform() is invoked.
PreviewThemeData _themeBuilder() {
return PreviewThemeData(
materialLight: ThemeData.light(),
materialDark: ThemeData.dark(),
);
}
@override
Preview transform() {
final originalPreview = super.transform();
// Creates a PreviewBuilder that can be used to modify
// the preview contents.
final builder = originalPreview.toBuilder();
builder
..name = 'Transformed - ${originalPreview.name}'
..theme = _themeBuilder;
// Returns the updated Preview instance.
return builder.toPreview();
}
}
创建多种预览配置
#
为同一函数或构造函数应用多个 @Preview
注解,即可轻松创建多种不同配置的预览:
@Preview(
  group: 'Brightness',
  name: 'Example - light',
  brightness: Brightness.light,
)
@Preview(
  group: 'Brightness',
  name: 'Example - dark',
  brightness: Brightness.dark,
)
Widget buttonPreview() => const ButtonShowcase();
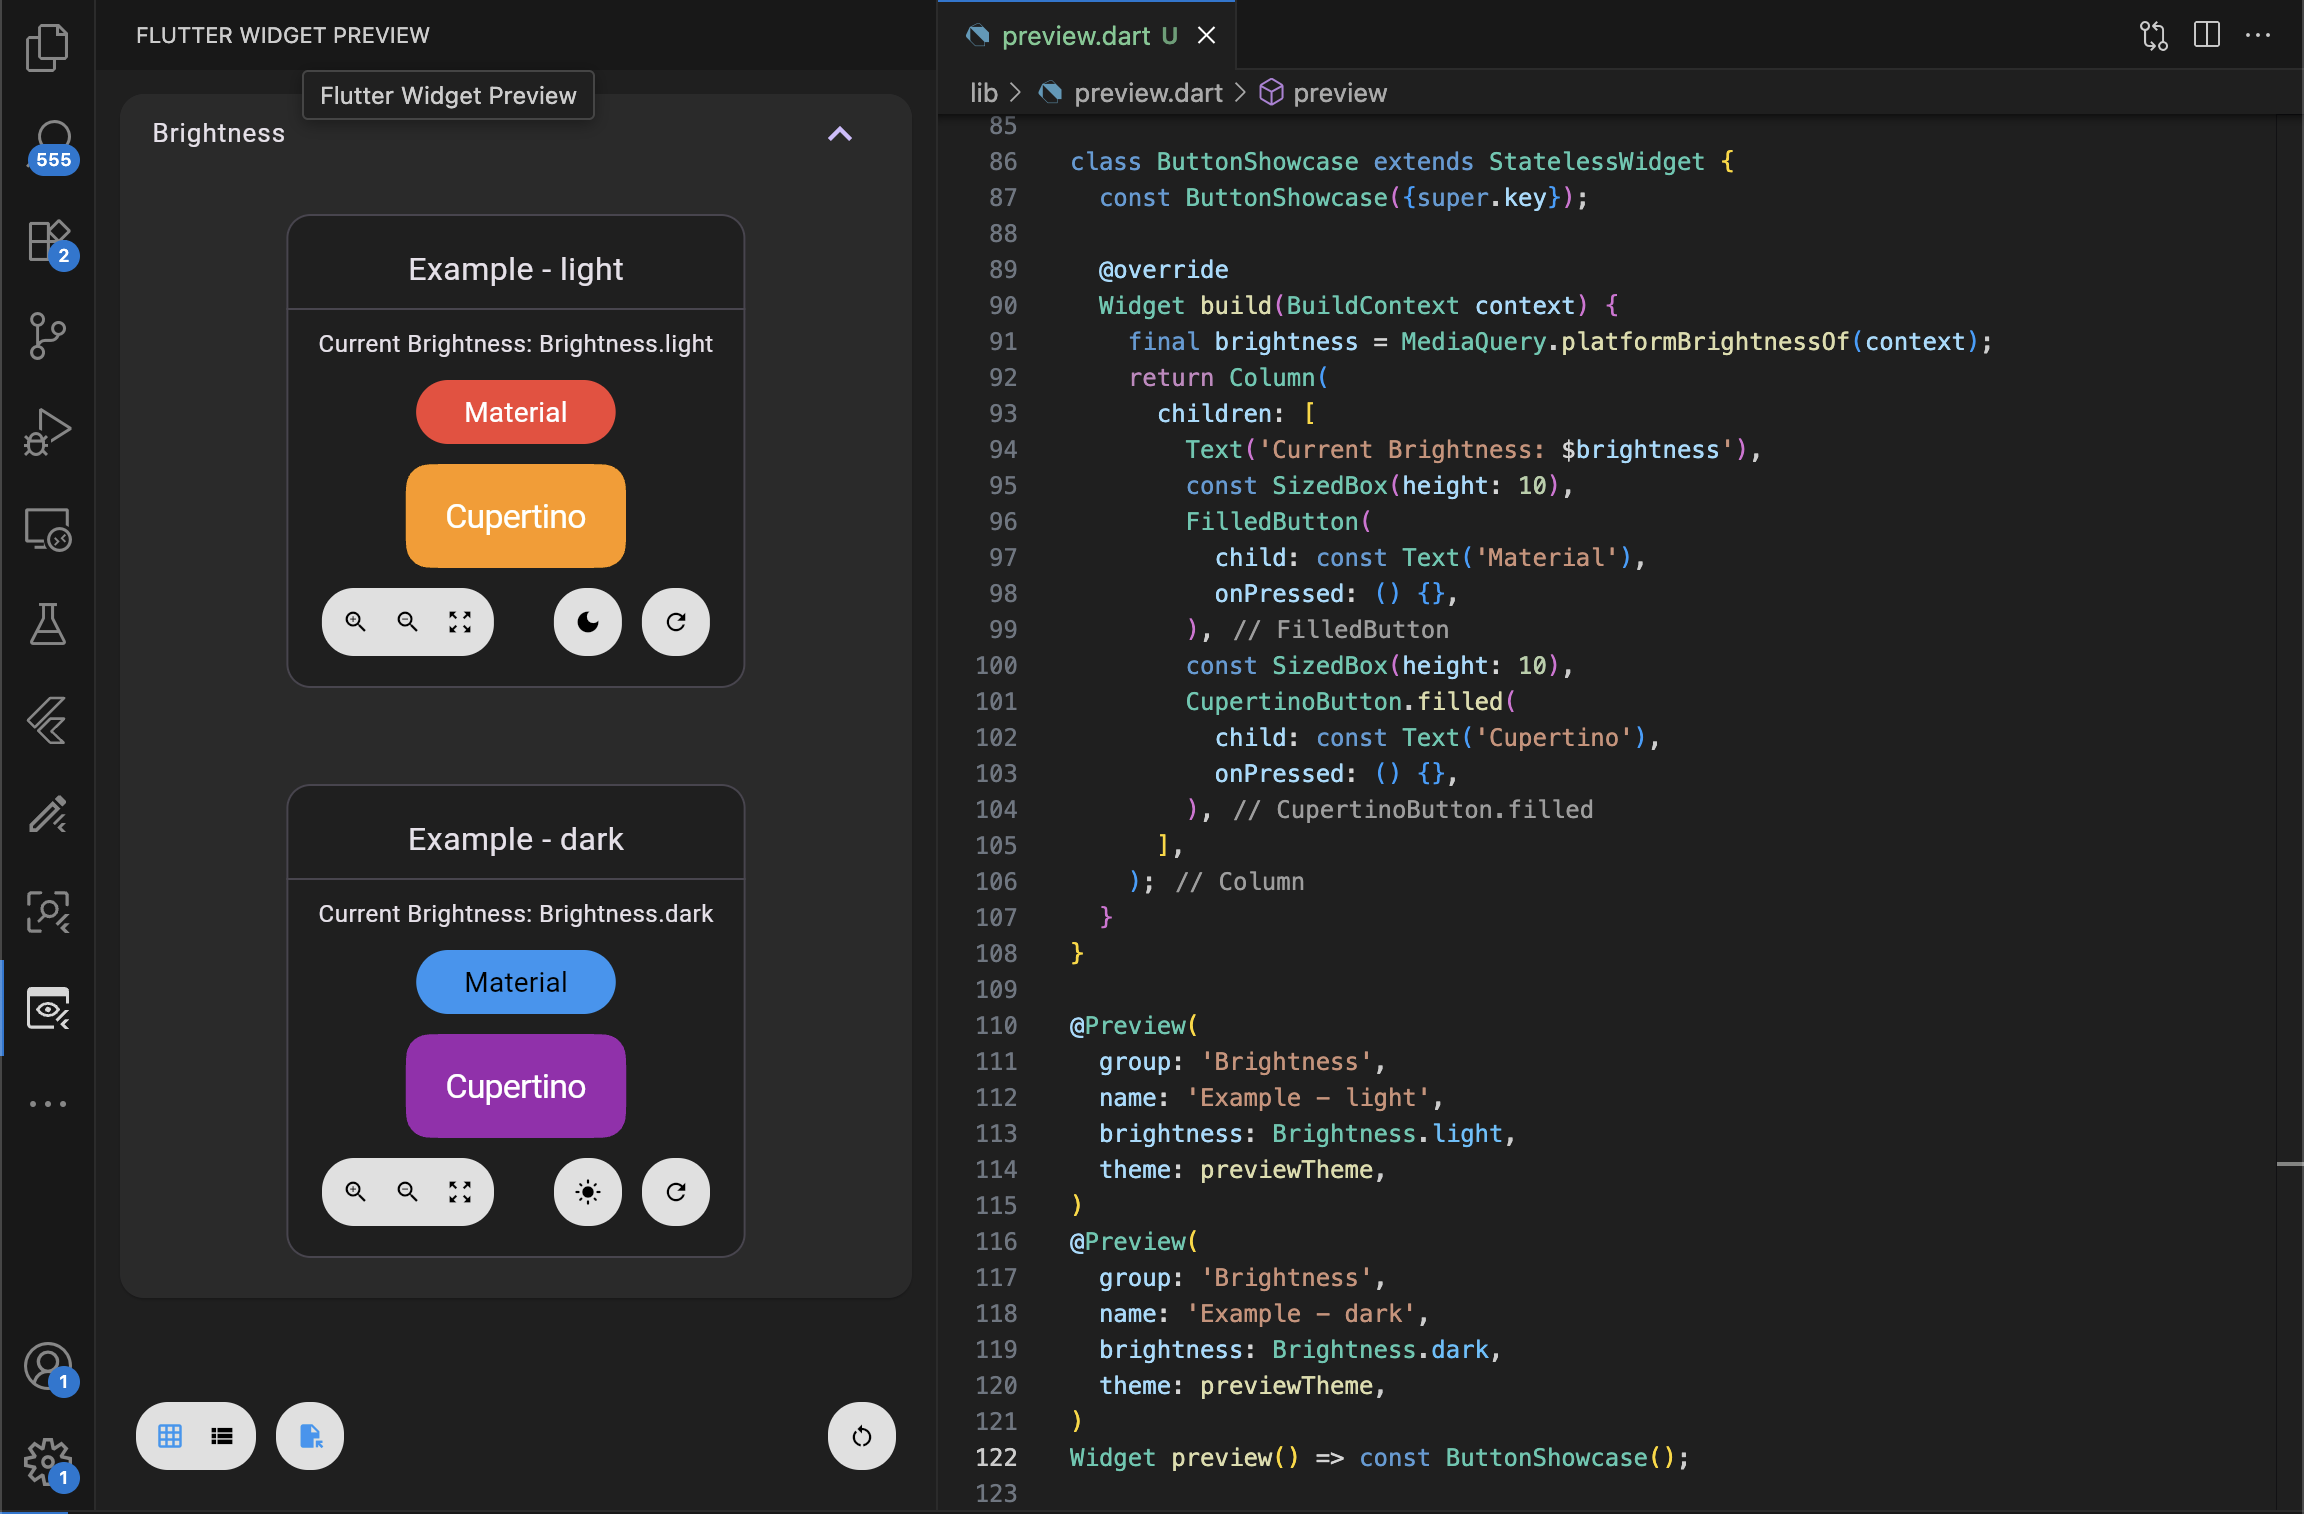
要简化使用通用配置创建多个预览,可扩展 MultiPreview
来定义一个自定义注解,用于创建多个预览。以下 MultiPreview
会创建与上一示例相同的两项预览:
/// Creates light and dark mode previews.
final class MultiBrightnessPreview extends MultiPreview {
const MultiBrightnessPreview();
@override
List<Preview> get previews => const [
Preview(
group: 'Brightness',
name: 'Example - light',
brightness: Brightness.light,
),
Preview(
group: 'Brightness',
name: 'Example - dark',
brightness: Brightness.dark,
),
];
}
@MultiBrightnessPreview()
Widget buttonPreview() => const ButtonShowcase();
与 Preview
类似,MultiPreview
也提供 MultiPreview.transform()
方法,在运行时对每个预览进行变换:
/// Creates light and dark mode previews.
final class MultiBrightnessPreview extends MultiPreview {
const MultiBrightnessPreview({required this.name});
final String name;
@override
List<Preview> get previews => const [
Preview(brightness: Brightness.light),
Preview(brightness: Brightness.dark),
];
@override
List<Preview> transform() {
final previews = super.transform();
return previews.map((preview) {
final builder = preview.toBuilder()
..group = 'Brightness'
// Building names based on values provided to the annotation
// isn't possible within a constant constructor. However,
// there's no such restriction when building a Preview at
// runtime.
..name = '$name - ${preview.brightness!.name}';
return builder.toPreview();
}).toList();
}
}
@MultiBrightnessPreview(name: 'Example')
Widget buttonPreview() => const ButtonShowcase();
限制与约束
#使用 Flutter Widget 预览器时应注意以下限制:
-
公共回调名称:提供给预览注解的所有回调参数必须是 public 且为 constant。预览器的代码生成实现需要如此才能正常工作。
-
不支持的 API:不支持原生插件以及
dart:io或dart:ffi库中的任何 API。因为 widget 预览器基于 Flutter Web 构建,无法访问底层原生平台 API。在你的浏览器中 Web 插件可能可用,但不保证在其他环境(例如嵌入 IDE 时)也能工作。对
dart:io或dart:ffi有传递依赖的 widget 可以正常加载,但调用这些库中的 API 时会抛出异常。有关如何在面向多平台时整洁地支持平台特定库,请参阅 Dart 条件导入文档。
-
资源路径:使用
dart:ui的fromAssetAPI 加载资源时,必须使用 基于 package 的路径,而非直接本地路径。这样资源才能在预览器的 Web 环境中正确定位和加载。例如使用'packages/my_package_name/assets/my_image.png',而不是'assets/my_image.png'。在预览 Web widget 时,预览器会自动从主项目的
web/目录同步资源,并应用自定义主题或index.html的自定义设置。 -
无约束 widget:无约束 widget 会自动约束为约为 widget 预览器高度和宽度的一半。此行为未来可能变更,因此尽可能使用
size参数施加约束。 -
IDE 中的多项目支持:widget 预览器目前仅支持显示单个项目或 Pub 工作区内的预览。我们正在积极研究支持包含多个 Flutter 项目的 IDE 会话的方案 (#173550)。
除非另有说明,本文档之所提及适用于 Flutter 3.47.2 版本。本页面最后更新时间:2026-08-11。查看文档源码 或者 为本页面内容提出建议。