主动画 (Hero animations)
如何让 widget 动画飞跃两个屏幕。
你可能经常遇到 hero 动画。比如,页面上显示的代售商品列表。选择一件商品后,应用会跳转至包含更多细节以及“购买”按钮的新页面。在 Flutter 中,图像从当前页面转到另一个页面称为 hero 动画,相同的动作有时也被称为 共享元素过渡。
下面的一分钟视频介绍了 Hero widget:
这个指南演示了如何创建标准 hero 动画,以及 hero 动画如何在飞行过程中将图像形状由圆形变成正方形。
你可以在 Flutter 中使用 Hero widgets 创建这个动画。当 hero 动画从原页面到目标页面,目标页面(减去 hero)淡入视野。可以说,heroes 是 UI 的一小部分,就像图像,两个页面有共同之处。从用户的角度来说,hero 在页面间「飞翔」。本指南展示如何创建如下 hero 动画:
标准 hero 动画
一个 标准 hero 动画 使 hero 从一页飞至新页面,通常以不同大小到达不同的目的地。
下面的视频(慢放)演示了一个典型示例。点击页面中间的 flippers,它将飞至一个新的蓝色页面的左上角,并缩小。点击蓝色页面中的 flippers(或者使用设备的回到前页手势),它将返回原页面。
径向 hero 动画
在 径向 hero 动画 中,随着 hero 在页面间飞翔,它的形状也会有圆形变成矩形。
下面的视频(慢放)演示了一个径向 hero 动画的示例。开始,一排三个圆形的图像在页面底部。点击任意圆形图像,其飞至新页面,并变成正方形。点击正方形图像,hero 返回至原页面,并变回圆形。
在学习 标准 或 径向 hero 动画之前,请阅读 hero 动画基本结构 来学习如何构建 hero 动画代码,以及 幕后 来了解 Flutter 如何显示一个 hero 动画。
hero 动画基本结构
#
Hero 动画需要使用两个 Hero
widgets 来实现:一个用来在原页面中描述 widget,另一个在目标页面中描述 widget。从用户角度来说,hero 似乎是分享的,只有程序员需要了解实施细节。
Hero 动画代码有如下结构:
-
定义一个起始 Hero widget,被称为 source hero。该 hero 指定图形表示(通常是图像),以及识别标签,并且在由原页面定义的当前显示的 widget 树中。
-
定义一个截至 Hero widget,被称为 destination hero。该 hero 也指定图形表示,并与 source hero 使用同样的标签。 这是基本,两个 hero widgets 要创建相同的标签,通常是代表基础数据的对象。为了获得最佳效果,heroes 应该有几乎完全相同的 widget 树。
-
创建一个含有 destination hero 的页面。目标页面定义了动画结束时应有的 widget 树。
-
通过推送目标页面到 Navigator 堆栈来触发动画。 Navigator 推送并弹出操作触发原页面和目标页面中含有配对标签 heroes 的 hero 动画。
Flutter 设置了 tween 用来界定 Hero 从起点到终点的界限(插入大小和位置),并在图层上执行动画。
下一章节将更详细地介绍 Flutter 的过程。
幕后
#下面将介绍 Flutter 如何执行一个页面到另一页面的过渡。
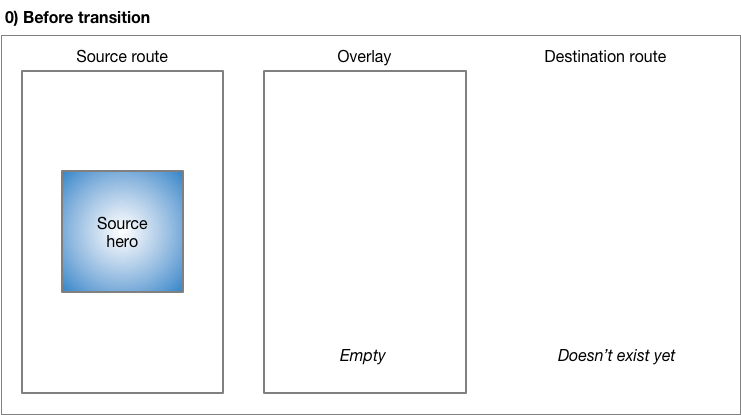
过渡前,source hero 在原页面的 widget 树中等待。而目标页面此时并不存在,图层也是空的。
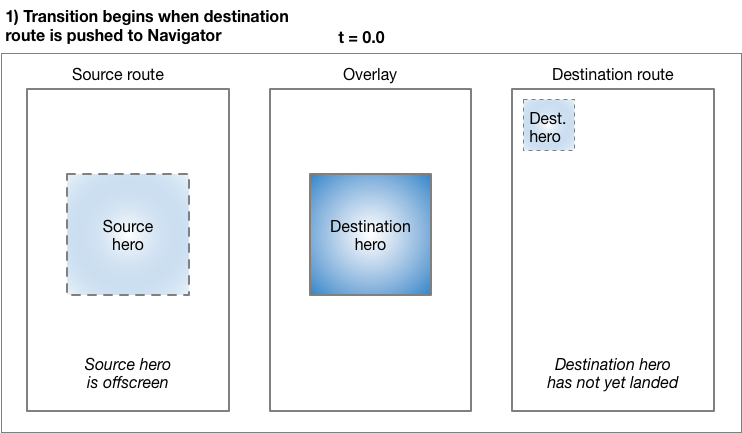
推送一个页面到 Navigator 来触发动画。t=0.0 时,Flutter 执行如下动作:
-
使用 Material motion spec 中介绍的曲线运动计算 destination hero 路径,后台运行。 Flutter 限制知道 hero 应在何处终止。
-
将 destination hero 放到图层,与 source hero 相同的位置和大小。添加一个 hero 到图层改变其 Z 轴的顺序,这样才可以出现在所有页面的上面。
将 source hero 移至后台运行。
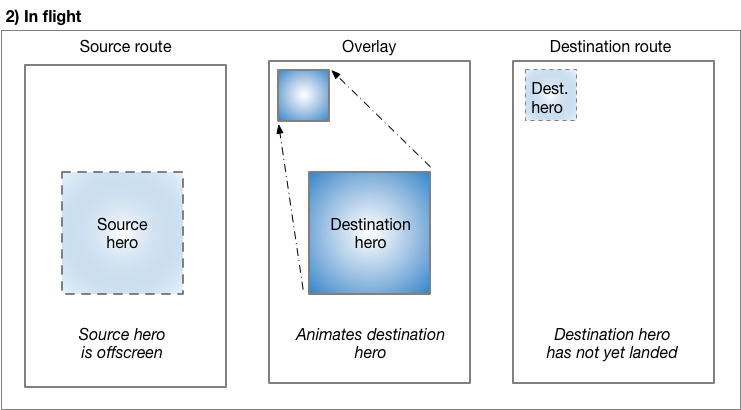
hero 飞翔时,它的矩形边界使用 Hero 的
createRectTween
属性中特定的 Tween<Rect> 进行动画。默认情况下,Flutter 使用 MaterialRectArcTween
的示例,它沿着一个曲线路径设置矩形对角动画。(参考 径向 hero 动画,该示例使用了不同的补间动画)
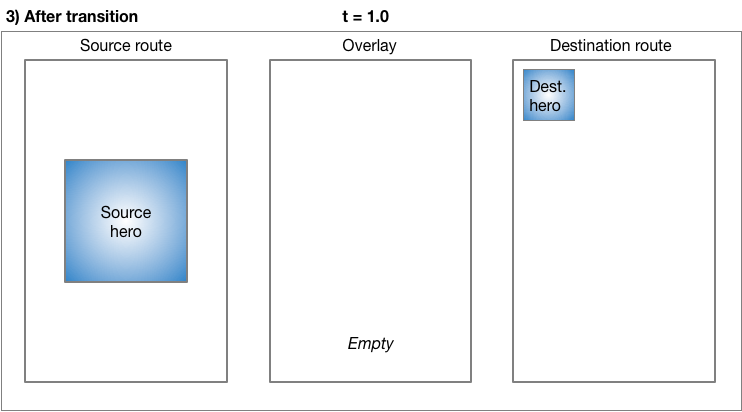
当飞翔完成时:
-
Flutter 将 hero widget 从图层移动到目标页面。图层现在是空的。
-
destination hero 出现在目标图层的最终位置。
source hero 被储存到原页面中。
弹出的页面执行同样的过程,hero 动画回到原页面并回复原来大小和位置。
基本类
#本指南中的示例使用了如下类来实现 hero 动画:
Hero
从原页面飞到目标页面的 widget。定义一个原页面的 Hero 和另一个目标页面的 Hero,并设置相同的标签。
Flutter 为成对的含有匹配标签的 heroes 设置动画。
Inkwell
指定点击 hero 时发生什么。
InkWell 的 onTap() 方法可以创建新页面并推送至 Navigator
的堆栈。
Navigator
Navigator 管理一个页面堆栈。推送或弹出 Navigator 堆栈中的页面触发动画。
Route
指定屏幕或页面。除最基本的应用程序外,大部分含有多页面。
标准 hero 动画
#然后呢?
#使用 Flutter 的 hero widget 可以轻松实现图像由一个页面飞至另一个。当使用 MaterialPageRoute 指定新页面时,图像将沿 Material Design motion spec 中介绍的曲线路径飞翔。
创建一个新的 Flutter 应用 并使用来自 hero_animation 的文件更新。
运行示例:
-
点击主页的图片使图像飞至新页面并在不同位置以不同规格显示相同图片。
-
点击图像或使用设备的回到前页手势返回之前页面。
-
可以使用
timeDilation属性来减缓过渡。
PhotoHero 类
#自定义的 PhotoHero 类保留了 hero 以及其大小,图像,和点击时的动作。PhotoHero 创建如下 widget 树:
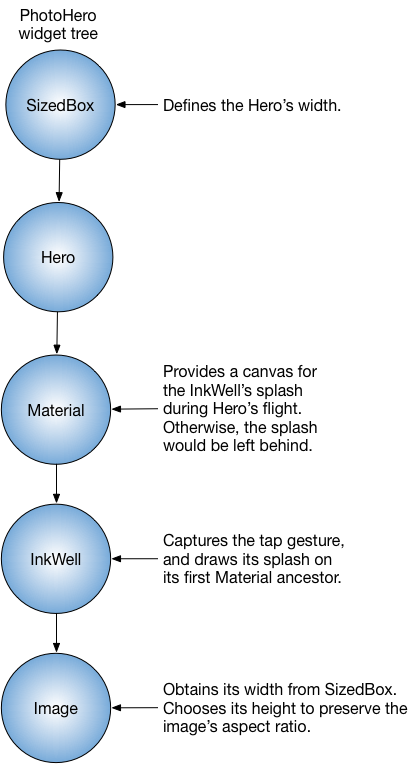
代码如下:
class PhotoHero extends StatelessWidget {
const PhotoHero({
super.key,
required this.photo,
this.onTap,
required this.width,
});
final String photo;
final VoidCallback? onTap;
final double width;
@override
Widget build(BuildContext context) {
return SizedBox(
width: width,
child: Hero(
tag: photo,
child: Material(
color: Colors.transparent,
child: InkWell(
onTap: onTap,
child: Image.asset(
photo,
fit: BoxFit.contain,
),
),
),
),
);
}
}
重要信息:
-
当
HeroAnimation作为应用程序的主页属性时,起始页面由MaterialApp隐式推送。 -
InkWell裹挟图像,使得为 source hero 和 destination hero 添加点击动作变得简单。 -
用透明色定义 Material widget 使图片在飞至目标页时可以从背景中“弹出”。
-
SizedBox指定动画起始和结束时 hero 的大小。 -
设置图像的
fit属性到BoxFit.contain,可以确保在过渡过程中尽可能放大,且不改变长宽比例。
HeroAnimation 类
#HeroAnimation 类可以创建 source PhotoHero 和 destination PhotoHero,并建立过渡。
代码如下:
class HeroAnimation extends StatelessWidget {
const HeroAnimation({super.key});
Widget build(BuildContext context) {
timeDilation = 5.0; // 1.0 means normal animation speed.
return Scaffold(
appBar: AppBar(
title: const Text('Basic Hero Animation'),
),
body: Center(
child: PhotoHero(
photo: 'images/flippers-alpha.png',
width: 300.0,
onTap: () {
Navigator.of(context).push(MaterialPageRoute<void>(
builder: (context) {
return Scaffold(
appBar: AppBar(
title: const Text('Flippers Page'),
),
body: Container(
// Set background to blue to emphasize that it's a new route.
color: Colors.lightBlueAccent,
padding: const EdgeInsets.all(16),
alignment: Alignment.topLeft,
child: PhotoHero(
photo: 'images/flippers-alpha.png',
width: 100.0,
onTap: () {
Navigator.of(context).pop();
},
),
),
);
}
));
},
),
),
);
}
}
重要信息:
-
当用户点击含有 source hero 的
InkWell时,代码使用MaterialPageRoute生成目标页面。并将目标页面推送至Navigator堆栈,触发动画。 -
Container将PhotoHero置于目标页面左上角,AppBar 的下方。 -
目标页
PhotoHero的onTap()函数会弹出Navigator的堆栈,触发动画 Hero 飞回至原页面。 -
在调试时,可以使用
timeDilation属性来减缓过渡。
径向 hero 动画
#
hero 从一个页面飞至另一页的同时由圆形过渡到矩形,这是一个滑入效果,可使用 Hero widgets 来实现。要做到这一点,代码需要动画两个剪裁形状的交叉:一个圆形和一个正方形。整个动画中,圆形剪裁(和图片)由
minRadius 缩放到 maxRadius,而正方形剪裁保持大小不变。同时,图像从原页面飞至目标页面的相同位置。这个过渡的效果示例,请参见 Material motion spec 中的 径向过渡。
这个动画看起来复杂,但是你可以根据自身需要自定义范例。艰巨的工作已为你完成。
然后呢?
#下面的图表显示了在动画起始(t = 0.0)和结束(t = 1.0)时的剪裁图像。

蓝色渐变(代表图像),表明剪裁形状交叉的位置。在过渡的开始,交叉的结果是圆形剪裁 (ClipOval)。在过渡过程中,ClipOval 由 minRadius 缩放至 maxRadius,
ClipRect
则保持原尺寸。在过渡结束时,圆形和矩形剪裁的交集产生一个与 hero widget 相同大小的矩形。也就是说,在过渡结束时,图片已不再被剪裁。
创建一个新的 Flutter 应用 并使用来自 radial_hero_animation 的文件更新。
运行示例:
-
点击三个圆形缩略图中的任意一个,使图像变成位于新页面中间的一个较大的正方形,且覆盖原页面。
-
点击图片或使用设备的返回手势,返回之前页面。
-
可以使用
timeDilation属性来减缓过渡。
Photo 类
#Photo 类创建保存图像的 widget 树:
class Photo extends StatelessWidget {
const Photo({super.key, required this.photo, this.color, this.onTap});
final String photo;
final Color? color;
final VoidCallback onTap;
Widget build(BuildContext context) {
return Material(
// Slightly opaque color appears where the image has transparency.
color: Theme.of(context).primaryColor.withValues(alpha: 0.25),
child: InkWell(
onTap: onTap,
child: Image.asset(
photo,
fit: BoxFit.contain,
),
),
);
}
}
重要信息:
-
Inkwell捕捉点击动作。调用函数将onTap()函数传递给 Photo 的构造函数。 -
飞翔过程中,InkWell 的飞溅效果会出现在它第一个 Material 祖先上。
-
Material widget 有轻微不透明色,所以图像的透明部分会被渲染上颜色。这确保了圆形到正方形过渡,即使是透明的图像依然清晰可见。
-
Photo 类的 widget 树中并不包含 Hero。为了使动画运行,hero需要包裹
RadialExpansionwidget。
RadialExpansion 类
#RadialExpansion widget,demo 的核心,建立过渡过程中剪裁图像的 widget 树。剪裁的形状来自于圆形剪裁(飞翔过程中增长)和矩形剪裁(自始至终保持一致大小)的交集。
为此,它建立了如下 widget 树:
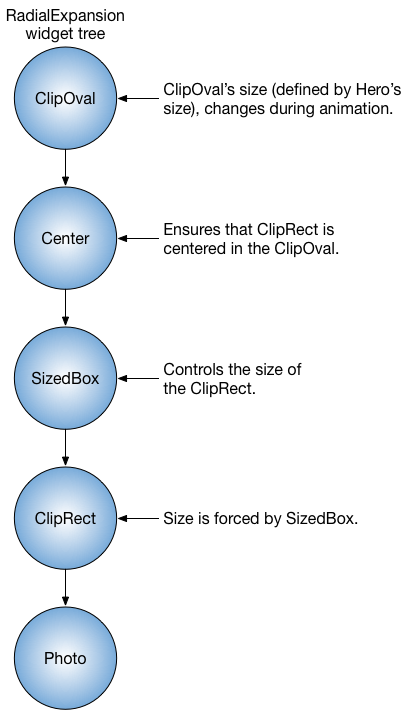
代码如下:
class RadialExpansion extends StatelessWidget {
const RadialExpansion({
super.key,
required this.maxRadius,
this.child,
}) : clipRectSize = 2.0 * (maxRadius / math.sqrt2);
final double maxRadius;
final double clipRectSize;
final Widget? child;
@override
Widget build(BuildContext context) {
return ClipOval(
child: Center(
child: SizedBox(
width: clipRectSize,
height: clipRectSize,
child: ClipRect(
child: child, // Photo
),
),
),
);
}
}
重要信息:
-
hero 包裹
RadialExpansionwidget。 -
hero 飞翔时会改变大小,因为它限制了 child 的大小,所以
RadialExpansionwidget 会改变大小以匹配。 -
RadialExpansion动画由两个重叠的剪裁创建。 -
这个示例用
MaterialRectCenterArcTween定义了补间插值。 hero 动画的默认飞翔路径,利用 heroes 的角插值补间。这个方法会影响到径向过渡时 hero 的长宽比例,所以新的飞翔路径使用MaterialRectCenterArcTween方法,利用每个 hero 的中心点来插值补间。代码如下:
dartstatic RectTween _createRectTween(Rect? begin, Rect? end) { return MaterialRectCenterArcTween(begin: begin, end: end); }Hero 的飞行路线仍然是一个弧线,但图像的长宽比将保持不变。
除非另有说明,本文档之所提及适用于 Flutter 3.38.1 版本。本页面最后更新时间:2025-11-29。查看文档源码 或者 为本页面内容提出建议。