面向插件作者的 Swift Package Manager
如何为 iOS 和 macOS 插件添加 Swift Package Manager 兼容性
For information on how to turn SwiftPM off and on, visit Swift Package Manager for app developers.
如何为现有 Flutter 插件添加 Swift Package Manager 支持
#本指南说明如何为已支持 CocoaPods 的插件添加 Swift Package Manager 支持,确保所有 Flutter 项目都能使用该插件。
在另行通知前,Flutter 插件应 同时 支持 Swift Package Manager 和 CocoaPods。
Swift Package Manager 的采用将逐步推进。从 Flutter 3.44 开始,不支持 CocoaPods 的插件将无法用于尚未迁移到 Swift Package Manager 的项目。不支持 Swift Package Manager 的插件会给已迁移的项目带来问题。请尽快迁移你的插件。
在本指南全文将 plugin_name 替换为你的插件名称。以下示例使用 ios,请酌情将 ios 替换为 macos 或 darwin。
-
请确保你运行的是 Flutter 3.44 或更高版本。该版本默认启用了 SwiftPM。
-
首先在
ios、macos和/或darwin目录下创建一个目录。将该新目录命名为平台 package 的名称。plugin_name/
ios/
- …
- plugin_name/
-
在此新目录中,创建以下文件/目录:
Package.swift(文件)Sources(目录)Sources/plugin_name(目录)
你的插件结构应如下所示:
plugin_name/
ios/
- …
plugin_name/
- Package.swift
Sources/
- plugin_name/
-
在
Package.swift文件中使用以下模板:Package.swiftswift// swift-tools-version: 5.9 // The swift-tools-version declares the minimum version of Swift required to build this package. import PackageDescription let package = Package( // TODO: Update your plugin name. name: "plugin_name", platforms: [ // TODO: Update the platforms your plugin supports. // If your plugin only supports iOS, remove `.macOS(...)`. // If your plugin only supports macOS, remove `.iOS(...)`. .iOS("13.0"), .macOS("10.15") ], products: [ // TODO: Update your library and target names. // If the plugin name contains "_", replace with "-" for the library name. .library(name: "plugin-name", targets: ["plugin_name"]) ], dependencies: [ .package(name: "FlutterFramework", path: "../FlutterFramework") ], targets: [ .target( // TODO: Update your target name. name: "plugin_name", dependencies: [ .product(name: "FlutterFramework", package: "FlutterFramework") ], resources: [ // TODO: If your plugin requires a privacy manifest // (e.g. if it uses any required reason APIs), update the PrivacyInfo.xcprivacy file // to describe your plugin's privacy impact, and then uncomment this line. // For more information, visit: // https://developer.apple.com/documentation/bundleresources/privacy_manifest_files // .process("PrivacyInfo.xcprivacy"), // TODO: If you have other resources that need to be bundled with your plugin, refer to // the following instructions to add them: // https://developer.apple.com/documentation/xcode/bundling-resources-with-a-swift-package ] ) ] ) -
在
Package.swift文件中更新 支持的平台。Package.swiftswiftplatforms: [ // TODO: Update the platforms your plugin supports. // If your plugin only supports iOS, remove `.macOS(...)`. // If your plugin only supports macOS, remove `.iOS(...)`. .iOS("13.0"), .macOS("10.15") ], -
在
Package.swift文件中更新 package、库和目标名称。Package.swiftswiftlet package = Package( // TODO: Update your plugin name. name: "plugin_name", platforms: [ .iOS("13.0"), .macOS("10.15") ], products: [ // TODO: Update your library and target names. // If the plugin name contains "_", replace with "-" for the library name .library(name: "plugin-name", targets: ["plugin_name"]) ], dependencies: [ .package(name: "FlutterFramework", path: "../FlutterFramework") ], targets: [ .target( // TODO: Update your target name. name: "plugin_name", dependencies: [ .product(name: "FlutterFramework", package: "FlutterFramework") ], resources: [ // TODO: If your plugin requires a privacy manifest // (e.g. if it uses any required reason APIs), update the PrivacyInfo.xcprivacy file // to describe your plugin's privacy impact, and then uncomment this line. // For more information, visit: // https://developer.apple.com/documentation/bundleresources/privacy_manifest_files // .process("PrivacyInfo.xcprivacy"), // TODO: If you have other resources that need to be bundled with your plugin, refer to // the following instructions to add them: // https://developer.apple.com/documentation/xcode/bundling-resources-with-a-swift-package ] ) ] ) -
如果你的插件有
PrivacyInfo.xcprivacy文件,请将其移动到ios/plugin_name/Sources/plugin_name/PrivacyInfo.xcprivacy,并在Package.swift文件中取消注释该资源。Package.swiftswiftresources: [ // TODO: If your plugin requires a privacy manifest // (e.g. if it uses any required reason APIs), update the PrivacyInfo.xcprivacy file // to describe your plugin's privacy impact, and then uncomment this line. // For more information, visit: // https://developer.apple.com/documentation/bundleresources/privacy_manifest_files .process("PrivacyInfo.xcprivacy"), // TODO: If you have other resources that need to be bundled with your plugin, refer to // the following instructions to add them: // https://developer.apple.com/documentation/xcode/bundling-resources-with-a-swift-package ], -
将
ios/Assets中的资源文件移动到ios/plugin_name/Sources/plugin_name(或其子目录)。如适用,将资源文件添加到Package.swift文件中。更多说明请参阅 将资源打包到 Swift package 中。 -
将
ios/Classes中的所有文件移动到ios/plugin_name/Sources/plugin_name。 -
将
FlutterFramework添加为依赖。在
Package.swift中添加FlutterFramework:Package.swiftswiftdependencies: [ .package(name: "FlutterFramework", path: "../FlutterFramework") ], targets: [ .target( // TODO: Update your target name. name: "plugin_name", dependencies: [ .product(name: "FlutterFramework", package: "FlutterFramework") ], ) ] -
ios/Assets、ios/Resources和ios/Classes目录现在应为空,可以删除。 -
如果你的插件使用 Pigeon,请更新 Pigeon 输入文件。
pigeons/messages.dartdartkotlinOptions: KotlinOptions(), javaOut: 'android/app/src/main/java/io/flutter/plugins/Messages.java', javaOptions: JavaOptions(), swiftOut: 'ios/Classes/messages.g.swift', swiftOut: 'ios/plugin_name/Sources/plugin_name/messages.g.swift', swiftOptions: SwiftOptions(), -
根据需要进行自定义,更新
Package.swift文件。在 Xcode 中打开
ios/plugin_name/目录。在 Xcode 中打开
Package.swift文件。确认 Xcode 不会对此文件产生警告或错误。如果
ios/plugin_name.podspec文件包含 CocoaPodsdependency,请将对应的 Swift Package Manager 依赖 添加到Package.swift文件。如果 package 必须显式以
static或dynamic链接(Apple 不推荐),请更新 Product 以定义类型:Package.swiftswiftproducts: [ .library(name: "plugin-name", type: .static, targets: ["plugin_name"]) ],进行其他自定义。有关如何编写
Package.swift文件的更多信息,请参阅 https://developer.apple.com/documentation/packagedescription。
-
更新
ios/plugin_name.podspec,使其指向新路径。ios/plugin_name.podspecrubys.source_files = 'Classes/**/*.swift' s.resource_bundles = {'plugin_name_privacy' => ['Resources/PrivacyInfo.xcprivacy']} s.source_files = 'plugin_name/Sources/plugin_name/**/*.swift' s.resource_bundles = {'plugin_name_privacy' => ['plugin_name/Sources/plugin_name/PrivacyInfo.xcprivacy']} -
更新从 bundle 加载资源的方式,改用
Bundle.module。swift#if SWIFT_PACKAGE let settingsURL = Bundle.module.url(forResource: "image", withExtension: "jpg") #else let settingsURL = Bundle(for: Self.self).url(forResource: "image", withExtension: "jpg") #endif -
如果
.gitignore未包含.build/和.swiftpm/目录,你需要更新.gitignore以包含:.gitignore.build/ .swiftpm/将插件的更改提交到版本控制系统。
-
验证插件在 CocoaPods 下仍能正常工作。
关闭 Swift Package Manager:
shflutter config --no-enable-swift-package-manager进入插件的示例应用目录。
shcd path/to/plugin/example/确保插件的示例应用能构建并运行。
shflutter run进入插件的顶层目录。
shcd path/to/plugin/运行 CocoaPods 验证 lint:
shpod lib lint ios/plugin_name.podspec --configuration=Debug --skip-tests --use-modular-headers --use-librariesshpod lib lint ios/plugin_name.podspec --configuration=Debug --skip-tests --use-modular-headers
-
验证插件在 Swift Package Manager 下能正常工作。
开启 Swift Package Manager:
shflutter config --enable-swift-package-manager进入插件的示例应用目录。
shcd path/to/plugin/example/确保插件的示例应用能构建并运行。
shflutter run在 Xcode 中打开插件的示例应用。确保左侧 Project Navigator(项目导航器)中显示 Package Dependencies(Package 依赖)。
-
验证测试通过。
如果你的插件有原生单元测试(XCTest),请确保你也 更新了插件示例应用中的单元测试。
按照 测试插件 说明操作。
在本指南全文将 plugin_name 替换为你的插件名称。以下示例使用 ios,请酌情将 ios 替换为 macos 或 darwin。
-
请确保你运行的是 Flutter 3.44 或更高版本。该版本默认启用了 SwiftPM。
-
首先在
ios、macos和/或darwin目录下创建一个目录。将该新目录命名为平台 package 的名称。plugin_name/
ios/
- …
- plugin_name/
-
在此新目录中,创建以下文件/目录:
Package.swift(文件)Sources(目录)Sources/plugin_name(目录)Sources/plugin_name/include(目录)Sources/plugin_name/include/plugin_name(目录)Sources/plugin_name/include/plugin_name/.gitkeep(文件)此文件确保目录会被提交。如果向该目录添加了其他文件,可以删除
.gitkeep文件。
你的插件结构应如下所示:
plugin_name/
ios/
- …
plugin_name/
- Package.swift
Sources/plugin_name/include/plugin_name/
- .gitkeep/
-
在
Package.swift文件中使用以下模板:Package.swiftswift// swift-tools-version: 5.9 // The swift-tools-version declares the minimum version of Swift required to build this package. import PackageDescription let package = Package( // TODO: Update your plugin name. name: "plugin_name", platforms: [ // TODO: Update the platforms your plugin supports. // If your plugin only supports iOS, remove `.macOS(...)`. // If your plugin only supports macOS, remove `.iOS(...)`. .iOS("13.0"), .macOS("10.15") ], products: [ // TODO: Update your library and target names. // If the plugin name contains "_", replace with "-" for the library name .library(name: "plugin-name", targets: ["plugin_name"]) ], dependencies: [ .package(name: "FlutterFramework", path: "../FlutterFramework") ], targets: [ .target( // TODO: Update your target name. name: "plugin_name", dependencies: [ .product(name: "FlutterFramework", package: "FlutterFramework") ], resources: [ // TODO: If your plugin requires a privacy manifest // (in other words, if it uses any required reason APIs), // update the PrivacyInfo.xcprivacy file // to describe your plugin's privacy impact, and then uncomment this line. // For more information, visit: // https://developer.apple.com/documentation/bundleresources/privacy_manifest_files // .process("PrivacyInfo.xcprivacy"), // TODO: If you have other resources that need to be bundled with your plugin, refer to // the following instructions to add them: // https://developer.apple.com/documentation/xcode/bundling-resources-with-a-swift-package ], cSettings: [ // TODO: Update your plugin name. .headerSearchPath("include/plugin_name") ] ) ] ) -
在
Package.swift文件中更新 支持的平台。Package.swiftswiftplatforms: [ // TODO: Update the platforms your plugin supports. // If your plugin only supports iOS, remove `.macOS(...)`. // If your plugin only supports macOS, remove `.iOS(...)`. .iOS("13.0"), .macOS("10.15") ], -
在
Package.swift文件中更新 package、库和目标名称。Package.swiftswiftlet package = Package( // TODO: Update your plugin name. name: "plugin_name", platforms: [ .iOS("13.0"), .macOS("10.15") ], products: [ // TODO: Update your library and target names. // If the plugin name contains "_", replace with "-" for the library name .library(name: "plugin-name", targets: ["plugin_name"]) ], dependencies: [ .package(name: "FlutterFramework", path: "../FlutterFramework") ], targets: [ .target( // TODO: Update your target name. name: "plugin_name", dependencies: [ .product(name: "FlutterFramework", package: "FlutterFramework") ], resources: [ // TODO: If your plugin requires a privacy manifest // (for example, if it uses any required reason APIs), // update the PrivacyInfo.xcprivacy file // to describe your plugin's privacy impact, and then uncomment this line. // For more information, visit: // https://developer.apple.com/documentation/bundleresources/privacy_manifest_files // .process("PrivacyInfo.xcprivacy"), // TODO: If you have other resources that need to be bundled with your plugin, refer to // the following instructions to add them: // https://developer.apple.com/documentation/xcode/bundling-resources-with-a-swift-package ], cSettings: [ // TODO: Update your plugin name. .headerSearchPath("include/plugin_name") ] ) ] ) -
如果你的插件有
PrivacyInfo.xcprivacy文件,请将其移动到ios/plugin_name/Sources/plugin_name/PrivacyInfo.xcprivacy,并在Package.swift文件中取消注释该资源。Package.swiftswiftresources: [ // TODO: If your plugin requires a privacy manifest // (for example, if it uses any required reason APIs), // update the PrivacyInfo.xcprivacy file // to describe your plugin's privacy impact, and then uncomment this line. // For more information, visit: // https://developer.apple.com/documentation/bundleresources/privacy_manifest_files .process("PrivacyInfo.xcprivacy"), // TODO: If you have other resources that need to be bundled with your plugin, refer to // the following instructions to add them: // https://developer.apple.com/documentation/xcode/bundling-resources-with-a-swift-package ], -
将
ios/Assets中的资源文件移动到ios/plugin_name/Sources/plugin_name(或其子目录)。如适用,将资源文件添加到Package.swift文件中。更多说明请参阅 https://developer.apple.com/documentation/xcode/bundling-resources-with-a-swift-package。 -
将
ios/Classes中的公共头文件移动到ios/plugin_name/Sources/plugin_name/include/plugin_name。如果不确定哪些头文件是公共的,请检查
podspec文件中的public_header_files属性。如果未指定该属性,则所有头文件都是公共的。你应斟酌是否希望所有头文件都是公共的。在
pubspec.yaml文件中定义的pluginClass必须是公共的,且位于此目录中。
-
处理
modulemap。如果你的插件没有
modulemap,请跳过此步骤。如果你为 CocoaPods 使用
modulemap来创建 Test 子模块,请考虑为 Swift Package Manager 将其移除。请注意,这会使所有公共头文件通过该模块可用。若要为 Swift Package Manager 移除
modulemap但为 CocoaPods 保留,请在插件的Package.swift文件中排除modulemap和 umbrella 头文件。以下示例假定
modulemap和 umbrella 头文件位于ios/plugin_name/Sources/plugin_name/include目录。Package.swiftswift.target( name: "plugin_name", dependencies: [], exclude: ["include/cocoapods_plugin_name.modulemap", "include/plugin_name-umbrella.h"],如果你希望单元测试同时兼容 CocoaPods 和 Swift Package Manager,可以尝试以下做法:
Tests/TestFile.mobjc@import plugin_name; @import plugin_name.Test; #if __has_include(<plugin_name/plugin_name-umbrella.h>) @import plugin_name.Test; #endif如果你希望将自定义
modulemap用于 Swift package,请参阅 Swift Package Manager 文档。 -
将
ios/Classes中所有剩余文件移动到ios/plugin_name/Sources/plugin_name。 -
ios/Assets、ios/Resources和ios/Classes目录现在应为空,可以删除。 -
添加
FlutterFramework为依赖项。在
Package.swift中添加FlutterFramework:Package.swiftswiftdependencies: [ .package(name: "FlutterFramework", path: "../FlutterFramework") ], targets: [ .target( // TODO: Update your target name. name: "plugin_name", dependencies: [ .product(name: "FlutterFramework", package: "FlutterFramework") ] ) ] -
如果头文件不再与实现文件位于同一目录,你应更新 import 语句。
例如,假设进行以下迁移:
迁移前:
ios/Classes/ ├── PublicHeaderFile.h └── ImplementationFile.m迁移后:
ios/plugin_name/Sources/plugin_name/
└── include/plugin_name/
   └── PublicHeaderFile.h
└── ImplementationFile.m
在此示例中,应更新
ImplementationFile.m中的 import 语句:Sources/plugin_name/ImplementationFile.mobjc#import "PublicHeaderFile.h" #import "./include/plugin_name/PublicHeaderFile.h" -
如果你的插件使用 Pigeon,请更新 Pigeon 输入文件。
pigeons/messages.dartdartjavaOptions: JavaOptions(), objcHeaderOut: 'ios/Classes/messages.g.h', objcSourceOut: 'ios/Classes/messages.g.m', objcHeaderOut: 'ios/plugin_name/Sources/plugin_name/messages.g.h', objcSourceOut: 'ios/plugin_name/Sources/plugin_name/messages.g.m', copyrightHeader: 'pigeons/copyright.txt',如果
objcHeaderOut文件不再与objcSourceOut位于同一目录,可以使用ObjcOptions.headerIncludePath更改#import:pigeons/messages.dartdartjavaOptions: JavaOptions(), objcHeaderOut: 'ios/Classes/messages.g.h', objcSourceOut: 'ios/Classes/messages.g.m', objcHeaderOut: 'ios/plugin_name/Sources/plugin_name/include/plugin_name/messages.g.h', objcSourceOut: 'ios/plugin_name/Sources/plugin_name/messages.g.m', objcOptions: ObjcOptions( headerIncludePath: './include/plugin_name/messages.g.h', ), copyrightHeader: 'pigeons/copyright.txt',运行 Pigeon,以最新配置重新生成代码。
-
根据需要进行自定义,更新
Package.swift文件。在 Xcode 中打开
ios/plugin_name/目录。在 Xcode 中打开
Package.swift文件。确认 Xcode 不会对此文件产生警告或错误。如果
ios/plugin_name.podspec文件包含 CocoaPodsdependency,请将对应的 Swift Package Manager 依赖 添加到Package.swift文件。如果 package 必须显式以
static或dynamic链接(Apple 不推荐),请更新 Product 以定义类型:Package.swiftswiftproducts: [ .library(name: "plugin-name", type: .static, targets: ["plugin_name"]) ],进行其他自定义。有关如何编写
Package.swift文件的更多信息,请参阅 https://developer.apple.com/documentation/packagedescription。
-
更新
ios/plugin_name.podspec,使其指向新路径。ios/plugin_name.podspecrubys.source_files = 'Classes/**/*.{h,m}' s.public_header_files = 'Classes/**/*.h' s.module_map = 'Classes/cocoapods_plugin_name.modulemap' s.resource_bundles = {'plugin_name_privacy' => ['Resources/PrivacyInfo.xcprivacy']} s.source_files = 'plugin_name/Sources/plugin_name/**/*.{h,m}' s.public_header_files = 'plugin_name/Sources/plugin_name/include/**/*.h' s.module_map = 'plugin_name/Sources/plugin_name/include/cocoapods_plugin_name.modulemap' s.resource_bundles = {'plugin_name_privacy' => ['plugin_name/Sources/plugin_name/PrivacyInfo.xcprivacy']} -
更新从 bundle 加载资源的方式,改用
SWIFTPM_MODULE_BUNDLE:objc#if SWIFT_PACKAGE NSBundle *bundle = SWIFTPM_MODULE_BUNDLE; #else NSBundle *bundle = [NSBundle bundleForClass:[self class]]; #endif NSURL *imageURL = [bundle URLForResource:@"image" withExtension:@"jpg"]; -
如果
ios/plugin_name/Sources/plugin_name/include目录仅包含.gitkeep,你需要更新.gitignore以包含以下内容:.gitignore!.gitkeep运行
flutter pub publish --dry-run,确保include目录会被发布。 将插件的更改提交到版本控制系统。
-
验证插件在 CocoaPods 下仍能正常工作。
关闭 Swift Package Manager:
shflutter config --no-enable-swift-package-manager进入插件的示例应用目录。
shcd path/to/plugin/example/确保插件的示例应用能构建并运行。
shflutter run进入插件的顶层目录。
shcd path/to/plugin/运行 CocoaPods 验证 lint:
shpod lib lint ios/plugin_name.podspec --configuration=Debug --skip-tests --use-modular-headers --use-librariesshpod lib lint ios/plugin_name.podspec --configuration=Debug --skip-tests --use-modular-headers
-
验证插件在 Swift Package Manager 下能正常工作。
开启 Swift Package Manager:
shflutter config --enable-swift-package-manager进入插件的示例应用目录。
shcd path/to/plugin/example/确保插件的示例应用能构建并运行。
shflutter run在 Xcode 中打开插件的示例应用。确保左侧 Project Navigator(项目导航器)中显示 Package Dependencies(Package 依赖)。
-
验证测试通过。
如果你的插件有原生单元测试(XCTest),请确保你也 更新了插件示例应用中的单元测试。
按照 测试插件 说明操作。
(可选但推荐)在示例应用中将插件添加为本地 package
#若插件包含示例,建议在示例应用中将插件添加为本地 package。非必须,但在示例应用中编辑插件源码时能提供更好的 Xcode 支持。请参阅 issue #179032。
将插件添加为本地 package
#在终端中进入
my_plugin。-
在 Xcode 中运行以下命令打开示例应用的工作区(若插件面向 macOS,将
ios替换为macos):
open example/ios/Runner.xcworkspace
-
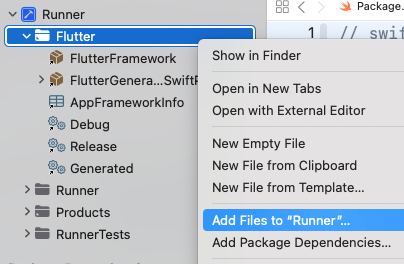
右键 Flutter > Add Files to "Runner"(添加文件到 Runner)。
-
选择
my_plugin/ios/my_plugin(或根据插件支持的平台选择macos或darwin)。 -
确保选中「Reference files in place」(引用文件位置,通常为默认),然后点击 Finish(完成)。
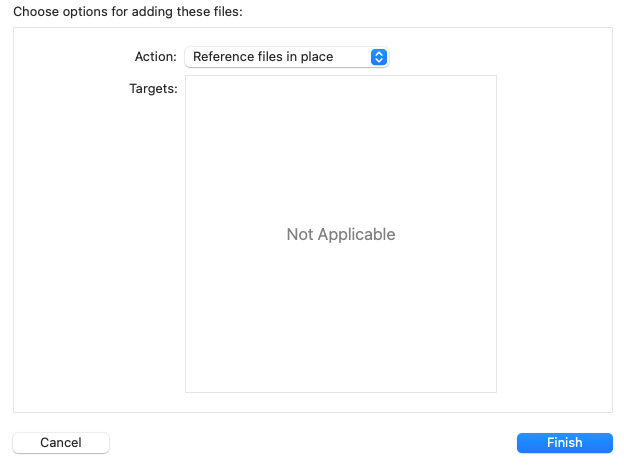
这样会将插件添加为本地 package,但会以绝对路径引用,不利于分发。要改为相对路径,请按以下步骤操作。
改为相对路径
#-
从文件检查器复制插件的「Full Path」(完整路径)。

-
在终端执行:
open -a Xcode example/ios/Runner.xcodeproj/project.pbxproj -
找到以下内容:
path = [COPIED FULL PATH]; sourceTree = "<absolute>"例如:
path = /Users/username/path/to/my_plugin/ios/my_plugin; sourceTree = "<absolute>" -
并替换为相对路径:
path = ../../ios/my_plugin; sourceTree = "<group>"(按需将
ios调整为macos或darwin)。
如何更新插件示例应用中的单元测试
#若插件有原生 XCTests,在以下任一情况下可能需要更新它们以配合 Swift Package Manager:
测试使用了 CocoaPod 依赖。
-
插件在
Package.swift中显式设为type: .dynamic。
要更新单元测试:
-
在 Xcode 中打开
example/ios/Runner.xcworkspace。 -
若测试曾使用 CocoaPod 依赖(如
OCMock),请从Podfile中移除。ios/Podfilerubytarget 'RunnerTests' do inherit! :search_paths pod 'OCMock', '3.5' end然后在终端于
plugin_name_ios/example/ios目录运行pod install。 -
导航到项目的 Package Dependencies(package 依赖)。
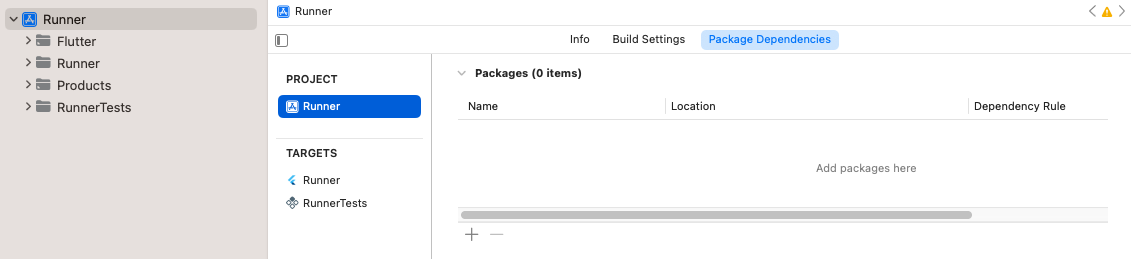
The project's package dependencies
-
点击 + 按钮,在右上角搜索栏搜索并添加仅用于测试的依赖。
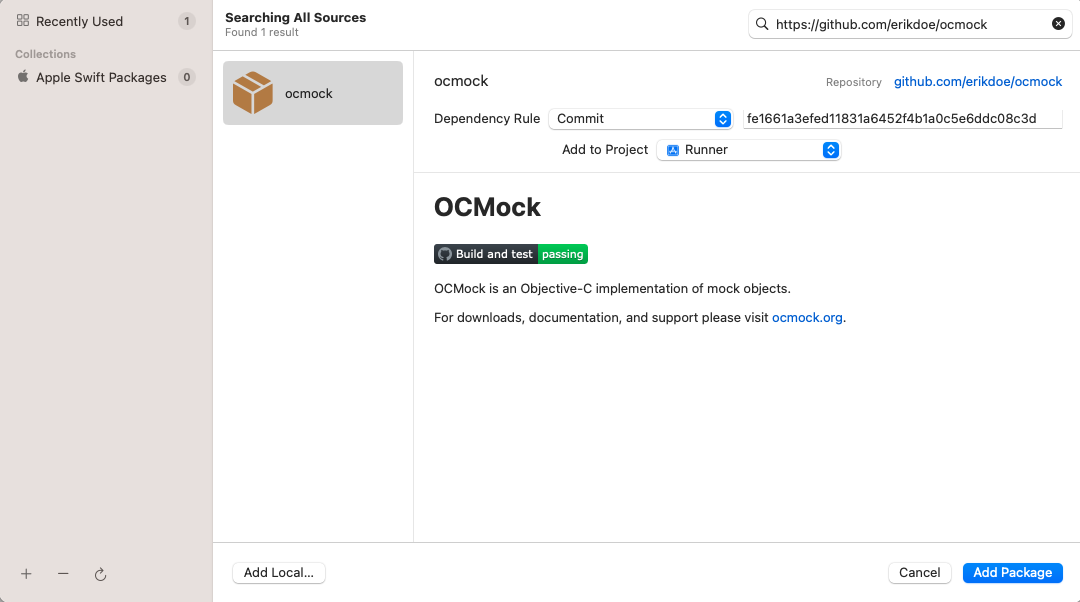
Search for test-only dependencies
-
确保依赖已添加到
RunnerTestsTarget。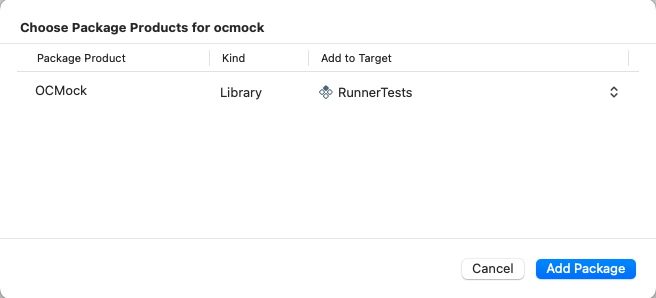
Ensure the dependency is added to the
RunnerTeststarget -
点击 Add Package(添加 package)按钮。
-
若在
Package.swift中将插件库类型显式设为.dynamic(Apple 不推荐),还需将其添加为RunnerTeststarget 的依赖。确保
RunnerTests的 Build Phases(构建阶段)包含 Link Binary With Libraries(链接二进制与库)构建阶段: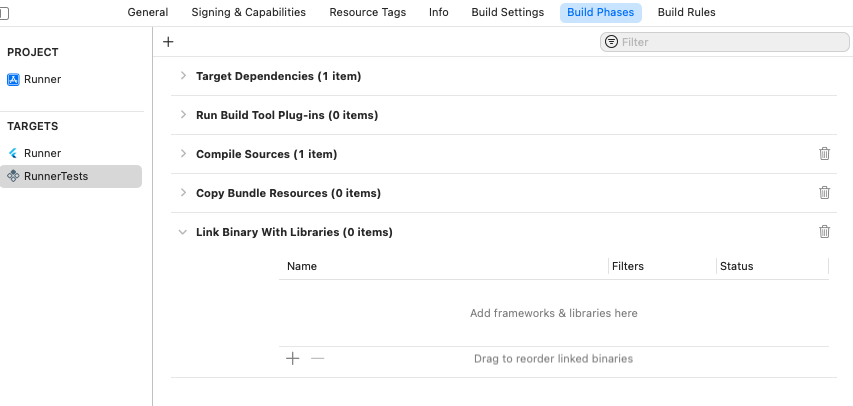
The
Link Binary With LibrariesBuild Phase in theRunnerTeststarget若尚无该构建阶段,请创建:点击 add 按钮,再点击 New Link Binary With Libraries Phase。
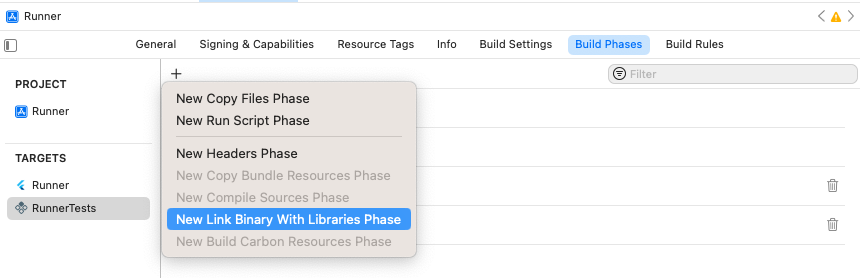
Add
Link Binary With LibrariesBuild Phase导航到项目的 Package Dependencies。
点击 add 按钮。
在打开的对话框中点击 Add Local... 按钮。
导航到
plugin_name/plugin_name_ios/ios/plugin_name_ios并点击 Add Package 按钮。确保已添加到
RunnerTeststarget 并点击 Add Package 按钮。
-
确保 Product > Test(测试)通过。
除非另有说明,本文档之所提及适用于 Flutter 3.47.2 版本。本页面最后更新时间:2026-06-22。查看文档源码 或者 为本页面内容提出建议。