在列表顶部放置一个浮动的 app bar
如何在列表顶部放置一个浮动的 app bar 或导航栏。
本指南将介绍如何在 Flutter 应用的列表顶部放置浮动 app bar 或导航栏。
概览
#为了方便用户查看列表,你可能希望在用户向下滚动列表时最小化 app bar(导航栏)。
将 app bar 放入 CustomScrollView
中,就可以创建一个随着滚动 CustomScrollView 中的列表项,同时会最小化或在屏幕外滚动的 app bar。
下面这篇教程将介绍如何通过 CustomScrollView
来生成一个带有随着用户滑动列表同时会最小化的 app bar 的列表。
创建一个
CustomScrollView-
在
CustomScrollView中添加一个浮动的 app bar。 -
在
CustomScrollView中添加列表项。
1. 创建一个 CustomScrollView
#
要创建一个浮动的 app bar,你需要将 app bar
放在一个包含列表的 CustomScrollView 里,这会同步 app bar 和列表的滚动位置。你可以把 CustomScrollView widget 当成一个可以让你把不同类型的可滚动列表和 widget 混合匹配在一起的 ListView。
可以放在 CustomScrollView 里的可滚动列表和 widget
我们称之为 slivers。有几种类型的 sliver,比如 SliverList、SliverGrid 和 SliverAppBar。实际上,ListView 和 GridView widget 底层使用的就是 SliverList 和 SliverGrid。
以下例子演示了创建一个包含 SliverList 的 CustomScrollView。此外,如果存在 app bar 属性,请将其从代码中删除。
MaterialApp(
  title: 'Floating App Bar',
  home: Scaffold(
    // No app bar property provided yet.
    body: CustomScrollView(
      // Add the app bar and list of items as slivers in the next steps.
      slivers: <Widget>[],
    ),
  ),
);
CupertinoApp(
  title: 'Floating Navigation Bar',
  home: CupertinoPageScaffold(
    // No navigation bar property provided yet.
    child: CustomScrollView(
      // Add the navigation bar and list of items as slivers in the next steps.
      slivers: <Widget>[],
    ),
  ),
);
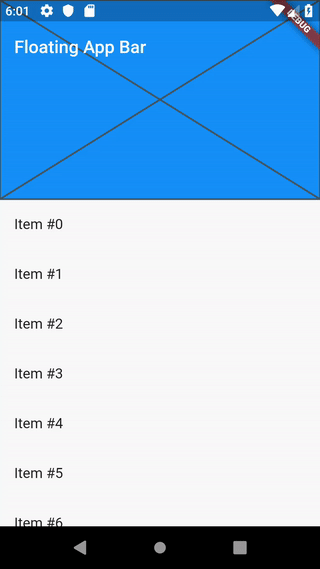
2. 添加一个浮动的 app bar
#
接下来,在 CustomScrollView
中添加一个 app bar。
Flutter 提供开箱即用的 SliverAppBar
widget,与普通的 AppBar widget 非常相似,你可以使用 SliverAppBar 来显示标题、标签、图像等内容。
同时,SliverAppBar widget 也提供一种创建 “浮动” app bar 的能力,当你向下滚动列表离开顶部时,app bar 会随之缩小并浮动。
要达到这个效果:
先创建一个只显示标题的 app bar。
-
然后设置
pinned属性为true。 -
最后添加一个
flexibleSpacewidget,该 widget 将填充可用的expandedHeight高度。
slivers: [
  // Add the app bar to the CustomScrollView.
  SliverAppBar(
    // Provide a standard title.
    title: Text('Floating App Bar'),
    // Pin the app bar when scrolling.
    pinned: true,
    // Display a placeholder widget to visualize the shrinking size.
    flexibleSpace: Placeholder(),
    // Make the initial height of the SliverAppBar larger than normal.
    expandedHeight: 200,
  ),
],
Flutter 还提供了 CupertinoSliverNavigationBar
widget,可以让你拥有一个 “浮动” 导航栏,当你向下滚动时,导航栏会缩小,而当你不在页面顶部时,导航栏会浮动。
要达到这个效果:
-
在
CustomScrollView中添加CupertinoSliverNavigationBar。 创建一个只显示标题的 app bar。
slivers: [
  // Add the navigation bar to the CustomScrollView.
  CupertinoSliverNavigationBar(
    // Provide a standard title.
    largeTitle: Text('Floating App Bar'),
  ),
],
3. 添加一个列表
#
现在你已经创建好一个 app bar,接下来应该给 CustomScrollView 添加一个列表。你有两种选择:SliverList
或者 SliverGrid。如果你需要一项接着一项地显示列表中的内容,那就应该用 SliverList widget。如果你需要网格状地显示列表中的内容,那就应该用 SliverGrid widget。
// Next, create a SliverList
SliverList.builder(
  // The builder function returns a ListTile with a title that
  // displays the index of the current item.
  itemBuilder: (context, index) =>
      ListTile(title: Text('Item #$index')),
  // Builds 50 ListTiles
  itemCount: 50,
)
// Next, create a SliverList
SliverList.builder(
  // The builder function returns a CupertinoListTile with a title
  // that displays the index of the current item.
  itemBuilder: (context, index) =>
      CupertinoListTile(title: Text('Item #$index')),
  // Builds 50 CupertinoListTile
  itemCount: 50,
)
交互式样例
#import 'package:flutter/material.dart';
void main() => runApp(const MyApp());
class MyApp extends StatelessWidget {
const MyApp({super.key});
@override
Widget build(BuildContext context) {
const title = 'Floating App Bar';
return MaterialApp(
title: title,
home: Scaffold(
// No app bar provided to Scaffold, only a body with a
// CustomScrollView.
body: CustomScrollView(
slivers: [
// Add the app bar to the CustomScrollView.
const SliverAppBar(
// Provide a standard title.
title: Text(title),
// Pin the app bar when scrolling
pinned: true,
// Display a placeholder widget to visualize the shrinking size.
flexibleSpace: Placeholder(),
// Make the initial height of the SliverAppBar larger than normal.
expandedHeight: 200,
),
// Next, create a SliverList
SliverList.builder(
// The builder function returns a ListTile with a title that
// displays the index of the current item.
itemBuilder: (context, index) =>
ListTile(title: Text('Item #$index')),
// Builds 50 ListTiles
itemCount: 50,
),
],
),
),
);
}
}
import 'package:flutter/cupertino.dart';

void main() => runApp(const MyApp());

class MyApp extends StatelessWidget {
  const MyApp({super.key});

  @override
  Widget build(BuildContext context) {
    const title = 'Floating Navigation Bar';

    return CupertinoApp(
      title: title,
      home: CupertinoPageScaffold(
        // No navigation bar provided to CupertinoPageScaffold,
        // only a body with a CustomScrollView.
        child: CustomScrollView(
          slivers: [
            // Add the navigation bar to the CustomScrollView.
            const CupertinoSliverNavigationBar(
              // Provide a standard title.
              largeTitle: Text(title),
            ),
            // Next, create a SliverList
            SliverList.builder(
              // The builder function returns a CupertinoListTile with a title
              // that displays the index of the current item.
              itemBuilder: (context, index) =>
                  CupertinoListTile(title: Text('Item #$index')),
              // Builds 50 CupertinoListTile
              itemCount: 50,
            ),
          ],
        ),
      ),
    );
  }
}除非另有说明,本文档之所提及适用于 Flutter 3.44.0 版本。本页面最后更新时间:2026-05-05。查看文档源码 或者 为本页面内容提出建议。