Add ads to your mobile Flutter app or game
How to use the google_mobile_ads package to show ads in Flutter.
Many developers use advertising to monetize their mobile apps and games. This allows their app to be downloaded free of charge, which improves the app's popularity.

To add ads to your Flutter project, use
AdMob,
Google's mobile advertising platform.
This recipe demonstrates how to use the
google_mobile_ads
package to add a banner ad to your app or game.
1. Get AdMob App IDs
#-
Go to AdMob and set up an account. This could take some time because you need to provide banking information, sign contracts, and so on.
-
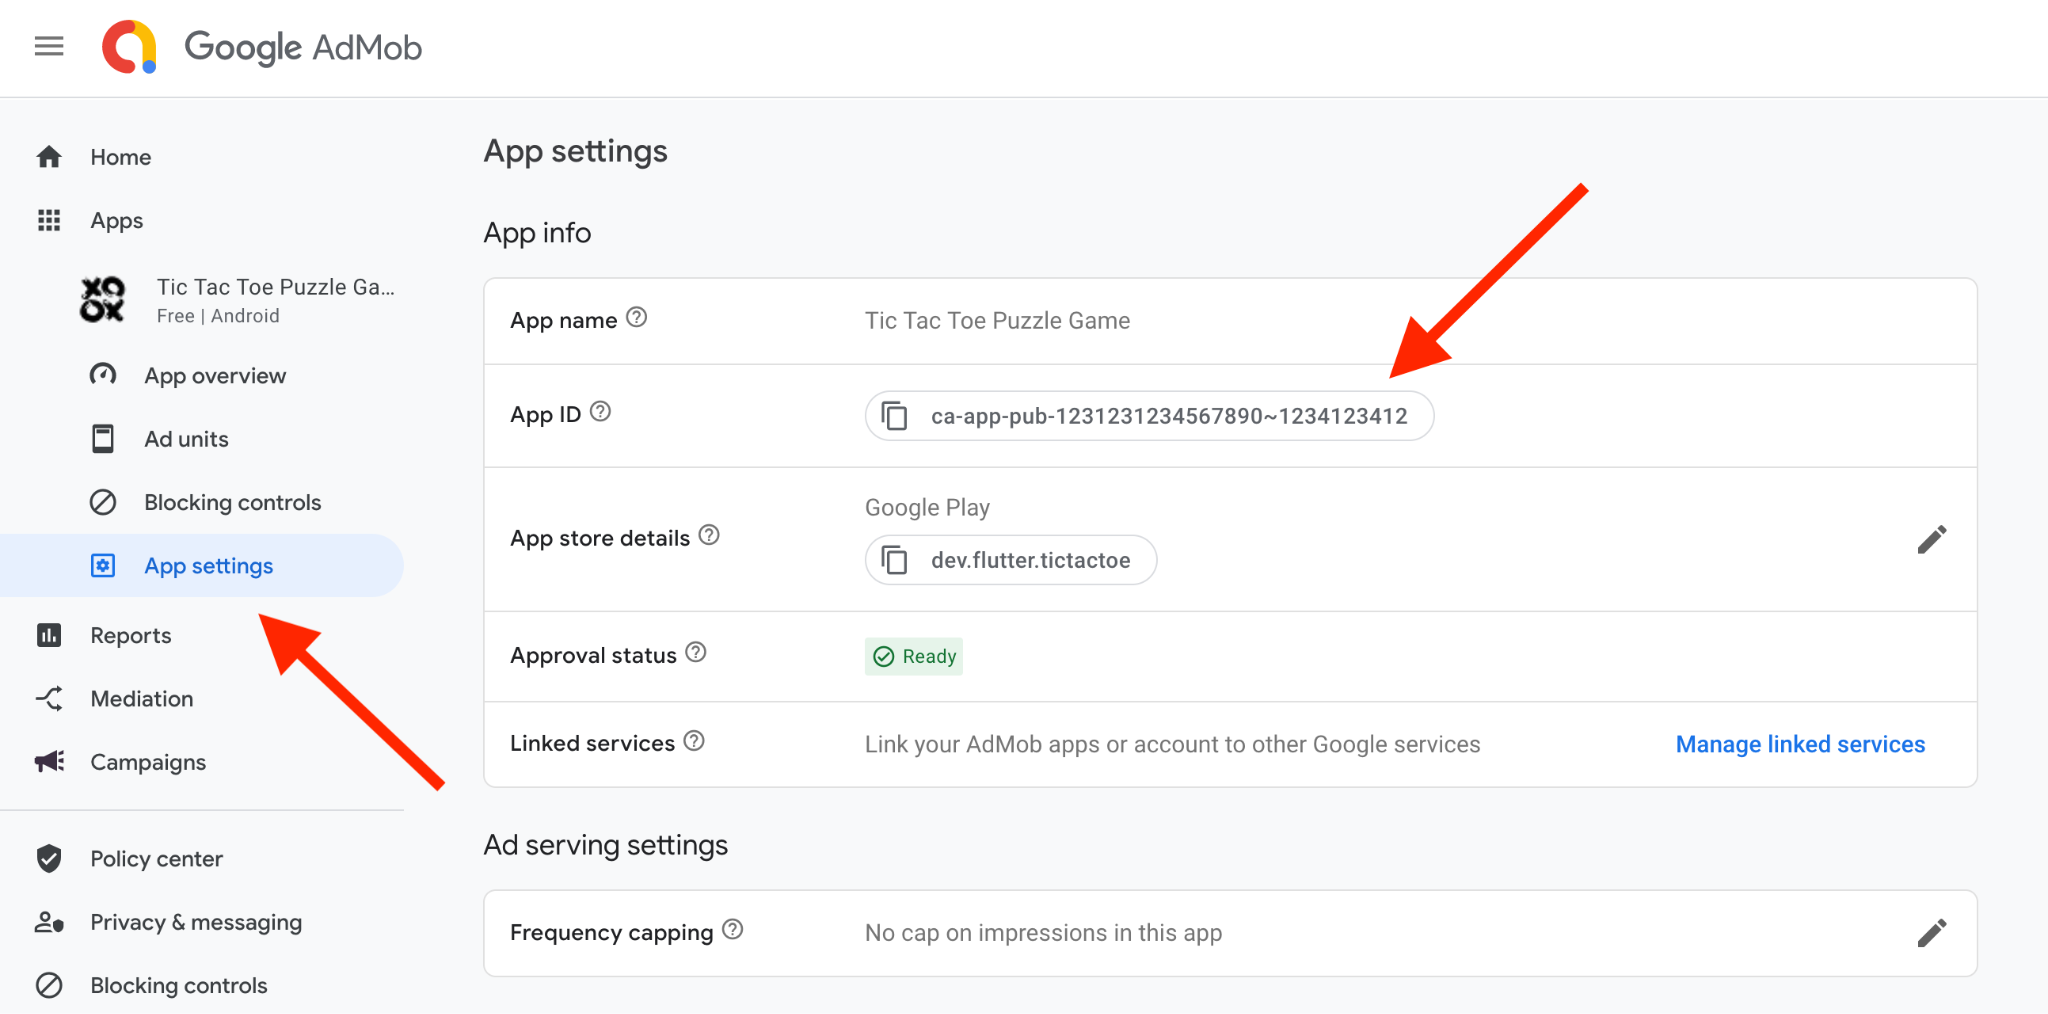
With the AdMob account ready, create two Apps in AdMob: one for Android and one for iOS.
Open the App settings section.
-
Get the AdMob App IDs for both the Android app and the iOS app. They resemble
ca-app-pub-1234567890123456~1234567890. Note the tilde (~) between the two numbers.
2. Platform-specific setup
#Update your Android and iOS configurations to include your App IDs.
Android
#Add your AdMob app ID to your Android app.
Open the app's
android/app/src/main/AndroidManifest.xmlfile.Add a new
<meta-data>tag.-
Set the
android:nameelement with a value ofcom.google.android.gms.ads.APPLICATION_ID. -
Set the
android:valueelement with the value to your own AdMob app ID that you got in the previous step. Include them in quotes as shown:xml<manifest> <application> ... <!-- Sample AdMob app ID: ca-app-pub-3940256099942544~3347511713 --> <meta-data android:name="com.google.android.gms.ads.APPLICATION_ID" android:value="ca-app-pub-xxxxxxxxxxxxxxxx~yyyyyyyyyy"/> </application> </manifest>
iOS
#Add your AdMob app ID to your iOS app.
Open your app's
ios/Runner/Info.plistfile.Enclose
GADApplicationIdentifierwith akeytag.-
Enclose your AdMob app ID with a
stringtag. You created this AdMob App ID in step 1.xml<key>GADApplicationIdentifier</key> <string>ca-app-pub-################~##########</string>
3. Add the google_mobile_ads plugin
#
To add the google_mobile_ads plugin as a dependency, run
flutter pub add:
flutter pub add google_mobile_ads
4. Initialize the Mobile Ads SDK
#You need to initialize the Mobile Ads SDK before loading ads.
-
Call
MobileAds.instance.initialize()to initialize the Mobile Ads SDK.dartvoid main() async { WidgetsFlutterBinding.ensureInitialized(); unawaited(MobileAds.instance.initialize()); runApp(const MyApp()); }
Run the initialization step at startup, as shown above, so that the AdMob SDK has enough time to initialize before it is needed.
5. Load a banner ad
#To show an ad, you need to request it from AdMob.
To load a banner ad, construct a BannerAd instance, and
call load() on it.
/// Loads a banner ad.
void _loadAd() {
final bannerAd = BannerAd(
size: widget.adSize,
adUnitId: widget.adUnitId,
request: const AdRequest(),
listener: BannerAdListener(
// Called when an ad is successfully received.
onAdLoaded: (ad) {
if (!mounted) {
ad.dispose();
return;
}
setState(() {
_bannerAd = ad as BannerAd;
});
},
// Called when an ad request failed.
onAdFailedToLoad: (ad, error) {
debugPrint('BannerAd failed to load: $error');
ad.dispose();
},
),
);
// Start loading.
bannerAd.load();
}
To view a complete example, check out the last step of this recipe.
6. Show banner ad
#Once you have a loaded instance of BannerAd, use AdWidget to show it.
AdWidget(ad: _bannerAd)
It's a good idea to wrap the widget in a SafeArea (so that no part of
the ad is obstructed by device notches) and a SizedBox (so that it has
its specified, constant size before and after loading).
@override
Widget build(BuildContext context) {
  return SafeArea(
    child: SizedBox(
      width: widget.adSize.width.toDouble(),
      height: widget.adSize.height.toDouble(),
      child: _bannerAd == null
          // Nothing to render yet.
          ? const SizedBox()
          // The actual ad.
          : AdWidget(ad: _bannerAd!),
    ),
  );
}
You must dispose of an ad when you no longer need to access it. The best
practice for when to call dispose() is either after the AdWidget
is
removed from the widget tree or in the
BannerAdListener.onAdFailedToLoad() callback.
_bannerAd?.dispose();
7. Configure ads
#To show anything beyond test ads, you have to register ad units.
Open AdMob.
-
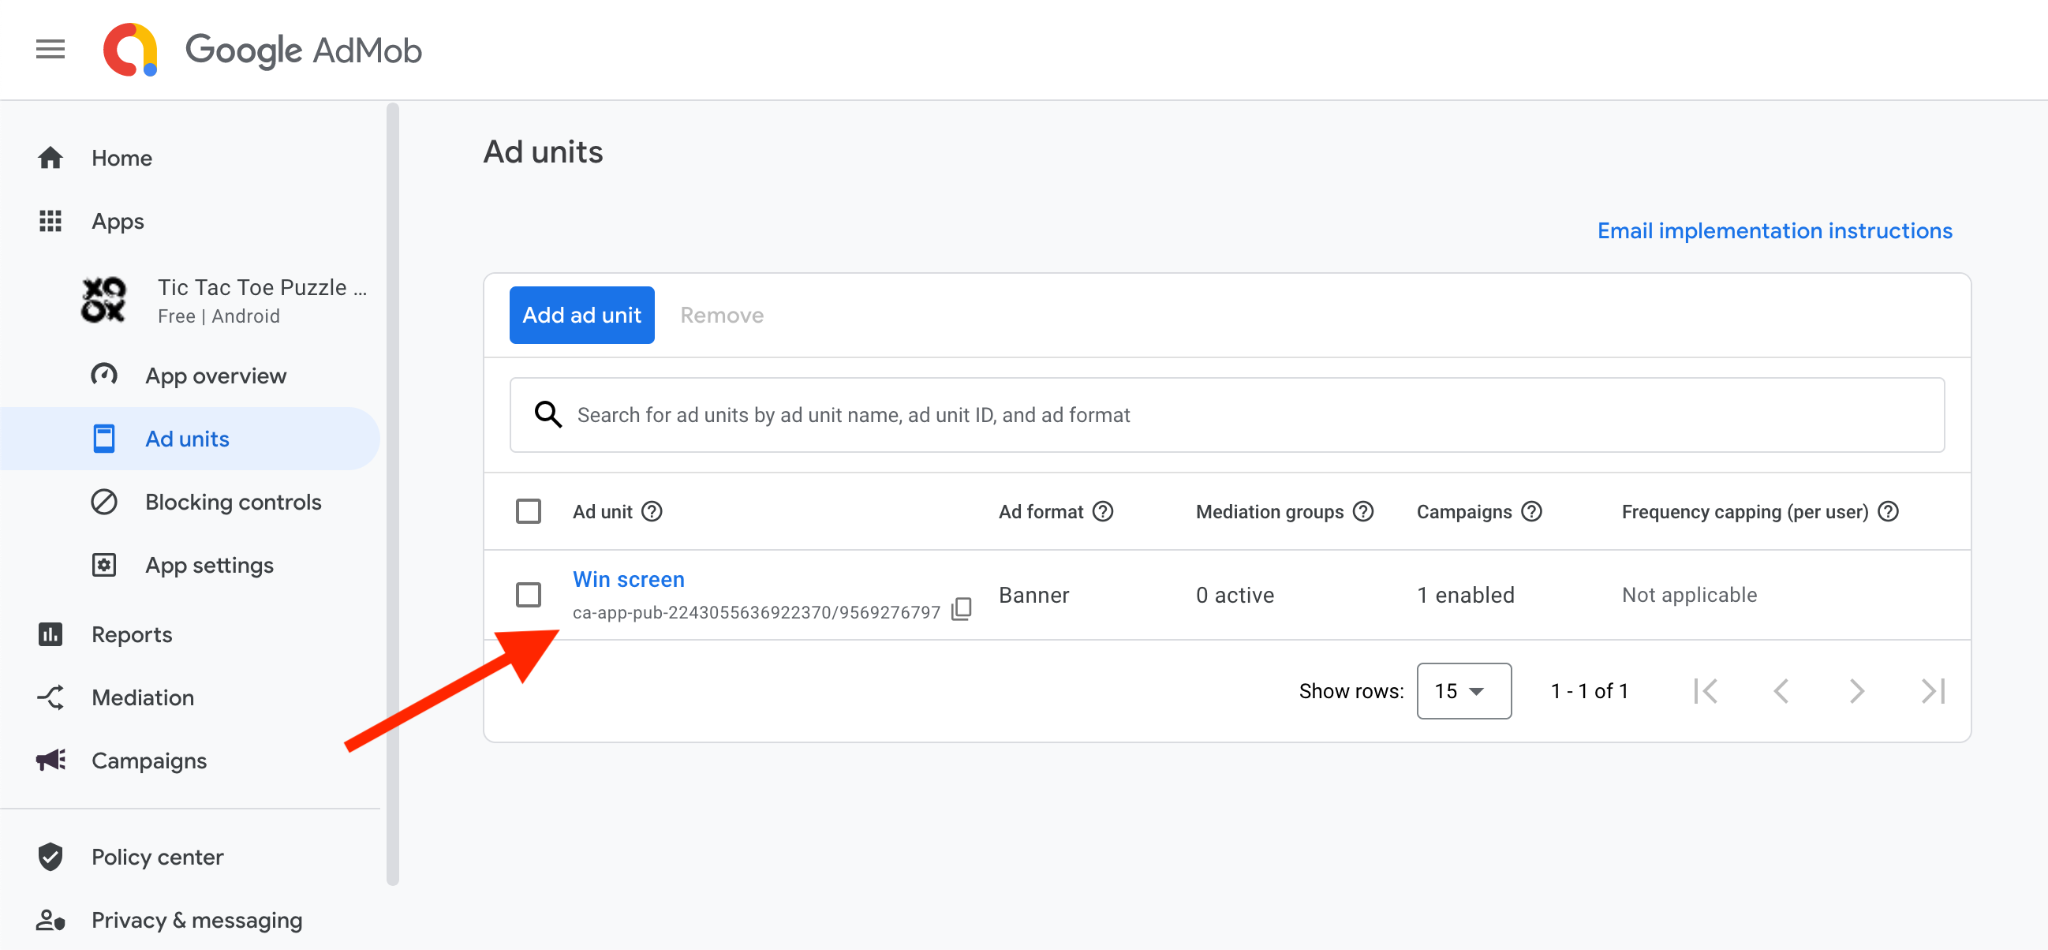
Create an Ad unit for each of the AdMob apps.

This asks for the Ad unit's format. AdMob provides many formats beyond banner ads --- interstitials, rewarded ads, app open ads, and so on. The API for those is similar, and documented in the AdMob documentation and through official samples.
Choose banner ads.
-
Get the Ad unit IDs for both the Android app and the iOS app. You can find these in the Ad units section. They look something like
ca-app-pub-1234567890123456/1234567890. The format resembles the App ID but with a slash (/) between the two numbers. This distinguishes an Ad unit ID from an App ID.
-
Add these Ad unit IDs to the constructor of
BannerAd, depending on the target app platform.dartfinal String adUnitId = Platform.isAndroid // Use this ad unit on Android... ? 'ca-app-pub-3940256099942544/6300978111' // ... or this one on iOS. : 'ca-app-pub-3940256099942544/2934735716';
8. Final touches
#To display the ads in a published app or game (as opposed to debug or testing scenarios), your app must meet additional requirements:
-
Your app must be reviewed and approved before it can fully serve ads. Follow AdMob's app readiness guidelines. For example, your app must be listed on at least one of the supported stores such as Google Play Store or Apple App Store.
-
You must create an
app-ads.txtfile and publish it on your developer website.

To learn more about app and game monetization, visit the official sites of AdMob and Ad Manager.
9. Complete example
#The following code implements a simple stateful widget that loads a banner ad and shows it.
import 'dart:io';
import 'package:flutter/widgets.dart';
import 'package:google_mobile_ads/google_mobile_ads.dart';
class MyBannerAdWidget extends StatefulWidget {
/// The requested size of the banner. Defaults to [AdSize.banner].
final AdSize adSize;
/// The AdMob ad unit to show.
///
/// TODO: replace this test ad unit with your own ad unit
final String adUnitId = Platform.isAndroid
    // Use this ad unit on Android...
    ? 'ca-app-pub-3940256099942544/6300978111'
    // ... or this one on iOS.
    : 'ca-app-pub-3940256099942544/2934735716';
MyBannerAdWidget({super.key, this.adSize = AdSize.banner});
@override
State<MyBannerAdWidget> createState() => _MyBannerAdWidgetState();
}
class _MyBannerAdWidgetState extends State<MyBannerAdWidget> {
/// The banner ad to show. This is `null` until the ad is actually loaded.
BannerAd? _bannerAd;
@override
Widget build(BuildContext context) {
return SafeArea(
child: SizedBox(
width: widget.adSize.width.toDouble(),
height: widget.adSize.height.toDouble(),
child: _bannerAd == null
// Nothing to render yet.
? const SizedBox()
// The actual ad.
: AdWidget(ad: _bannerAd!),
),
);
}
@override
void initState() {
super.initState();
_loadAd();
}
@override
void dispose() {
_bannerAd?.dispose();
super.dispose();
}
/// Loads a banner ad.
void _loadAd() {
final bannerAd = BannerAd(
size: widget.adSize,
adUnitId: widget.adUnitId,
request: const AdRequest(),
listener: BannerAdListener(
// Called when an ad is successfully received.
onAdLoaded: (ad) {
if (!mounted) {
ad.dispose();
return;
}
setState(() {
_bannerAd = ad as BannerAd;
});
},
// Called when an ad request failed.
onAdFailedToLoad: (ad, error) {
debugPrint('BannerAd failed to load: $error');
ad.dispose();
},
),
);
// Start loading.
bannerAd.load();
}
}
除非另有说明,本文档之所提及适用于 Flutter 3.38.1 版本。本页面最后更新时间:2025-10-30。查看文档源码 或者 为本页面内容提出建议。