将 Flutter 模块集成到 iOS 项目(旧版)
了解如何将 Flutter 模块集成到你现有的 iOS 项目中。
可将 Flutter UI 组件以嵌入 framework 的方式逐步添加到你现有的 iOS 应用中。要将 Flutter 嵌入现有应用,可考虑以下三种方法之一。
flutter_module。 |
||
Flutter.xcframework)库提供替代方案。 |
将 Flutter 添加到现有 iOS 应用时,会 增大 iOS 应用体积。
使用 UIKit 构建的应用示例,请参阅 add_to_app 代码示例 中的 iOS 目录。 SwiftUI 示例请参阅 News Feed App 中的 iOS 目录。
开发系统要求
#Flutter 需要最新版本的 Xcode 与 CocoaPods。
创建 Flutter 模块
#使用任一方式将 Flutter 嵌入现有应用前,须先创建 Flutter 模块。使用以下命令创建:
cd /path/to/my_flutter
flutter create --template module my_flutter
Flutter 会在 /path/to/my_flutter/ 下创建模块项目。若使用 CocoaPods 方式,请将模块保存在与现有 iOS 应用相同的父目录中。
在 Flutter 模块目录中,你可运行与其他 Flutter 项目相同的 flutter 命令,例如 flutter run 或 flutter build ios。你也可在安装了 Flutter 与 Dart 插件的 VS Code 或 Android Studio/IntelliJ
中运行模块。该项目包含嵌入现有 iOS 应用前的单视图示例版本,便于测试代码中仅 Flutter 的部分。
组织模块结构
#my_flutter 模块目录结构类似典型 Flutter 应用。
-
my_flutter/
.ios/
- Runner.xcworkspace
Flutter/
- podhelper.rb
lib/
- main.dart
- test/
- pubspec.yaml
Dart 代码应放在 lib/ 目录。Flutter 依赖、package 与插件须添加到 pubspec.yaml。
隐藏的 .ios/ 子文件夹包含 Xcode workspace,可单独运行模块。该包装项目引导 Flutter 代码,并包含辅助脚本,便于构建 framework 或通过 CocoaPods 将模块嵌入现有应用。
将 Flutter 模块嵌入 iOS 应用
#开发完 Flutter 模块后,可使用页面顶部表格中的方法进行嵌入。
可在模拟器或真机上以 Debug 模式运行,在真机上以 Release 模式运行。
使用 CocoaPods 与 Flutter SDK
#方法
#第一种方法使用 CocoaPods 嵌入 Flutter 模块。 CocoaPods 管理 Swift 项目的依赖,包括 Flutter 代码与 plugin。每次 Xcode 构建 app 时,CocoaPods 都会嵌入 Flutter 模块。
这样你可以在 Xcode 之外无需运行额外命令,即可用 Flutter 模块的最新版本快速迭代。
要了解更多 CocoaPods 信息,请参阅 CocoaPods 入门指南。
观看视频
#若观看视频有助于学习,本视频介绍如何将 Flutter 添加到 iOS app:
要求
#参与项目的每位开发者都必须在本地安装 Flutter SDK 和 CocoaPods。
示例项目结构
#本节假定现有 app 与 Flutter 模块位于同级目录。若目录结构不同,请调整相对路径。示例目录结构如下:
-
my_flutter/
- .ios/
Flutter/
- podhelper.rb
-
MyApp/
- Podfile
更新你的 Podfile
#
将 Flutter 模块添加到你的 Podfile 配置文件。本节假定你的 Swift app 名为 MyApp。
-
(可选) 若现有 app 没有
Podfile配置文件,请进入 app 目录根目录,使用pod init命令创建Podfile文件。 -
更新你的
Podfile配置文件。在
platform声明之后添加以下行。MyApp/Podfilerubyflutter_application_path = '../my_flutter' load File.join(flutter_application_path, '.ios', 'Flutter', 'podhelper.rb')对于每个需要嵌入 Flutter 的 Podfile target,添加对
install_all_flutter_pods(flutter_application_path)方法的调用。在上一步设置之后添加这些调用。MyApp/Podfilerubytarget 'MyApp' do install_all_flutter_pods(flutter_application_path) end在
Podfile的post_install块中,添加对flutter_post_install(installer)的调用。该块应是Podfile配置文件中的最后一个块。MyApp/Podfilerubypost_install do |installer| flutter_post_install(installer) if defined?(flutter_post_install) end
要查看 Podfile 示例,请参阅此 Flutter Podfile 示例。
嵌入你的 framework
#
构建时,Xcode 会将 Dart 代码、每个 Flutter plugin 以及 Flutter engine 分别打包为各自的 *.xcframework bundle。随后 CocoaPods 的 podhelper.rb 脚本将这些 *.xcframework bundle 嵌入你的项目。
-
Flutter.xcframework包含 Flutter engine。 -
App.xcframework包含本项目的已编译 Dart 代码。 -
<plugin>.xcframework包含一个 Flutter plugin。
要将 Flutter engine、Dart 代码和 Flutter plugin 嵌入 iOS app,请完成以下步骤。
-
刷新 Flutter plugin。
若更改了
pubspec.yaml中的 Flutter 依赖,请在 Flutter 模块目录中运行flutter pub get。这会刷新podhelper.rb脚本读取的 plugin 列表。flutter pub get -
使用 CocoaPods 嵌入 plugin 与 framework。
进入 iOS app 项目目录
/path/to/MyApp/MyApp。使用
pod install命令。pod install
iOS app 的 Debug 与 Release 构建配置会嵌入对应该构建模式的 Flutter 组件。
-
构建项目。
在 Xcode 中打开
MyApp.xcworkspace。请确认打开的是
MyApp.xcworkspace,而不是MyApp.xcodeproj。.xcworkspace文件包含 CocoaPods 依赖,.xcodeproj则没有。选择 Product > Build,或按 Cmd + B。
设置 LLDB Init File
#-
生成 Flutter LLDB 文件。
在 Flutter 应用中运行以下命令:
flutter build ios --config-only这会在
.ios/Flutter/ephemeral目录中生成 LLDB 文件。 -
设置 LLDB Init File。
前往 Product > Scheme > Edit Scheme。
在左侧边栏选择 Run 部分。
设置 LLDB Init File,使用与 Update your Podfile(更新你的 Podfile)一节中 Podfile 相同的、指向 Flutter 应用的相对路径。
$(SRCROOT)/../my_flutter/.ios/Flutter/ephemeral/flutter_lldbinit若 scheme 已有 LLDB Init File,可将 Flutter 的 LLDB 文件加入其中。Flutter LLDB Init File 的路径必须相对于项目 LLDB Init File 的位置。
例如,若 LLDB 文件位于
/path/to/MyApp/.lldbinit,可添加以下内容:command source --relative-to-command-file "../my_flutter/.ios/Flutter/ephemeral/flutter_lldbinit"
在 Xcode 中链接并嵌入 framework
#方法
#在第二种方法中,编辑你现有的 Xcode 项目,生成所需的 framework,并将其嵌入 app。 Flutter 会为 Flutter 自身、你已编译的 Dart 代码以及每个 Flutter plugin 生成 iOS framework。嵌入这些 framework 并更新现有应用的构建设置。
要求
#此方法不需要额外的软件或硬件。在以下用例中使用此方法:
-
团队成员无法安装 Flutter SDK 和 CocoaPods
-
你不想在现有 iOS app 中使用 CocoaPods 作为依赖管理器
限制
#
Flutter 无法处理与 xcframework 的公共依赖。如果宿主 app 与 Flutter 模块的 plugin 都定义了相同的 pod 依赖,而你又通过此选项集成 Flutter 模块,就会产生错误。这些错误包括诸如 Multiple commands produce 'CommonDependency.framework'
之类的问题。
要解决此问题,请将 Flutter 模块中每个 plugin 在其 podspec 文件里的源码链接到宿主 app 的 Podfile。应链接源码,而不是 plugin 的 xcframework framework。下一节说明如何生成该 framework。
为防止出现公共依赖导致的错误,请使用带 --no-plugins 标志的 flutter build ios-framework。
示例项目结构
#以下示例假定你要将 framework 生成到 /path/to/MyApp/Flutter/。
flutter build ios-framework --output=/path/to/MyApp/Flutter/
每次 更改 Flutter 模块中的代码时都要运行此命令。
生成的项目结构应与此目录树类似。
-
/path/to/MyApp/
Flutter/
Debug/
- Flutter.xcframework
- App.xcframework
- FlutterPluginRegistrant.xcframework(If you have plugins with iOS-platform code)
- example_plugin.xcframework(One framework file for each plugin)
Profile/
- Flutter.xcframework
- App.xcframework
- FlutterPluginRegistrant.xcframework
- example_plugin.xcframework
Release/
- Flutter.xcframework
- App.xcframework
- FlutterPluginRegistrant.xcframework
- example_plugin.xcframework
步骤
#在 Xcode 中将生成的 framework 链接、嵌入或同时执行两者,取决于 framework 的类型。
链接并嵌入动态 framework。
-
链接静态 framework。切勿嵌入它们。
Flutter plugin 可能生成 静态或动态 framework。请链接静态 framework,切勿 嵌入它们。
若将静态 framework 嵌入 iOS app,则无法将该 app 发布到 App Store。发布时会因 Found an unexpected Mach-O header code 归档错误而失败。
链接所有 framework
#要链接所需 framework,请按以下步骤操作。
-
选择要链接的 framework。
在 Project Navigator 中点击你的项目。
点击 Build Phases 标签页。
展开 Link Binary With Libraries。
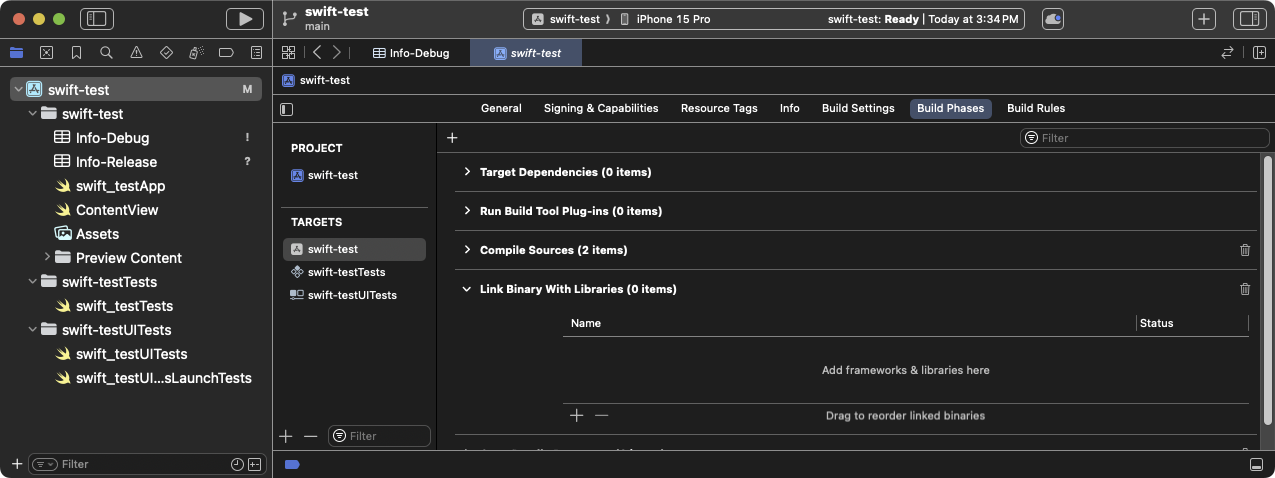
Expand the Link Binary With Libraries build phase in Xcode
点击 +(加号)。
点击 Add Other...,然后点击 Add Files...。
在 Choose frameworks and libraries to add: 对话框中,导航到
/path/to/MyApp/Flutter/Release/目录。按住 Command 键点击该目录中的 framework,然后点击 Open。
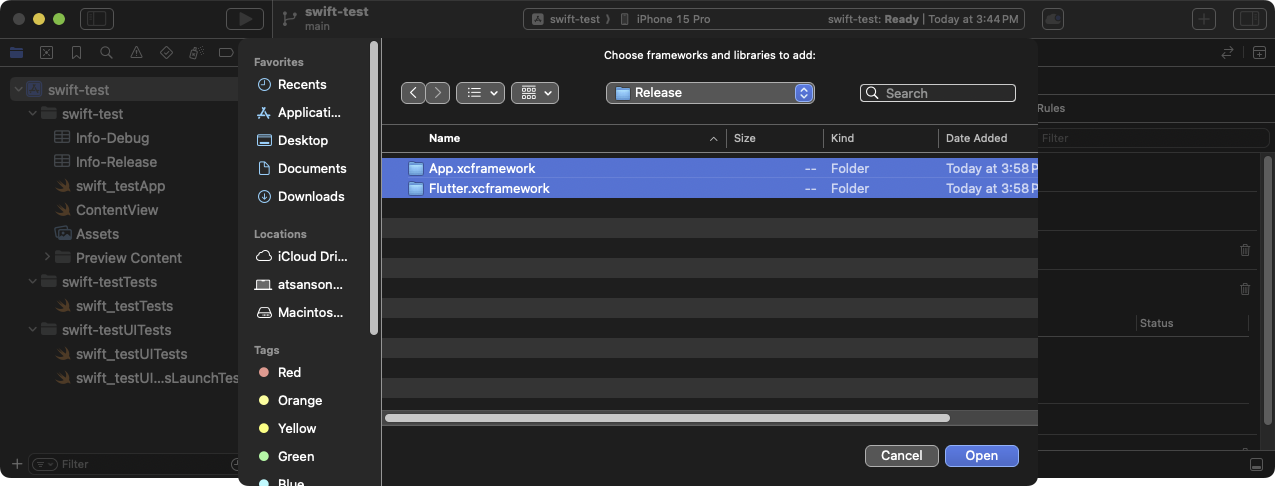
Choose frameworks to link from the Choose frameworks and libraries to add: dialog box in Xcode
-
更新库路径以适配构建模式。
打开 Finder。
导航到
/path/to/MyApp/目录。右键点击
MyApp.xcodeproj,选择 Show Package Contents。用 Xcode 打开
project.pbxproj。文件会在 Xcode 文本编辑器中打开。在关闭文本编辑器之前,Project Navigator 也会被锁定。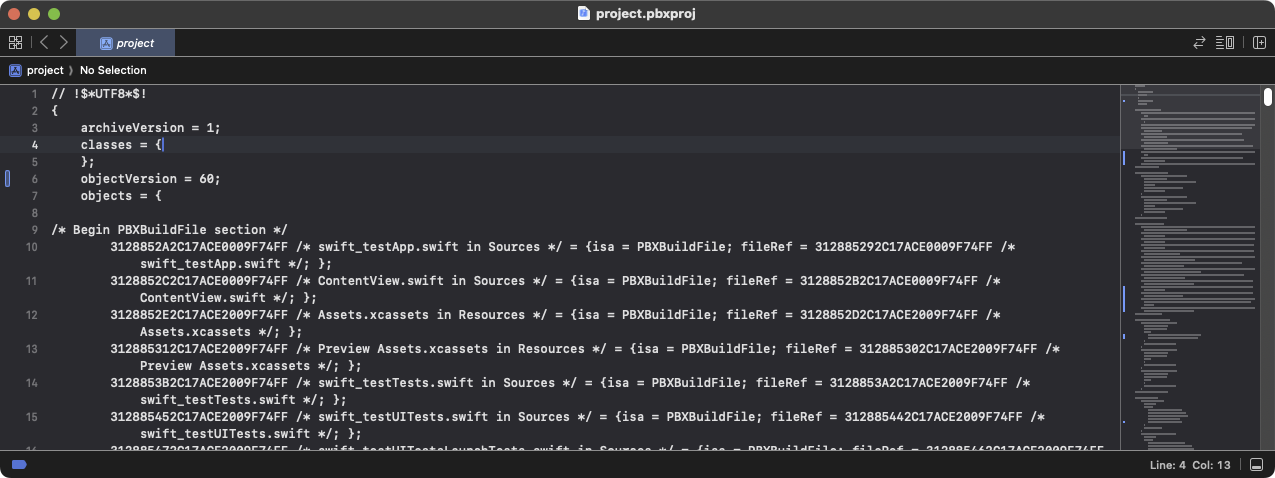
The
project-pbxprojfile open in the Xcode text editor在
/* Begin PBXFileReference section */中查找类似以下内容的行。312885572C1A441C009F74FF /* Flutter.xcframework */ = { isa = PBXFileReference; expectedSignature = "AppleDeveloperProgram:S8QB4VV633:FLUTTER.IO LLC"; lastKnownFileType = wrapper.xcframework; name = Flutter.xcframework; path = Flutter/Release/Flutter.xcframework; sourceTree = "<group>"; }; 312885582C1A441C009F74FF /* App.xcframework */ = { isa = PBXFileReference; lastKnownFileType = wrapper.xcframework; name = App.xcframework; path = Flutter/Release/App.xcframework; sourceTree = "<group>"; };将上一步中高亮的
Release文本改为$(CONFIGURATION),并用引号包裹路径。312885572C1A441C009F74FF /* Flutter.xcframework */ = { isa = PBXFileReference; expectedSignature = "AppleDeveloperProgram:S8QB4VV633:FLUTTER.IO LLC"; lastKnownFileType = wrapper.xcframework; name = Flutter.xcframework; path = "Flutter/$(CONFIGURATION)/Flutter.xcframework"; sourceTree = "<group>"; }; 312885582C1A441C009F74FF /* App.xcframework */ = { isa = PBXFileReference; lastKnownFileType = wrapper.xcframework; name = App.xcframework; path = "Flutter/$(CONFIGURATION)/App.xcframework"; sourceTree = "<group>"; };
-
更新搜索路径。
点击 Build Settings 标签页。
导航到 Search Paths
双击 Framework Search Paths 右侧。
在组合框中点击 +(加号)。
输入
$(inherited),然后按 Enter。点击 +(加号)。
输入
$(PROJECT_DIR)/Flutter/$(CONFIGURATION)/,然后按 Enter。
Update Framework Search Paths in Xcode
链接 framework 后,它们应显示在 target General 设置的 Frameworks, Libraries, and Embedded Content 部分。
嵌入动态 framework
#要嵌入动态 framework,请完成以下步骤。
-
导航到 General > Frameworks, Libraries, and Embedded Content。
-
点击每个动态 framework,选择 Embed & Sign。
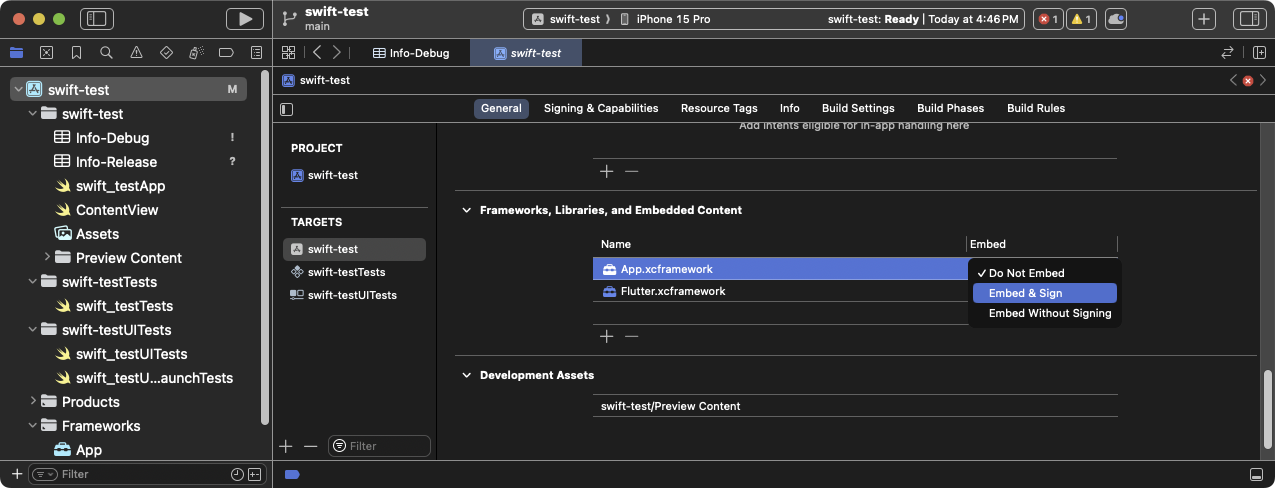
Select Embed & Sign for each of your frameworks in Xcode
不要包含任何静态 framework,包括
FlutterPluginRegistrant.xcframework。 点击 Build Phases 标签页。
-
展开 Embed Frameworks。动态 framework 应显示在该部分。
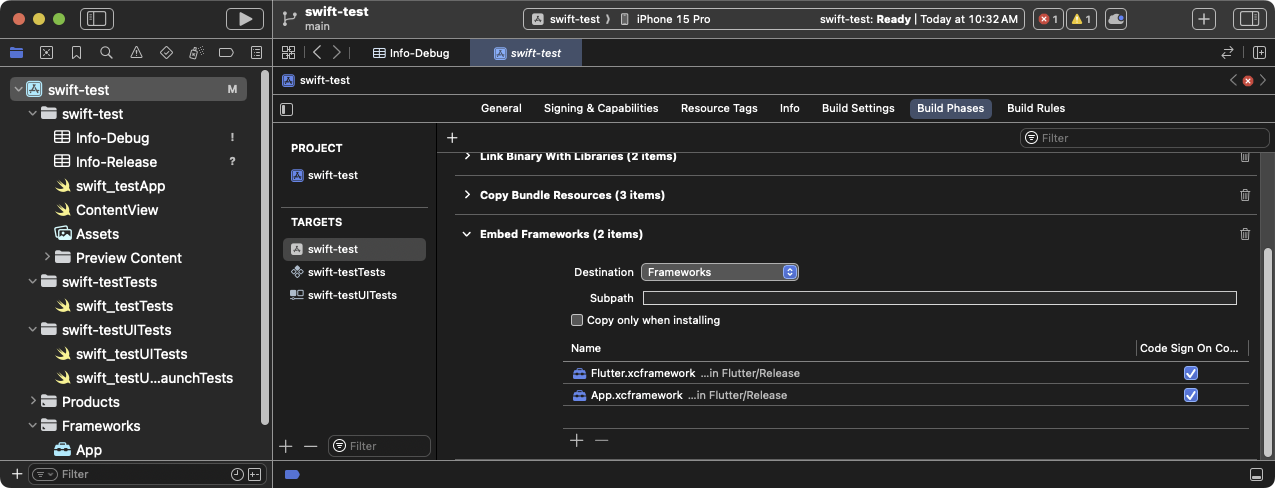
The expanded Embed Frameworks build phase in Xcode
-
构建项目。
在 Xcode 中打开
MyApp.xcworkspace。请确认打开的是
MyApp.xcworkspace,而不是MyApp.xcodeproj。.xcworkspace文件包含 CocoaPods 依赖,.xcodeproj则没有。选择 Product > Build,或按 Cmd + B。
设置 LLDB Init File
#-
生成 Flutter LLDB 文件。
在 Flutter 应用中,若尚未运行,请重新执行
flutter build ios-framework:
flutter build ios-framework --output=/path/to/MyApp/Flutter/这会在
/path/to/MyApp/Flutter/目录中生成 LLDB 文件。 -
设置 LLDB Init File。
前往 Product > Scheme > Edit Scheme。
在左侧边栏选择 Run 部分。
将 LLDB Init File 设置为以下内容:
$(PROJECT_DIR)/Flutter/flutter_lldbinit若 scheme 已有 LLDB Init File,可将 Flutter 的 LLDB 文件加入其中。Flutter LLDB Init File 的路径必须相对于项目 LLDB Init File 的位置。
例如,若 LLDB 文件位于
/path/to/MyApp/.lldbinit,可添加以下内容:command source --relative-to-command-file "Flutter/flutter_lldbinit"
在 Xcode 中使用 framework,并将 Flutter framework 作为 podspec
#方法
#
此方法将 Flutter 生成为 CocoaPods podspec,而不是将大型 Flutter.xcframework 分发给其他开发者、机器或持续集成系统。
Flutter 仍会为已编译的 Dart 代码以及每个 Flutter plugin 生成 iOS framework。嵌入这些 framework 并更新现有应用的构建设置。
要求
#此方法不需要额外的软件或硬件。在以下用例中使用此方法:
-
团队成员无法安装 Flutter SDK 和 CocoaPods
-
你不想在现有 iOS app 中使用 CocoaPods 作为依赖管理器
限制
#
Flutter 无法处理与 xcframework 的公共依赖。如果宿主 app 与 Flutter 模块的 plugin 都定义了相同的 pod 依赖,而你又通过此选项集成 Flutter 模块,就会产生错误。这些错误包括诸如 Multiple commands produce 'CommonDependency.framework'
之类的问题。
要解决此问题,请将 Flutter 模块中每个 plugin 在其 podspec 文件里的源码链接到宿主 app 的 Podfile。应链接源码,而不是 plugin 的 xcframework framework。下一节说明如何生成该 framework。
为防止出现公共依赖导致的错误,请使用带 --no-plugins 标志的 flutter build ios-framework。
此方法仅适用于 beta 或 stable 发布渠道。
示例项目结构
#以下示例假定你要将 framework 生成到 /path/to/MyApp/Flutter/。
flutter build ios-framework --output=/path/to/MyApp/Flutter/
每次 更改 Flutter 模块中的代码时都要运行此命令。
生成的项目结构应与此目录树类似。
-
/path/to/MyApp/
Flutter/
Debug/
- Flutter.xcframework
- App.xcframework
- FlutterPluginRegistrant.xcframework(If you have plugins with iOS-platform code)
- example_plugin.xcframework(One framework file for each plugin)
Profile/
- Flutter.xcframework
- App.xcframework
- FlutterPluginRegistrant.xcframework
- example_plugin.xcframework
Release/
- Flutter.xcframework
- App.xcframework
- FlutterPluginRegistrant.xcframework
- example_plugin.xcframework
将 Flutter engine 添加到你的 Podfile
#使用 CocoaPods 的宿主 app 可以将 Flutter engine 添加到其 Podfile。
pod 'Flutter', :podspec => '/path/to/MyApp/Flutter/[build mode]/Flutter.podspec'
链接并嵌入 app 与 plugin framework
#Flutter plugin 可能生成 静态或动态 framework。请链接静态 framework,切勿 嵌入它们。
若将静态 framework 嵌入 iOS app,则无法将该 app 发布到 App Store。发布时会因 Found an unexpected Mach-O header code 归档错误而失败。
链接所有 framework
#要链接所需 framework,请按以下步骤操作。
-
选择要链接的 framework。
在 Project Navigator 中点击你的项目。
点击 Build Phases 标签页。
展开 Link Binary With Libraries。
Expand the Link Binary With Libraries build phase in Xcode
点击 +(加号)。
点击 Add Other...,然后点击 Add Files...。
在 Choose frameworks and libraries to add: 对话框中,导航到
/path/to/MyApp/Flutter/Release/目录。按住 Command 键点击该目录中的 framework,然后点击 Open。
Choose frameworks to link from the Choose frameworks and libraries to add: dialog box in Xcode
-
更新库路径以适配构建模式。
打开 Finder。
导航到
/path/to/MyApp/目录。右键点击
MyApp.xcodeproj,选择 Show Package Contents。用 Xcode 打开
project.pbxproj。文件会在 Xcode 文本编辑器中打开。在关闭文本编辑器之前,Project Navigator 也会被锁定。The
project-pbxprojfile open in the Xcode text editor在
/* Begin PBXFileReference section */中查找类似以下内容的行。312885572C1A441C009F74FF /* Flutter.xcframework */ = { isa = PBXFileReference; expectedSignature = "AppleDeveloperProgram:S8QB4VV633:FLUTTER.IO LLC"; lastKnownFileType = wrapper.xcframework; name = Flutter.xcframework; path = Flutter/Release/Flutter.xcframework; sourceTree = "<group>"; }; 312885582C1A441C009F74FF /* App.xcframework */ = { isa = PBXFileReference; lastKnownFileType = wrapper.xcframework; name = App.xcframework; path = Flutter/Release/App.xcframework; sourceTree = "<group>"; };将上一步中高亮的
Release文本改为$(CONFIGURATION),并用引号包裹路径。312885572C1A441C009F74FF /* Flutter.xcframework */ = { isa = PBXFileReference; expectedSignature = "AppleDeveloperProgram:S8QB4VV633:FLUTTER.IO LLC"; lastKnownFileType = wrapper.xcframework; name = Flutter.xcframework; path = "Flutter/$(CONFIGURATION)/Flutter.xcframework"; sourceTree = "<group>"; }; 312885582C1A441C009F74FF /* App.xcframework */ = { isa = PBXFileReference; lastKnownFileType = wrapper.xcframework; name = App.xcframework; path = "Flutter/$(CONFIGURATION)/App.xcframework"; sourceTree = "<group>"; };
-
更新搜索路径。
点击 Build Settings 标签页。
导航到 Search Paths
双击 Framework Search Paths 右侧。
在组合框中点击 +(加号)。
输入
$(inherited),然后按 Enter。点击 +(加号)。
输入
$(PROJECT_DIR)/Flutter/$(CONFIGURATION)/,然后按 Enter。Update Framework Search Paths in Xcode
链接 framework 后,它们应显示在 target General 设置的 Frameworks, Libraries, and Embedded Content 部分。
嵌入动态 framework
#要嵌入动态 framework,请完成以下步骤。
-
导航到 General > Frameworks, Libraries, and Embedded Content。
-
点击每个动态 framework,选择 Embed & Sign。
Select Embed & Sign for each of your frameworks in Xcode
不要包含任何静态 framework,包括
FlutterPluginRegistrant.xcframework。 点击 Build Phases 标签页。
-
展开 Embed Frameworks。动态 framework 应显示在该部分。
The expanded Embed Frameworks build phase in Xcode
-
构建项目。
在 Xcode 中打开
MyApp.xcworkspace。请确认打开的是
MyApp.xcworkspace,而不是MyApp.xcodeproj。.xcworkspace文件包含 CocoaPods 依赖,.xcodeproj则没有。选择 Product > Build,或按 Cmd + B。
设置 LLDB Init File
#-
生成 Flutter LLDB 文件。
在 Flutter 应用中,若尚未运行,请重新执行
flutter build ios-framework:
flutter build ios-framework --output=/path/to/MyApp/Flutter/这会在
/path/to/MyApp/Flutter/目录中生成 LLDB 文件。 -
设置 LLDB Init File。
前往 Product > Scheme > Edit Scheme。
在左侧边栏选择 Run 部分。
将 LLDB Init File 设置为以下内容:
$(PROJECT_DIR)/Flutter/flutter_lldbinit若 scheme 已有 LLDB Init File,可将 Flutter 的 LLDB 文件加入其中。Flutter LLDB Init File 的路径必须相对于项目 LLDB Init File 的位置。
例如,若 LLDB 文件位于
/path/to/MyApp/.lldbinit,可添加以下内容:command source --relative-to-command-file "Flutter/flutter_lldbinit"
设置本地网络隐私权限
#
在 iOS 14 及更高版本上,请在 iOS app 的 Debug 版本中启用 Dart 多播 DNS 服务。这样可通过 flutter attach 使用热重载和 DevTools 等调试功能。
若仅在 app 的 Debug 版本中设置本地网络隐私权限,请为每个构建配置创建单独的 Info.plist。
SwiftUI 项目一开始可能没有 Info.plist 文件。如需创建属性列表,可通过 Xcode 或文本编辑器完成。以下说明假定使用默认的 Debug 和 Release。请根据 app 的构建配置按需调整名称。
-
创建新的属性列表。
在 Xcode 中打开项目。
在 Project Navigator 中点击项目名称。
在编辑器窗格的 Targets 列表中点击你的 app。
点击 Info 标签页。
展开 Custom iOS Target Properties。
右键点击列表,选择 Add Row。
在下拉菜单中选择 Bonjour Services。这会在项目目录中创建一个名为
Info的新属性列表。在 Finder 中显示为Info.plist。
-
将
Info.plist重命名为Info-Debug.plist在左侧项目列表中点击 Info 文件。
在右侧 Identity and Type 面板中,将 Name 从
Info.plist改为Info-Debug.plist。
-
创建 Release 属性列表。
在 Project Navigator 中点击
Info-Debug.plist。选择 File > Duplicate...。也可按 Cmd + Shift + S。
在对话框中将 Save As: 设为
Info-Release.plist,然后点击 Save。
-
向 Debug 属性列表添加必要属性。
在 Project Navigator 中点击
Info-Debug.plist。向 Bonjour Services 数组添加字符串值
_dartVmService._tcp。(可选) 若要设置自定义权限对话框文案,请添加键 Privacy - Local Network Usage Description。

The
Info-Debugproperty list with the Bonjour Services and Privacy - Local Network Usage Description keys added
-
设置 target 在不同构建模式下使用不同属性列表。
在 Project Navigator 中点击你的项目。
点击 Build Settings 标签页。
点击 All 和 Combined 子标签页。
在搜索框中输入
plist,将设置限定为与属性列表相关的项。滚动列表直至看到 Packaging。
点击 Info.plist File 设置。
将 Info.plist File 的值从
path/to/Info.plist改为path/to/Info-$(CONFIGURATION).plist。
Updating the
Info.plistbuild setting to use build mode-specific property lists在 Debug 中解析为 Info-Debug.plist,在 Release 中解析为 Info-Release.plist。

The updated Info.plist File build setting displaying the configuration variations
-
从 Build Phases 中移除 Release 属性列表。
在 Project Navigator 中点击你的项目。
点击 Build Phases 标签页。
展开 Copy Bundle Resources。
若列表包含
Info-Release.plist,请点击它,再点击下方 -(减号)将其从资源列表中移除。
The Copy Bundle build phase displaying the Info-Release.plist setting. Remove this setting.
-
Debug app 加载的第一个 Flutter 界面会提示本地网络权限。
点击 OK。
(可选) 若要在 app 加载前授予权限,请启用 Settings > Privacy > Local Network > Your App。
缓解 Apple Silicon Mac 上的已知问题
#
在 运行 Apple Silicon 的 Mac 上,宿主应用会为 arm64 模拟器构建。
Flutter 支持 arm64 模拟器,但部分插件可能不支持。若使用这类插件,可能看到类似 Undefined symbols for architecture arm64 的编译错误。若出现此情况,请在宿主应用中从模拟器架构中排除 arm64。
-
在 Project Navigator 中点击项目。
点击 Build Settings 标签页。
-
点击 All 与 Combined 子标签页。
-
在 Architectures 下点击 Excluded Architectures。
展开以查看可用构建配置。
点击 Debug。
点击 +(加号)。
选择 iOS Simulator。
-
双击 Any iOS Simulator SDK 的值列。
点击 +(加号)。
-
在 Debug > Any iOS Simulator SDK 对话框中输入
arm64。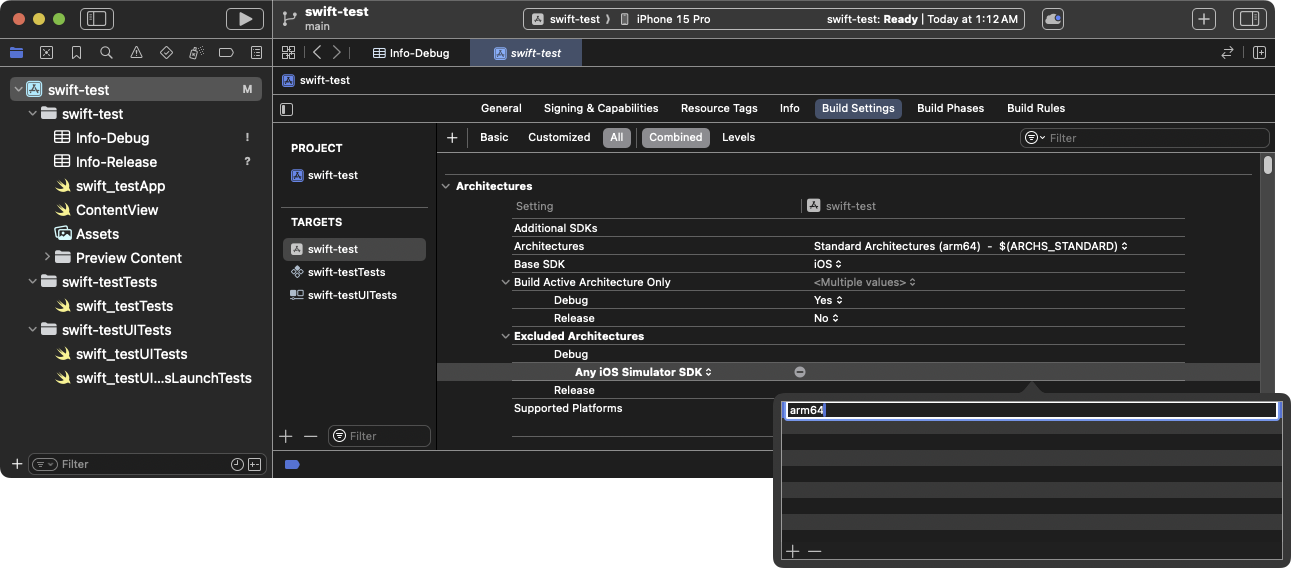
Add
arm64as an excluded architecture for your app 按 Esc 关闭对话框。
-
对 Release 构建模式重复上述步骤。
对所有 iOS 单元测试 target 重复操作。
后续步骤
#你现在可以 向现有 iOS 应用添加 Flutter 屏幕。
除非另有说明,本文档之所提及适用于 Flutter 3.44.0 版本。本页面最后更新时间:2026-06-22。查看文档源码 或者 为本页面内容提出建议。