创建一个点击展开的 FAB
如何实现一个可以点击展开为好几个按钮的浮动按钮。
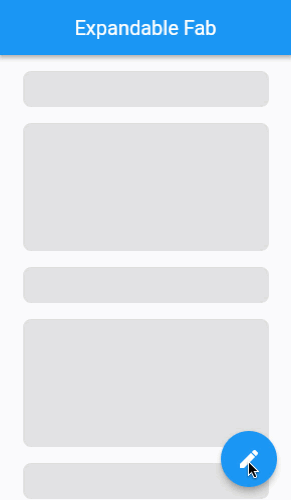
浮动操作按钮 (FAB) 是一个悬浮在内容区域右下角附近的圆形按钮。此按钮表示相关内容的主要操作,但有时可能没有明确的主要操作,而是有几个关键操作可供用户选择。在这种情况下,你可以创建一个可展开的 FAB,如下所示。当按下时,这个可展开的 FAB 会展开出多个其他操作按钮,每个按钮对应着一个关键操作。
下面的动画展示了应用会怎么做:
创建一个 ExpandableFab widget
#
首先,创建一个名为 ExpandableFab 的 StatefulWidget,它会显示主要的 FAB,并负责协调其他操作按钮的展开与收起。该 widget 接收以下参数:ExpandableFab 是否以展开状态开始、每个操作按钮的最大距离、以及一个子 widget 列表。稍后你会使用该列表生成其他操作按钮。
@immutable
class ExpandableFab extends StatefulWidget {
const ExpandableFab({
super.key,
this.initialOpen,
required this.distance,
required this.children,
});
final bool? initialOpen;
final double distance;
final List<Widget> children;
@override
State<ExpandableFab> createState() => _ExpandableFabState();
}
class _ExpandableFabState extends State<ExpandableFab> {
@override
Widget build(BuildContext context) {
return const SizedBox();
}
}
FAB 交叉淡入淡出
#
当收起时,ExpandableFab 会显示一个蓝色的编辑按钮;当展开时,则会显示一个白色的关闭按钮。在展开和收起的过程中,这两个按钮通过缩放和淡入淡出的动画相互过渡。
实现两个不同 FAB 之间展开和收起时的交叉淡入淡出动画。
class _ExpandableFabState extends State<ExpandableFab> {
bool _open = false;
@override
void initState() {
super.initState();
_open = widget.initialOpen ?? false;
}
void _toggle() {
setState(() {
_open = !_open;
});
}
@override
Widget build(BuildContext context) {
return SizedBox.expand(
child: Stack(
alignment: Alignment.bottomRight,
clipBehavior: Clip.none,
children: [_buildTapToCloseFab(), _buildTapToOpenFab()],
),
);
}
Widget _buildTapToCloseFab() {
return SizedBox(
width: 56,
height: 56,
child: Center(
child: Material(
shape: const CircleBorder(),
clipBehavior: Clip.antiAlias,
elevation: 4,
child: InkWell(
onTap: _toggle,
child: Padding(
padding: const EdgeInsets.all(8),
child: Icon(Icons.close, color: Theme.of(context).primaryColor),
),
),
),
),
);
}
Widget _buildTapToOpenFab() {
return IgnorePointer(
ignoring: _open,
child: AnimatedContainer(
transformAlignment: Alignment.center,
transform: Matrix4.diagonal3Values(
_open ? 0.7 : 1.0,
_open ? 0.7 : 1.0,
1.0,
),
duration: const Duration(milliseconds: 250),
curve: const Interval(0.0, 0.5, curve: Curves.easeOut),
child: AnimatedOpacity(
opacity: _open ? 0.0 : 1.0,
curve: const Interval(0.25, 1.0, curve: Curves.easeInOut),
duration: const Duration(milliseconds: 250),
child: FloatingActionButton(
onPressed: _toggle,
child: const Icon(Icons.create),
),
),
),
);
}
}
在 Stack 布局中,打开按钮叠放于关闭按钮之上,通过顶部按钮的出现和消失来呈现交叉淡入淡出的视觉效果。
为了实现交叉淡入淡出动画,打开按钮使用了带缩放变换的 AnimatedContainer 和 AnimatedOpacity。当 ExpandableFab 从收起状态变为展开状态时,打开按钮会缩小并淡出;相反,当 ExpandableFab 从展开状态变为收起状态时,打开按钮则会放大并淡入。
你会注意到打开按钮被包裹在一个 IgnorePointer widget 里,这是因为该按钮即使是透明的也一直存在。若不使用 IgnorePointer,即使关闭按钮可见,打开按钮也总会接收到点击事件。
创建一个 ActionButton widget
#
从 ExpandableFab 展开的每个按钮有相同的外观设计,都是带有白色图标的蓝色圆形。更准确地说,这些按钮的背景颜色为 ColorScheme.secondary,而图标的颜色则为 ColorScheme.onSecondary。
定义一个名为 ActionButton 的 Stateless widget,用来显示这些圆形按钮。
@immutable
class ActionButton extends StatelessWidget {
const ActionButton({super.key, this.onPressed, required this.icon});
final VoidCallback? onPressed;
final Widget icon;
@override
Widget build(BuildContext context) {
final theme = Theme.of(context);
return Material(
shape: const CircleBorder(),
clipBehavior: Clip.antiAlias,
color: theme.colorScheme.secondary,
elevation: 4,
child: IconButton(
onPressed: onPressed,
icon: icon,
color: theme.colorScheme.onSecondary,
),
);
}
}
将几个 ActionButton widget 的实例传入你的 ExpandableFab 中。
floatingActionButton: ExpandableFab(
  distance: 112,
  children: [
    ActionButton(
      onPressed: () => _showAction(context, 0),
      icon: const Icon(Icons.format_size),
    ),
    ActionButton(
      onPressed: () => _showAction(context, 1),
      icon: const Icon(Icons.insert_photo),
    ),
    ActionButton(
      onPressed: () => _showAction(context, 2),
      icon: const Icon(Icons.videocam),
    ),
  ],
),
展开和收起操作按钮
#
当展开时,子 ActionButton 应该从打开的 FAB 下方弹出;当收起时,子 ActionButton 应该返回到打开的 FAB 下方。此动画需要为每个 ActionButton 设置精确的 (x,y) 坐标,并通过 Animation 来编排这些坐标位置随时间进行变化。
引入一个 AnimationController 和一个 Animation,以控制各个 ActionButton 展开和收起的速度。
class _ExpandableFabState extends State<ExpandableFab>
with SingleTickerProviderStateMixin {
late final AnimationController _controller;
late final Animation<double> _expandAnimation;
bool _open = false;
@override
void initState() {
super.initState();
_open = widget.initialOpen ?? false;
_controller = AnimationController(
value: _open ? 1.0 : 0.0,
duration: const Duration(milliseconds: 250),
vsync: this,
);
_expandAnimation = CurvedAnimation(
curve: Curves.fastOutSlowIn,
reverseCurve: Curves.easeOutQuad,
parent: _controller,
);
}
@override
void dispose() {
_controller.dispose();
super.dispose();
}
void _toggle() {
setState(() {
_open = !_open;
if (_open) {
_controller.forward();
} else {
_controller.reverse();
}
});
}
}
接下来,引入一个名为 _ExpandingActionButton 的 StatelessWidget,并通过配置该 widget 来实现对单个 ActionButton 的动画与定位。该 widget 接收一个名为 child 的通用型 Widget 参数,ActionButton
即作为此参数传入。
@immutable
class _ExpandingActionButton extends StatelessWidget {
const _ExpandingActionButton({
required this.directionInDegrees,
required this.maxDistance,
required this.progress,
required this.child,
});
final double directionInDegrees;
final double maxDistance;
final Animation<double> progress;
final Widget child;
@override
Widget build(BuildContext context) {
return AnimatedBuilder(
animation: progress,
builder: (context, child) {
final offset = Offset.fromDirection(
directionInDegrees * (math.pi / 180.0),
progress.value * maxDistance,
);
return Positioned(
right: 4.0 + offset.dx,
bottom: 4.0 + offset.dy,
child: Transform.rotate(
angle: (1.0 - progress.value) * math.pi / 2,
child: child!,
),
);
},
child: FadeTransition(opacity: progress, child: child),
);
}
}
_ExpandingActionButton 最重要的部分是 Positioned widget,它将 child 定位在父级 Stack 中的特定 (x,y) 坐标上。
AnimatedBuilder 会在动画每次变化时让 Positioned widget 重新构建。
FadeTransition widget 负责在每个 ActionButton 展开和收起时分别控制它们的出现与消失。
最后,在 ExpandableFab 中使用新的 _ExpandingActionButton widget 以完成练习。
class _ExpandableFabState extends State<ExpandableFab>
with SingleTickerProviderStateMixin {
@override
Widget build(BuildContext context) {
return SizedBox.expand(
child: Stack(
alignment: Alignment.bottomRight,
clipBehavior: Clip.none,
children: [
_buildTapToCloseFab(),
..._buildExpandingActionButtons(),
_buildTapToOpenFab(),
],
),
);
}
List<Widget> _buildExpandingActionButtons() {
final children = <Widget>[];
final count = widget.children.length;
final step = 90.0 / (count - 1);
for (
var i = 0, angleInDegrees = 0.0;
i < count;
i++, angleInDegrees += step
) {
children.add(
_ExpandingActionButton(
directionInDegrees: angleInDegrees,
maxDistance: widget.distance,
progress: _expandAnimation,
child: widget.children[i],
),
);
}
return children;
}
}
恭喜!你现在有了一个可展开的 FAB。
互动实例
#运行这个应用:
-
点击右下角带有编辑图标的 FAB。它会展开成 3 个按钮,并被一个展示为 X 形状的关闭按钮替换。
-
点击关闭按钮,可以看到展开的按钮变回到原来的 FAB,X 形状被编辑图标替换。
-
再次展开 FAB,然后点击三个像卫星的按钮中的任意一个,即可看到按下按钮后对应操作的对话框。
import 'dart:math' as math;

import 'package:flutter/material.dart';

void main() {
  runApp(
    const MaterialApp(
      home: ExampleExpandableFab(),
      debugShowCheckedModeBanner: false,
    ),
  );
}

@immutable
class ExampleExpandableFab extends StatelessWidget {
  static const _actionTitles = ['Create Post', 'Upload Photo', 'Upload Video'];

  const ExampleExpandableFab({super.key});

  void _showAction(BuildContext context, int index) {
    showDialog<void>(
      context: context,
      builder: (context) {
        return AlertDialog(
          content: Text(_actionTitles[index]),
          actions: [
            TextButton(
              onPressed: () => Navigator.of(context).pop(),
              child: const Text('CLOSE'),
            ),
          ],
        );
      },
    );
  }

  @override
  Widget build(BuildContext context) {
    return Scaffold(
      appBar: AppBar(title: const Text('Expandable Fab')),
      body: ListView.builder(
        padding: const EdgeInsets.symmetric(vertical: 8),
        itemCount: 25,
        itemBuilder: (context, index) {
          return FakeItem(isBig: index.isOdd);
        },
      ),
      floatingActionButton: ExpandableFab(
        distance: 112,
        children: [
          ActionButton(
            onPressed: () => _showAction(context, 0),
            icon: const Icon(Icons.format_size),
          ),
          ActionButton(
            onPressed: () => _showAction(context, 1),
            icon: const Icon(Icons.insert_photo),
          ),
          ActionButton(
            onPressed: () => _showAction(context, 2),
            icon: const Icon(Icons.videocam),
          ),
        ],
      ),
    );
  }
}

@immutable
class ExpandableFab extends StatefulWidget {
  const ExpandableFab({
    super.key,
    this.initialOpen,
    required this.distance,
    required this.children,
  });

  final bool? initialOpen;
  final double distance;
  final List<Widget> children;

  @override
  State<ExpandableFab> createState() => _ExpandableFabState();
}

class _ExpandableFabState extends State<ExpandableFab>
    with SingleTickerProviderStateMixin {
  late final AnimationController _controller;
  late final Animation<double> _expandAnimation;
  bool _open = false;

  @override
  void initState() {
    super.initState();
    _open = widget.initialOpen ?? false;
    _controller = AnimationController(
      value: _open ? 1.0 : 0.0,
      duration: const Duration(milliseconds: 250),
      vsync: this,
    );
    _expandAnimation = CurvedAnimation(
      curve: Curves.fastOutSlowIn,
      reverseCurve: Curves.easeOutQuad,
      parent: _controller,
    );
  }

  @override
  void dispose() {
    _controller.dispose();
    super.dispose();
  }

  void _toggle() {
    setState(() {
      _open = !_open;
      if (_open) {
        _controller.forward();
      } else {
        _controller.reverse();
      }
    });
  }

  @override
  Widget build(BuildContext context) {
    return SizedBox.expand(
      child: Stack(
        alignment: Alignment.bottomRight,
        clipBehavior: Clip.none,
        children: [
          _buildTapToCloseFab(),
          ..._buildExpandingActionButtons(),
          _buildTapToOpenFab(),
        ],
      ),
    );
  }

  Widget _buildTapToCloseFab() {
    return SizedBox(
      width: 56,
      height: 56,
      child: Center(
        child: Material(
          shape: const CircleBorder(),
          clipBehavior: Clip.antiAlias,
          elevation: 4,
          child: InkWell(
            onTap: _toggle,
            child: Padding(
              padding: const EdgeInsets.all(8),
              child: Icon(Icons.close, color: Theme.of(context).primaryColor),
            ),
          ),
        ),
      ),
    );
  }

  List<Widget> _buildExpandingActionButtons() {
    final children = <Widget>[];
    final count = widget.children.length;
    final step = 90.0 / (count - 1);
    for (
      var i = 0, angleInDegrees = 0.0;
      i < count;
      i++, angleInDegrees += step
    ) {
      children.add(
        _ExpandingActionButton(
          directionInDegrees: angleInDegrees,
          maxDistance: widget.distance,
          progress: _expandAnimation,
          child: widget.children[i],
        ),
      );
    }
    return children;
  }

  Widget _buildTapToOpenFab() {
    return IgnorePointer(
      ignoring: _open,
      child: AnimatedContainer(
        transformAlignment: Alignment.center,
        transform: Matrix4.diagonal3Values(
          _open ? 0.7 : 1.0,
          _open ? 0.7 : 1.0,
          1.0,
        ),
        duration: const Duration(milliseconds: 250),
        curve: const Interval(0.0, 0.5, curve: Curves.easeOut),
        child: AnimatedOpacity(
          opacity: _open ? 0.0 : 1.0,
          curve: const Interval(0.25, 1.0, curve: Curves.easeInOut),
          duration: const Duration(milliseconds: 250),
          child: FloatingActionButton(
            onPressed: _toggle,
            child: const Icon(Icons.create),
          ),
        ),
      ),
    );
  }
}

@immutable
class _ExpandingActionButton extends StatelessWidget {
  const _ExpandingActionButton({
    required this.directionInDegrees,
    required this.maxDistance,
    required this.progress,
    required this.child,
  });

  final double directionInDegrees;
  final double maxDistance;
  final Animation<double> progress;
  final Widget child;

  @override
  Widget build(BuildContext context) {
    return AnimatedBuilder(
      animation: progress,
      builder: (context, child) {
        final offset = Offset.fromDirection(
          directionInDegrees * (math.pi / 180.0),
          progress.value * maxDistance,
        );
        return Positioned(
          right: 4.0 + offset.dx,
          bottom: 4.0 + offset.dy,
          child: Transform.rotate(
            angle: (1.0 - progress.value) * math.pi / 2,
            child: child!,
          ),
        );
      },
      child: FadeTransition(opacity: progress, child: child),
    );
  }
}

@immutable
class ActionButton extends StatelessWidget {
  const ActionButton({super.key, this.onPressed, required this.icon});

  final VoidCallback? onPressed;
  final Widget icon;

  @override
  Widget build(BuildContext context) {
    final theme = Theme.of(context);
    return Material(
      shape: const CircleBorder(),
      clipBehavior: Clip.antiAlias,
      color: theme.colorScheme.secondary,
      elevation: 4,
      child: IconButton(
        onPressed: onPressed,
        icon: icon,
        color: theme.colorScheme.onSecondary,
      ),
    );
  }
}

@immutable
class FakeItem extends StatelessWidget {
  const FakeItem({super.key, required this.isBig});

  final bool isBig;

  @override
  Widget build(BuildContext context) {
    return Container(
      margin: const EdgeInsets.symmetric(vertical: 8, horizontal: 24),
      height: isBig ? 128 : 36,
      decoration: BoxDecoration(
        borderRadius: const BorderRadius.all(Radius.circular(8)),
        color: Colors.grey.shade300,
      ),
    );
  }
}除非另有说明,本文档之所提及适用于 Flutter 3.44.0 版本。本页面最后更新时间:2026-05-05。查看文档源码 或者 为本页面内容提出建议。