Flutter fundamentals
To get started with Flutter, you need to have some familiarity with two subjects: the Dart programming language, which Flutter applications are written in, and widgets, which are the building blocks of Flutter UI. Both will be introduced on this page, but you’ll continue learning about each throughout this series. Additional resources are listed throughout this page, but you do not need to be an expert in either subject in order to continue.
Dart
#Flutter applications are built in Dart, a language that will look familiar to anyone who's written Java, Javascript, or any other C-like language.
The following example is a small program that fetches data from dart.dev, decodes the returned json, and prints it to the console. If you’re confident in your ability to understand this program, feel free to skip to the next section on this page.
import 'dart:convert';
import 'package:http/http.dart' as http;

class Package {
  final String name, latestVersion;
  String? description;

  Package(this.name, this.latestVersion, this.description);

  @override
  String toString() {
    return 'Package{name: $name, latestVersion: $latestVersion, description: $description}';
  }
}

void main() async {
  final httpPackageUrl = Uri.https('dart.dev', '/f/packages/http.json');
  final httpPackageResponse = await http.get(httpPackageUrl);
  if (httpPackageResponse.statusCode != 200) {
    print('Failed to retrieve the http package!');
    return;
  }
  final json = jsonDecode(httpPackageResponse.body);
  final package = Package(json['name'], json['latestVersion'], json['description']);
  print(package);
}
This program has two parts:
the Package class declaration, and the business logic,
which is contained in the main function.
The Package class contains many of the most common
features you’ll use when working with classes in Dart.
This class has three members,
and defines a constructor and a method.
The Dart language is type safe; it uses
static type checking to ensure that
a variable's value always matches the
variable's static type.
When defining a class, annotating the members with
String is required,
but it is often optional due to type inference.
In the main function in this example
there are many lines that start with final variableName =.
These lines are type safe,
despite not being explicitly given a type.
Dart also has built-in sound null safety.
In the example, the description member is
declared with the type String?.
The ? at the end of String? means that
this property can be null.
The other two members cannot be null,
and the program will not compile if
you tried to set them to null.
You can see this demonstrated in the constructor for
the ‘Package class’. It takes two required,
positional arguments and one optional, named argument.
Next in the example is the main function.
All Dart programs, including Flutter apps,
start with a mainfunction.
The function showcases several basic Dart language features,
including using libraries, marking functions as async,
making function calls, using if statement control-flow,
and more.
If these features aren’t familiar to you, read Introduction to Dart from the Dart documentation.
Widgets
#In regard to Flutter, you'll often hear "everything is a widget". Widgets are the building blocks of a Flutter app's user interface, and each widget is an immutable declaration of part of the user interface. Widgets are used to describe all aspects of a user interface, including physical aspects such as text and buttons to lay out effects like padding and alignment.
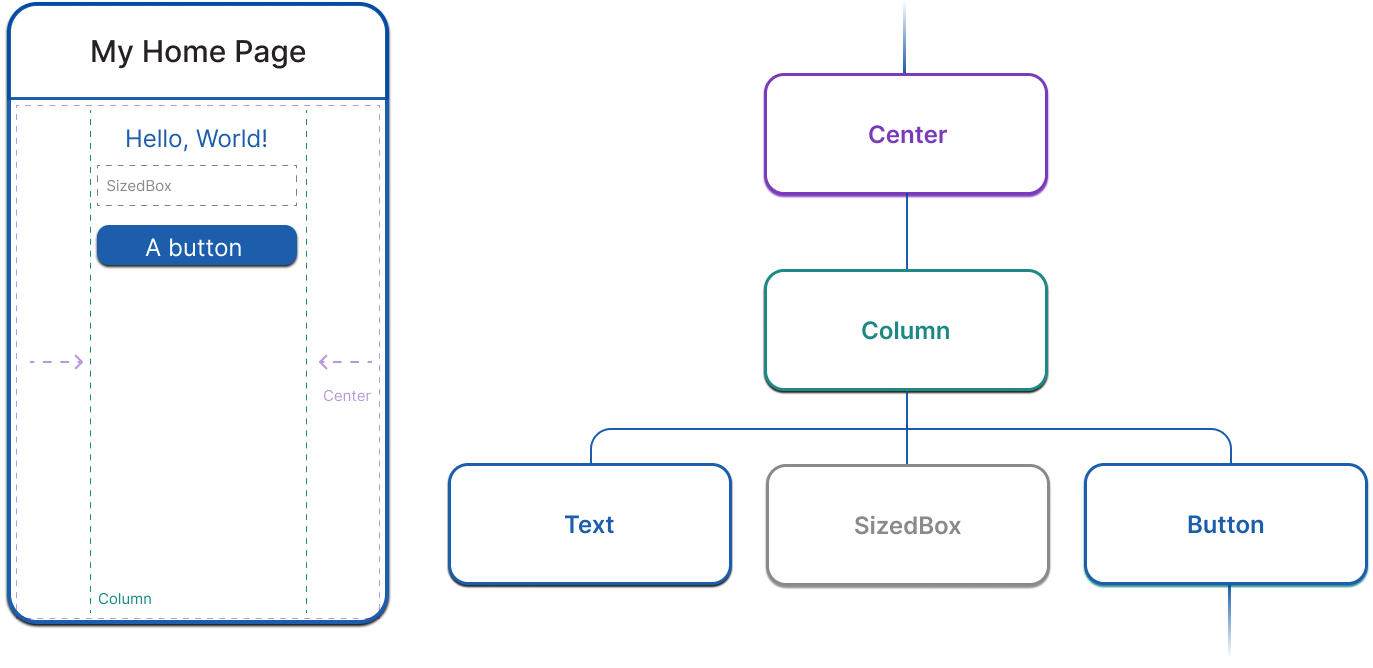
Widgets form a hierarchy based on composition. Each widget nests inside its parent and can receive context from the parent. This structure carries all the way up to the root widget, as this trivial example shows:
import 'package:flutter/material.dart';
import 'package:flutter/services.dart';

void main() => runApp(const MyApp());

class MyApp extends StatelessWidget {
  const MyApp({super.key});

  @override
  Widget build(BuildContext context) {
    return MaterialApp( // Root widget
      home: Scaffold(
        appBar: AppBar(
          title: const Text('My Home Page'),
        ),
        body: Center(
          child: Builder(
            builder: (context) {
              return Column(
                children: [
                  const Text('Hello, World!'),
                  const SizedBox(height: 20),
                  ElevatedButton(
                    onPressed: () {
                      print('Click!');
                    },
                    child: const Text('A button'),
                  ),
                ],
              );
            },
          ),
        ),
      ),
    );
  }
}
In the preceding code,
all instantiated classes are widgets:
MaterialApp, Scaffold, AppBar, Text,
Center, Builder, Column, SizedBox, and
ElevatedButton.
Widget composition
#As mentioned, Flutter emphasizes widgets as a unit of composition. Widgets are typically composed of many other small, single-purpose widgets that combine to produce powerful effects.
There are layout widgets such
as Padding, Alignment, Row, Column,
and Grid. These layout widgets do not have a
visual representation of their own.
Instead, their sole purpose is to
control some aspect of another widget's layout.
Flutter also includes utility widgets that
take advantage of this compositional approach.
For example, Container, a commonly used widget,
is made up of several widgets responsible for layout,
painting, positioning, and sizing.
Some widgets have visual representation,
such as ElevatedButton and
Text in the preceding example, as well as
widgets like Icon and Image.
If you run the code from the preceding example,
Flutter paints a button with the text
"Hello, World!" centered on the screen, laid out vertically.
To position these elements, there’s aCenter widget,
which positions its children in the center
of the available space, and a Column widget,
which lays out its children vertically one after another.
In the next page in this series, you will learn more about layout in Flutter.
Building widgets
#To create a user interface in Flutter,
you override the build method on widget objects.
All widgets must have a build method,
and it must return another widget. For example,
if you want to add text to the screen with some padding,
you could write it like this:
class PaddedText extends StatelessWidget {
  const PaddedText({super.key});

  @override
  Widget build(BuildContext context) {
    return Padding(
      padding: const EdgeInsets.all(8.0),
      child: const Text('Hello, World!'),
    );
  }
}
The framework calls the build method when this
widget is created and when the dependencies of this
widget change (such as state that is passed into the widget).
This method can potentially be called in every frame
and should not have any side effects beyond
building a widget.
For more information on how Flutter renders widgets,
read Flutter architectural overview.
Widget state
#The framework introduces two major classes of widget: stateful and stateless widgets.
Widgets that have no mutable state
(they have no class properties
that change over time) subclass StatelessWidget.
Many built-in widgets are stateless,
such as Padding, Text, and Icon.
When you create your own widgets,
you’ll create Stateless widgets most of the time.
On the other hand,
if the unique characteristics of a widget need to change
based on user interaction or other factors,
that widget is stateful.
For example, if a widget has a counter that
increments whenever the user taps a button,
then the value of the counter is the state for that widget.
When that value changes, the widget needs to be
rebuilt to update its part of the UI.
These widgets subclass StatefulWidget,
and (because the widget itself is immutable)
they store mutable state in a separate class that
subclasses State.
StatefulWidgets don't have a build method;
instead, their user interface is built through
their State object, as shown in the example below.
class CounterWidget extends StatefulWidget {
  @override
  State<CounterWidget> createState() => _CounterWidgetState();
}

class _CounterWidgetState extends State<CounterWidget> {
    int _counter = 0;

  void _incrementCounter() {
    setState(() {
      _counter++;
    });
  }

  @override
  Widget build(BuildContext context) {
    return Text('$_counter');
  }
}
Whenever you mutate a State object
(for example, by incrementing the counter),
you must call setState to signal the framework
to update the user interface by
calling the State's build method again.
Separating state from widget objects lets other widgets treat both stateless and stateful widgets in exactly the same way, without being concerned about losing state. Instead of needing to hold on to a child to preserve its state, the parent can create a new instance of the child at any time without losing the child's persistent state. The framework does all the work of finding and reusing existing state objects when appropriate.
There’s more information about
StatefulWidget objects later in this
series, in the state management lesson.
Important widgets to know
#The Flutter SDK includes many built-in widgets,
from the smallest pieces of UI, like Text,
to layout widgets, and widgets that style
your application. The following widgets are
the most important to be aware of as you move onto the
next lesson in the learning pathway.
Next: Layouts
#This page is an introduction to foundational Flutter concepts, like widgets, and helps you become familiar with reading Flutter and Dart code. It's okay if you don't feel clear on every topic you encountered, as every page after this is a deep-dive on specific topics. In the next section, you'll start building more interesting UIs by creating more complex layouts in Flutter.
If you’d like practice with the information you learned on this page, you can read Building user interfaces with Flutter.
Feedback
#As this section of the website is evolving, we welcome your feedback!
除非另有说明,本文档之所提及适用于 Flutter 的最新稳定版本,本页面最后更新时间: 2024-09-16。 查看文档源码 或者 为本页面内容提出建议。