# 配置 iOS 开发
> 配置你的开发环境,以便在 iOS 设备上运行、构建和部署 Flutter 应用。
Learn how to set up your development environment
to run, build, and deploy Flutter apps for iOS devices.
学习如何设置你的开发环境,
以便在 iOS 设备上运行、构建和部署 Flutter 应用。
:::note
If you haven't set up Flutter already,
visit and follow [Install Flutter][] first.
如果你还没有设置 Flutter,
请先访问并按照 [安装 Flutter][Install Flutter] 进行操作。
If you've already installed Flutter,
ensure that it's [up to date][].
如果你已经安装了 Flutter,
请确保它是 [最新版本][up to date]。
:::
[Install Flutter]: /install
[up to date]: /install/upgrade
## Set up iOS tooling {: #set-up-tooling}
## 配置 iOS 工具 {: #set-up-tooling}
With Xcode, you can run Flutter apps on
an iOS physical device or on the iOS Simulator.
使用 Xcode,你可以在 iOS 物理设备或 iOS 模拟器上运行 Flutter 应用。
1. Install Xcode
安装 Xcode
If you haven't done so already,
[install and set up the latest version of Xcode][xcode].
如果你还没有安装 Xcode,
请先 [安装并设置最新版本的 Xcode][xcode]。
If you've already installed Xcode,
update it to the latest version using the
same installation method you used originally.
如果你已经安装了 Xcode,
请使用你最初使用的安装方法将其更新到最新版本。
1. Set up Xcode command-line tools
设置 Xcode 命令行工具
To configure the Xcode command-line tools to use
the version of Xcode you installed,
run the following command in your preferred terminal:
要配置 Xcode 命令行工具以使用
你安装的 Xcode 版本,
请在你喜欢的终端中运行以下命令:
```console
$ sudo sh -c 'xcode-select -s /Applications/Xcode.app/Contents/Developer && xcodebuild -runFirstLaunch'
```
If you downloaded Xcode elsewhere or need to use a different version,
replace `/Applications/Xcode.app` with the path to there instead.
如果你从其他地方下载了 Xcode 或需要使用其他版本,
请将 `/Applications/Xcode.app` 替换为该路径。
1. Agree to the Xcode licenses
同意 Xcode 许可协议
After you've set up Xcode and configured its command-line tools,
agree to the Xcode licenses.
在你设置 Xcode 并配置其命令行工具后,
请同意 Xcode 许可协议。
1. Open your preferred terminal.
打开你喜欢的终端。
1. Run the following command to review and sign the Xcode licenses.
运行以下命令以查看并签署 Xcode 许可协议。
```console
$ sudo xcodebuild -license
```
1. Read and agree to all necessary licenses.
阅读并同意所有必要的许可协议。
Before agreeing to the terms of each license,
read each with care.
在同意每个许可协议的条款之前,
请仔细阅读每个协议。
1. Download prerequisite tooling
下载必备工具
To download iOS platform support and
the latest iOS Simulator runtimes,
run the following command in your preferred terminal.
要下载 iOS 平台支持和
最新的 iOS 模拟器运行时,
请在你喜欢的终端中运行以下命令。
```console
$ xcodebuild -downloadPlatform iOS
```
1. Install CocoaPods
安装 CocoaPods
To support [Flutter plugins][] that use native iOS or macOS code,
install the latest version of [CocoaPods][].
为了支持使用原生 iOS 或 macOS 代码的 [Flutter 插件][Flutter plugins],
请安装最新版本的 [CocoaPods][]。
Install CocoaPods by following the
[CocoaPods installation guide][].
请按照 [CocoaPods 安装指南][CocoaPods installation guide]
安装 CocoaPods。
If you've already installed CocoaPods,
update it by following the [CocoaPods update guide][].
如果你已经安装了 CocoaPods,
请按照 [CocoaPods 更新指南][CocoaPods update guide] 进行更新。
{: .steps}
[xcode]: https://developer.apple.com/xcode/
[cocoapods]: https://guides.cocoapods.org/using/getting-started.html#installation
[Flutter plugins]: /packages-and-plugins/developing-packages#types
[CocoaPods installation guide]: https://guides.cocoapods.org/using/getting-started.html#installation
[CocoaPods update guide]: https://guides.cocoapods.org/using/getting-started.html#updating-cocoapods
## Set up an iOS device {: #set-up-devices}
## 设置 iOS 设备 {: #set-up-devices}
We recommend starting with the iOS Simulator as
it's easier to get set up than a physical iOS device.
However, you should also test your app on an actual
physical device.
我们建议从 iOS 模拟器开始,因为它比物理 iOS 设备更容易设置。
但是,你也应该在实际的物理设备上测试你的应用。
Start the iOS Simulator with the following command:
使用以下命令启动 iOS 模拟器:
```console
$ open -a Simulator
```
If you need to install a simulator for a different OS version,
check out [Downloading and installing additional Xcode components][]
on the Apple Developer site.
如果你需要为不同的操作系统版本安装模拟器,
请查看 Apple Developer 网站上的 [下载和安装其他 Xcode 组件][Downloading and installing additional Xcode components]。
[Downloading and installing additional Xcode components]: https://developer.apple.com/documentation/xcode/downloading-and-installing-additional-xcode-components
[Flutter on latest iOS]: /platform-integration/ios/ios-latest
Set up each iOS device on which you want to test.
设置每台需要测试的 iOS 设备。
1. Configure your physical iOS device
配置你的物理 iOS 设备
1. Attach your iOS device to the USB port on your Mac.
将你的 iOS 设备连接到 Mac 上的 USB 端口。
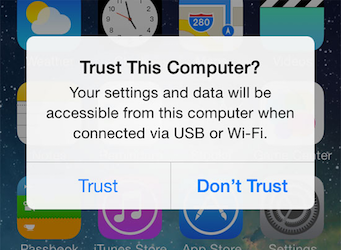
1. On first connecting an iOS device to your Mac,
your device displays the **Trust this computer?** dialog.
首次将 iOS 设备连接到 Mac 时,
你的设备会显示 **信任此电脑?** 对话框。
1. Click **Trust**.
点击 **信任**。
1. Configure your physical iOS device
配置你的物理 iOS 设备
Apple requires enabling **[Developer Mode][]**
on the device to protect against malicious software.
Apple 要求在设备上启用 **[开发者模式][Developer Mode]**
以防止恶意软件。
:::note
If the **Developer Mode** option is not visible
under **Settings > Privacy & Security**, connect the device
to your Mac, unlock it, and trust the computer.
Open Xcode (or run `flutter run`) to initiate device configuration,
which makes the option appear.
如果在 **设置 > 隐私与安全** 中未显示 **开发者模式** 选项,
请将设备连接到 Mac,解锁设备并信任该电脑。
打开 Xcode(或者运行 `flutter run`)来启动设备配置,
该选项随即会出现。
:::
1. Tap on **Settings** >
**Privacy & Security** >
**Developer Mode**.
点击 **设置** >
**隐私与安全性** >
**开发者模式**。
1. Tap to toggle **Developer Mode** to **On**.
点击以将 **开发者模式** 切换为 **开启**。
1. Restart the device.
重启设备。
1. When the **Turn on Developer Mode?** dialog appears,
tap **Turn On**.
当出现 **打开开发者模式?** 对话框时,
点击 **打开**。
1. Create a developer code signing certificate
创建开发者代码签名证书
To send your app to a physical iOS device,
_even_ for testing, you must establish trust
between your Mac and the device.
In addition to trusting the device when that
popup appears, you must upload a signed
developer certificate to your device.
要将你的应用发送到物理 iOS 设备,
**即使** 是为了测试,你也必须建立
你的 Mac 和设备之间的信任关系。
除了在弹出窗口出现时信任设备之外,
你还必须将签名的
开发者证书上传到你的设备。
To create a signed development certificate,
you need an Apple ID.
If you don't have one, [create one][apple-account-new].
You must also enroll in the [Apple Developer program][]
and create an [Apple Developer account][].
If you're just _testing_ your app on an iOS device,
a personal Apple Developer account is free and works.
要创建签名的开发证书,
你需要一个 Apple ID。
如果你没有,[创建一个][apple-account-new]。
你还必须注册 [Apple Developer program][] 并创建一个 [Apple Developer account][]。
如果你只是在 iOS 设备上 **测试** 你的应用,
个人 Apple Developer 帐户是免费的并且可以使用。
:::note Apple Developer program
When you want to _deploy_ your app to the App Store,
you'll need to upgrade your personal Apple Developer account to
a professional account.
当你想要将你的应用 **部署** 到 App Store 时,
你需要将你的个人 Apple Developer 帐户升级到
专业帐户。
:::
1. Prepare the device
准备设备
1. Find the **VPN & Device Management** menu under **Settings**.
在 **设置** 下找到 **VPN 与设备管理** 菜单。
Toggle your certificate to **Enable**.
将你的证书切换为 **启用**。
:::note
If you can't find the **VPN & Device Management** menu,
run your app on your iOS device once, then try again.
如果你找不到 **VPN 与设备管理** 菜单,
请在你的 iOS 设备上运行你的应用一次,然后重试。
:::
1. Under the **Developer App** heading,
you should find your certificate.
在 **开发者应用** 标题下,
你应该能找到你的证书。
1. Tap the certificate.
点击证书。
1. Tap **Trust "<certificate>"**.
点击 **信任 "<证书>"**。
1. When the dialog displays, tap **Trust**.
当对话框显示时,点击 **信任**。
If the **codesign wants to access key...** dialog appears:
如果出现 **codesign 想要访问密钥...** 对话框:
1. Enter your macOS password.
输入你的 macOS 密码。
1. Tap **Always Allow**.
点击 **始终允许**。
{: .steps}
[apple-account-new]: https://support.apple.com/en-us/108647
[Developer Mode]: https://developer.apple.com/documentation/xcode/enabling-developer-mode-on-a-device
[Apple Developer program]: https://developer.apple.com/programs/
[Apple Developer account]: https://developer.apple.com/account
---
## Start developing for iOS {: #start-developing}
## 开始为 iOS 开发 {: #start-developing}
**Congratulations.**
Now that you've set up iOS development for Flutter,
you can continue your Flutter learning journey while testing on iOS
or begin improving integration with iOS.
**恭喜你。**
既然你已经为 Flutter 设置了 iOS 开发,
你就可以在 iOS 上进行测试的同时继续你的 Flutter 学习之旅,
或者开始改进与 iOS 的集成。