# 添加 iOS App Extension
> 了解如何向 Flutter 应用添加 App Extension
This guide shows you how to use iOS app extensions with a
Flutter app.
本指南介绍如何在你的 Flutter 应用中使用 iOS App Extension。
## Overview {: #overview}
## 概述 {: #overview}
[iOS app extensions][] allow you to expand functionality
outside of your iOS app. Your app could appear as a home screen widget,
or you can make portions of your app available within other apps.
[iOS app extensions][] 让你能在 iOS 应用之外扩展功能。
你的应用可以显示为主屏幕 widget,也可以让应用的部分功能在其他应用中可用。
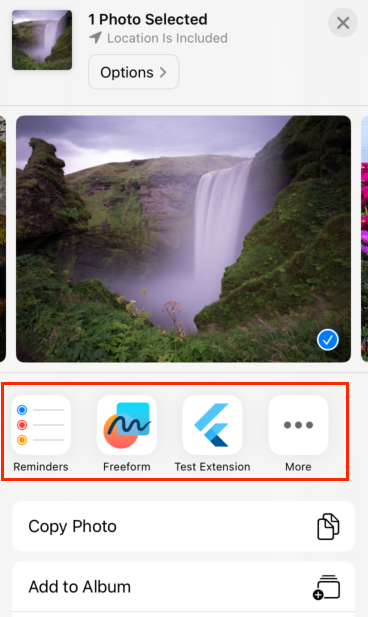
In the following example, when a user selects a
photo to share in the iOS Photo app, a Flutter app called
`Example App With Extension` is displayed in the
Photo apps share sheet:
在下面的示例中,当用户在 iOS「照片」应用中选择要分享的照片时,
名为 `Example App With Extension` 的 Flutter 应用会出现在照片应用的分享表单中:
[iOS app extensions]: https://developer.apple.com/app-extensions/
## Add an iOS app extension to your Flutter app {: #add-extension}
## 向 Flutter 应用添加 iOS App Extension {: #add-extension}
If you want to integrate your Flutter app with
the iOS operating system, you can add iOS app extensions
to your Flutter project. For a seamless workflow, the
following steps show how to add a [Share][]
app extension to a new Flutter app called
`example_app_with_extension`, but you can always start with
an existing project.
若要将 Flutter 应用与 iOS 操作系统集成,可以向 Flutter 项目添加 iOS App Extension。
为便于操作,以下步骤演示如何向名为 `example_app_with_extension` 的新 Flutter 应用添加 [Share][] App Extension;
你也可以从现有项目开始。
1. In the console, create a new Flutter project called
`example_app_with_extension`.
在控制台中,创建一个名为 `example_app_with_extension` 的新 Flutter 项目。
```console
$ flutter create example_app_with_extension
```
1. In the console, open the Xcode workspace for the
`example_app_with_extension` project.
在控制台中,打开 `example_app_with_extension` 项目的 Xcode 工作区。
```console
$ cd example_app_with_extension && open ios/Runner.xcworkspace
```
1. In Xcode, add an app extension called `Share`
and call it `ShareExtension`.
在 Xcode 中,添加名为 `Share` 的 App Extension,并将其命名为 `ShareExtension`。
* In the Xcode menu bar, select
**File** > **New** > **Target**.
在 Xcode 菜单栏中,选择 **File** > **New** > **Target**。
* Add **Share Extension**.
添加 **Share Extension**。
* In the **Name field**, enter **ShareExtension**.
在 **Name** 字段中输入 **ShareExtension**。
* Click **Finish**.
点击 **Finish**。
* In the **Activate … Scheme** dialog box that
appears, select **Activate**.
在出现的 **Activate … Scheme** 对话框中,选择 **Activate**。
1. In Xcode, change the order of the build process.
在 Xcode 中,调整构建过程的顺序。
* Open the **project navigator**
(**View** > **Navigators** > **Project**).
打开 **项目导航器**(**View** > **Navigators** > **Project**)。
* In the **project navigator**, at the top, select
**Runner**.
在 **项目导航器** 顶部,选择 **Runner**。
* In the main window under **TARGETS**, select
**Runner**.
在主窗口的 **TARGETS** 下,选择 **Runner**。
* Open the **Build Phases** tab.
打开 **Build Phases** 标签页。
* Drag **Embed Foundation Extensions** above
**Run Script**.
将 **Embed Foundation Extensions** 拖到 **Run Script** 上方。
1. Make sure your **Minimum Deployments** iOS value is properly
set and matches in both **Runner** and **ShareExtension**
确保 **Runner** 与 **ShareExtension** 的 **Minimum Deployments** iOS 值已正确设置且一致
* Open the **project navigator**
(**View** > **Navigators** > **Project**).
打开 **项目导航器**(**View** > **Navigators** > **Project**)。
* In the **project navigator**, at the top, select
**Runner**.
在 **项目导航器** 顶部,选择 **Runner**。
* In the main window under **TARGETS**, select
**Runner**.
在主窗口的 **TARGETS** 下,选择 **Runner**。
* On the **General** tab check your **Minimum Deployments**
dropdown value to match the one you have on
**ShareExtension** > **General** tab.
在 **General** 标签页中,
检查 **Minimum Deployments** 下拉值是否与 **ShareExtension** > **General** 标签页中的值一致。
1. In the console, run the following command to rebuild your
iOS app:
在控制台中,运行以下命令以重新构建 iOS 应用:
```console
$ flutter build ios --config-only
```
1. [Test your app with the simulator][].
[使用模拟器测试应用][Test your app with the simulator]。
When you add a new app extension, Xcode generates
sample code based on the template you selected. For more
information about the generated code and WidgetKit, see
[Apple's app extension documentation][].
添加新的 App Extension 时,Xcode 会根据所选模板生成示例代码。
有关生成代码与 WidgetKit 的更多信息,请参阅 [Apple 的 App Extension 文档][Apple's app extension documentation]。
[Apple's app extension documentation]: https://developer.apple.com/app-extensions/
[Test your app with the simulator]: #test-extensions
[Share]: https://developer.apple.com/library/archive/documentation/General/Conceptual/ExtensibilityPG/Share.html
## Test an iOS app extension {: #test-extensions}
## 测试 iOS App Extension {: #test-extensions}
After you've added an app extension to your Flutter project,
you can test it, using a simulator or physical device.
If you are testing you extension in debug mode, you must
use the iOS simulator.
向 Flutter 项目添加 App Extension 后,可使用模拟器或真机进行测试。
若在 debug 模式下测试扩展,必须使用 iOS 模拟器。
The following steps assume you're using the sample
application and Share extension from
[Adding iOS app extensions][].
以下步骤假定你使用的是 [添加 iOS App Extension][Adding iOS app extensions] 中的示例应用与 Share 扩展。
1. In Xcode, [add an app extension to your project][].
在 Xcode 中,[向项目添加 App Extension][add an app extension to your project]。
1. In the console, use the following command to run your
iOS app:
在控制台中,使用以下命令运行 iOS 应用:
```console
$ flutter run
```
1. In the simulator, test your app extension.
在模拟器中测试 App Extension。
* Launch an app that supports the Share extension,
such as the Photos app.
启动支持 Share 扩展的应用(例如「照片」应用)。
* Select a photo, tap the share button, then tap
on the share extension icon of your app.
选择一张照片,点按分享按钮,再点按你应用的分享扩展图标。
1. Add an app extension to your project.
向项目添加 App Extension。
1. In the console, run your Flutter app in release mode:
在控制台中,以 release 模式运行 Flutter 应用:
```console
$ flutter run --release
```
1. On your device, test your app extension.
在设备上测试 App Extension。
* Launch an app that supports the Share extension,
such as the Photos app.
启动支持 Share 扩展的应用(例如「照片」应用)。
* Select a photo, tap the share button, then tap on
the share extension icon of your app.
选择一张照片,点按分享按钮,再点按你应用的分享扩展图标。
[Adding iOS app extensions]: #add-extension
[add an app extension to your project]: #add-extension
## Additional ways to interact with iOS app extensions {: #interact-app-extensions}
## 与 iOS App Extension 交互的其他方式 {: #interact-app-extensions}
Flutter apps interact with iOS app extensions using the same
techniques as UIKit or SwiftUI apps.
The containing app and the app extension don't communicate directly.
The containing app might not be running while the device user
interacts with the extension.
The app and your extension can read and write to
shared resources or use higher-level APIs
to communicate with each other.
Flutter 应用与 iOS App Extension 的交互方式与 UIKit 或 SwiftUI 应用相同。
宿主应用与 App Extension 不直接通信;
用户在设备上与扩展交互时,宿主应用可能并未运行。
应用与扩展可通过读写共享资源或使用更高级 API 相互通信。
### Use higher-level APIs {: #using-higher-level-apis}
### 使用更高级的 API {: #using-higher-level-apis}
Some extensions have APIs. For example,
the [Core Spotlight][] framework indexes your app,
allowing users to search from Spotlight and Safari.
The [WidgetKit][] framework can trigger an update
of your home screen widget.
部分扩展提供 API。例如,[Core Spotlight][] 框架会为你的应用建立索引,
使用户可从 Spotlight 和 Safari 搜索;[WidgetKit][] 框架可触发主屏幕 widget 的更新。
To simplify how your app communicates with extensions,
Flutter plugins wrap these APIs.
To find plugins that wrap extension APIs,
check out [Leveraging Apple's System APIs and Frameworks][leverage]
or search [pub.dev][].
为简化应用与扩展的通信,Flutter 插件封装了这些 API。
要查找封装扩展 API 的插件,请参阅 [利用 Apple 系统 API 与框架][leverage],
或在 [pub.dev][] 上搜索。
[Core Spotlight]: https://developer.apple.com/documentation/corespotlight
[leverage]: /platform-integration/ios/apple-frameworks
[pub.dev]: https://pub-web.flutter-io.cn/packages
[WidgetKit]: https://developer.apple.com/documentation/widgetkit
### Share resources {: #sharing-resources}
### 共享资源 {: #sharing-resources}
To share resources between your Flutter app
and your app extension, put the `Runner` app target
and the extension target in the same [App Group][].
要在 Flutter 应用与 App Extension 之间共享资源,
将 `Runner` 应用 target 与扩展 target 置于同一 [App Group][] 中。
:::note
You must be signed in to your Apple Developer account.
你必须登录 Apple Developer 账户。
:::
To add a target to an App Group:
要将 target 添加到 App Group:
1. Open the target settings in Xcode.
在 Xcode 中打开 target 设置。
1. Navigate to the **Signing & Capabilities** tab.
进入 **Signing & Capabilities** 标签页。
1. Select **+ Capability** then **App Groups**.
选择 **+ Capability**,然后选择 **App Groups**。
1. Choose which App Group you want to add the target from
one of two options:
从以下两种方式之一选择要添加 target 的 App Group:
{: type="a"}
1. Select an App Group from the list.
从列表中选择一个 App Group。
1. Click **+** to add a new App Group.
点击 **+** 添加新的 App Group。
When two targets belong to the same App Group,
they can read from and write to the same source.
Choose one of the following sources for your data.
当两个 target 属于同一 App Group 时,它们可读写同一数据源。
请为数据选择以下数据源之一:
* **Key/value:** Use the [`shared_preference_app_group`][]
plugin to read or write to `UserDefaults` within the same App Group.
**键值对:** 使用 [`shared_preference_app_group`][] 插件在同一 App Group 内读写 `UserDefaults`。
* **File:** Use the App Group container path from the
[`path_provider`][] plugin to [read and write files][].
**文件:** 使用 [`path_provider`][] 插件获取 App Group 容器路径,以 [读写文件][read and write files]。
* **Database:** Use the App Group container path from
the [`path_provider`][] plugin to create a database with the
[`sqflite`][] plugin.
**数据库:** 使用 [`path_provider`][] 插件获取 App Group 容器路径,
并用 [`sqflite`][] 插件创建数据库。
[App Group]: https://developer.apple.com/documentation/xcode/configuring-app-groups
[`path_provider`]: https://pub-web.flutter-io.cn/packages/path_provider
[read and write files]: /cookbook/persistence/reading-writing-files
[`shared_preference_app_group`]: https://pub-web.flutter-io.cn/packages/shared_preference_app_group
[`sqflite`]: https://pub-web.flutter-io.cn/packages/sqflite
### Schedule background updates {: #background-updates}
### 安排后台更新 {: #background-updates}
Background tasks provide a means to update your extension
through code regardless of the status of your app.
后台任务让你能在应用处于任何状态时通过代码更新扩展。
To schedule background work from your Flutter app,
use the [`workmanager`][] plugin.
要从 Flutter 应用安排后台工作,请使用 [`workmanager`][] 插件。
[`workmanager`]: https://pub-web.flutter-io.cn/packages/workmanager
### Add deep linking {: #deep-linking}
### 添加深层链接 {: #deep-linking}
You might want to direct users from an
app extension to a specific page in your Flutter app.
To open a specific route in your app,
you can use [Deep Linking][].
你可能希望将用户从 App Extension 引导至 Flutter 应用中的特定页面。
要在应用中打开特定路由,可使用 [深层链接][Deep Linking]。
[Deep Linking]:/ui/navigation/deep-linking
### Add a scrollable list {: #advanced-scrolling-behavior}
### 添加可滚动列表 {: #advanced-scrolling-behavior}
By default, flutter view does not handle scroll gestures
in a [Share][] extension. To support a scrollable list in
the Share extension, follow [the instructions on GitHub][issue-164670].
默认情况下,[Share][] 扩展中的 Flutter 视图不处理滚动手势。
若要在 Share 扩展中支持可滚动列表,请按 [GitHub 上的说明][issue-164670] 操作。
[Share]: https://developer.apple.com/library/archive/documentation/General/Conceptual/ExtensibilityPG/Share.html
[issue-164670]: https://github.com/flutter/flutter/issues/164670#issuecomment-2762124121
### Open a Flutter app in an iOS app extension {: #creating-app-extension-uis-with-flutter}
### 在 iOS App Extension 中打开 Flutter 应用 {: #creating-app-extension-uis-with-flutter}
You can open your Flutter app directly
in some iOS app extensions, such as the
[Share][] extension, with a `FlutterViewController`.
你可以通过 `FlutterViewController` 在某些 iOS App Extension(例如 [Share][] 扩展)中直接打开 Flutter 应用。
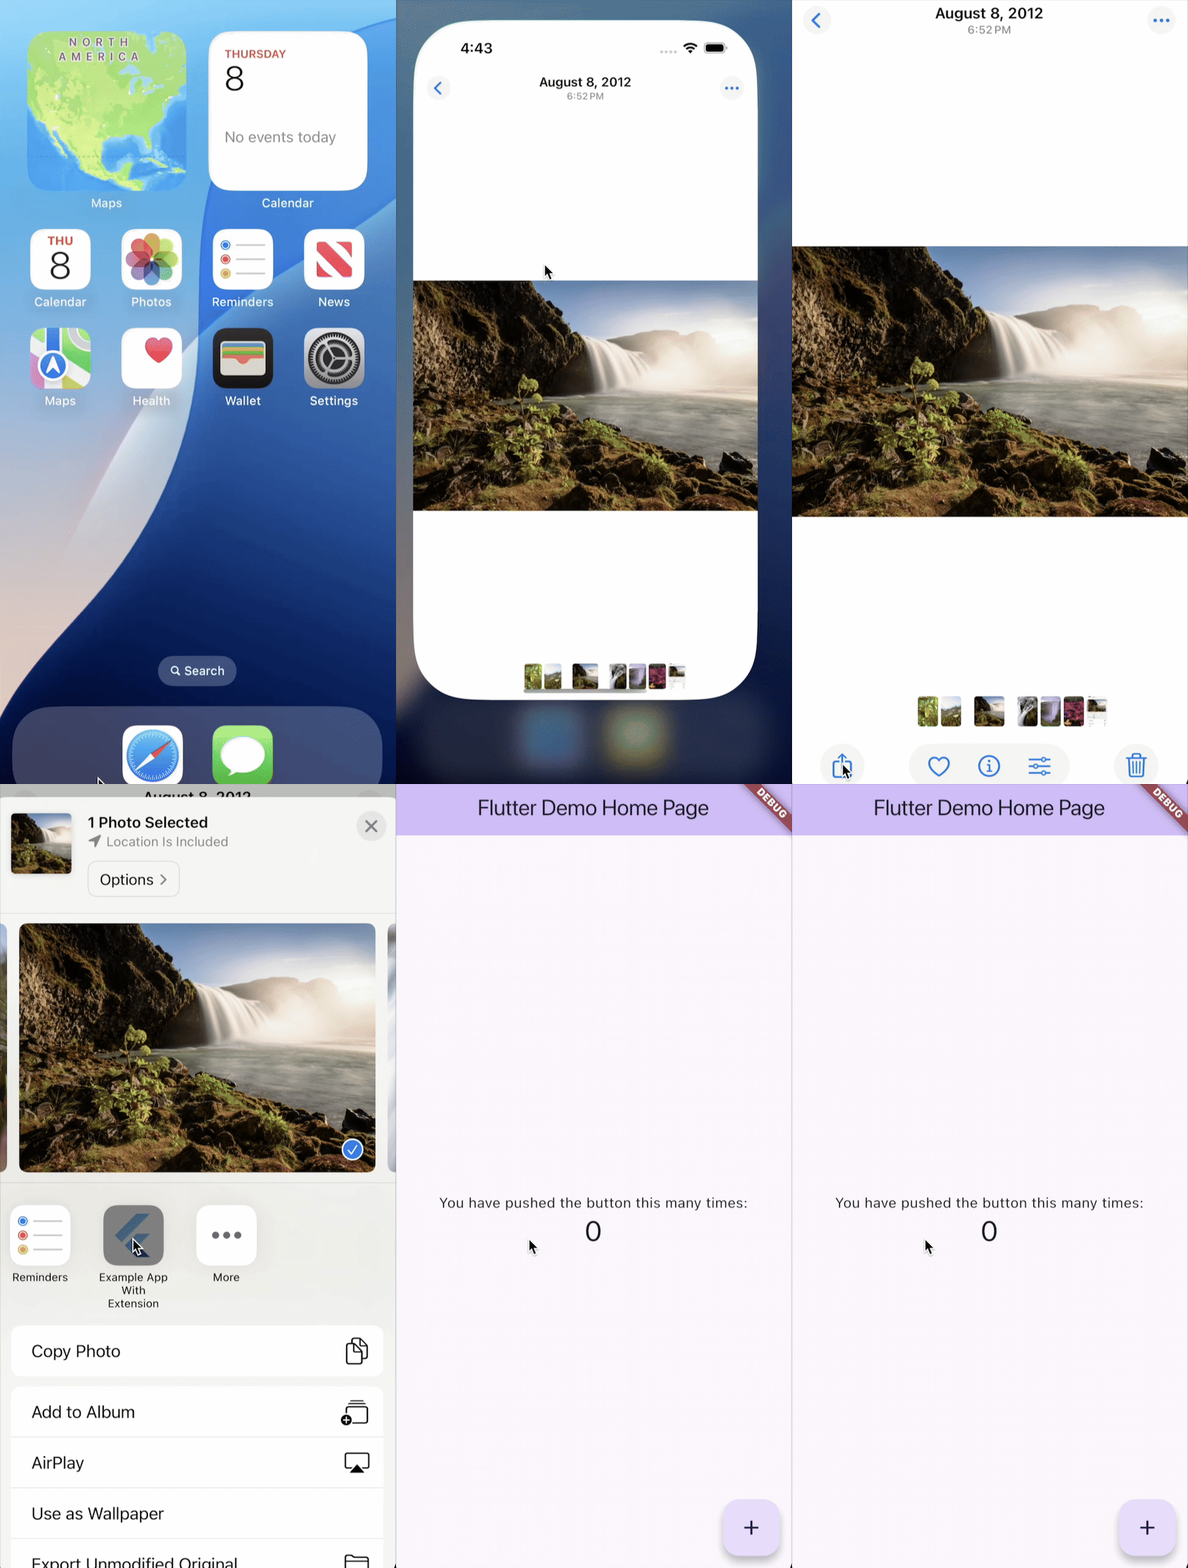
In the following example, a Flutter app called
`Example App With Extension` is opened in the
Share extension, which lets users share content
between apps:
在下面的示例中,名为 `Example App With Extension` 的 Flutter 应用在 Share 扩展中打开,
用户可在应用间分享内容:
Use the following steps to display a Flutter app inside of
a [Share][] app extension. In this example the app extension
scheme is called `ShareExtension`, the Flutter app scheme is
called `Runner`, and the Flutter app is called
`Example App With Extension`:
按以下步骤在 [Share][] App Extension 中显示 Flutter 应用。本示例中,
App Extension 的 scheme 为 `ShareExtension`,
Flutter 应用的 scheme 为 `Runner`,应用名为 `Example App With Extension`:
1. [Add an extension to your Flutter app][] if you haven't
already done so.
若尚未添加,请先 [向 Flutter 应用添加扩展][Add an extension to your Flutter app]。
1. In the console, navigate to your Flutter project
directory and then open your project in Xcode
with the following command:
在控制台中,进入 Flutter 项目目录,然后用以下命令在 Xcode 中打开项目:
```console
open ios/Runner.xcworkspace
```
1. In Xcode, disable user script sandboxing.
在 Xcode 中,禁用用户脚本沙盒(User Script Sandboxing)。
* Open the **project navigator**
(**View** > **Navigators** > **Project**).
打开 **项目导航器**(**View** > **Navigators** > **Project**)。
* In the main window under **TARGETS**, select
**ShareExtension**.
在主窗口的 **TARGETS** 下,选择 **ShareExtension**。
* Open the **Build Settings** tab.
打开 **Build Settings** 标签页。
* Navigate to **Build Options**.
找到 **Build Options**。
* Set **User Script Sandboxing** as **No**.
将 **User Script Sandboxing** 设为 **No**。
1. In Xcode, add the pre-action to the
`ShareExtension` scheme.
在 Xcode 中,为 `ShareExtension` scheme 添加预操作 (pre-action)。
* Open the **Manage Schemes** window
(**Product** > **Scheme** > **Manage Schemes**).
打开 **Manage Schemes** 窗口(**Product** > **Scheme** > **Manage Schemes**)。
* Select the **ShareExtension** scheme and edit it.
选择 **ShareExtension** scheme 并编辑。
* Expand the **Build** tab.
展开 **Build** 标签页。
* Select **Pre-actions**.
选择 **Pre-actions**。
* Click **+** and select **New Run Script Action**.
点击 **+**,选择 **New Run Script Action**。
* In the **Provide build settings from**
drop-down list, select **ShareExtension**.
在 **Provide build settings from** 下拉列表中选择 **ShareExtension**。
* In the **Shell** text field, enter:
在 **Shell** 文本框中输入:
```console
/bin/sh "$FLUTTER_ROOT/packages/flutter_tools/bin/xcode_backend.sh" prepare
```
* Click **Close**.
点击 **Close**。
1. In Xcode, share the build configurations.
在 Xcode 中,共享构建配置。
* Open the **project navigator**
(**View** > **Navigators** > **Project**).
打开 **项目导航器**(**View** > **Navigators** > **Project**)。
* In the main window under **PROJECT**, select
**Runner**.
在主窗口的 **PROJECT** 下,选择 **Runner**。
* Open the **Info** tab.
打开 **Info** 标签页。
* Expand **Configuration**.
展开 **Configuration**。
* Expand **Debug** and update the value for
**ShareExtension** to match the value for
**Runner**.
展开 **Debug**,将 **ShareExtension** 的值更新为与 **Runner** 一致。
* Repeat the previous step for **Profile**, and
**Release**.
对 **Profile** 和 **Release** 重复上一步。
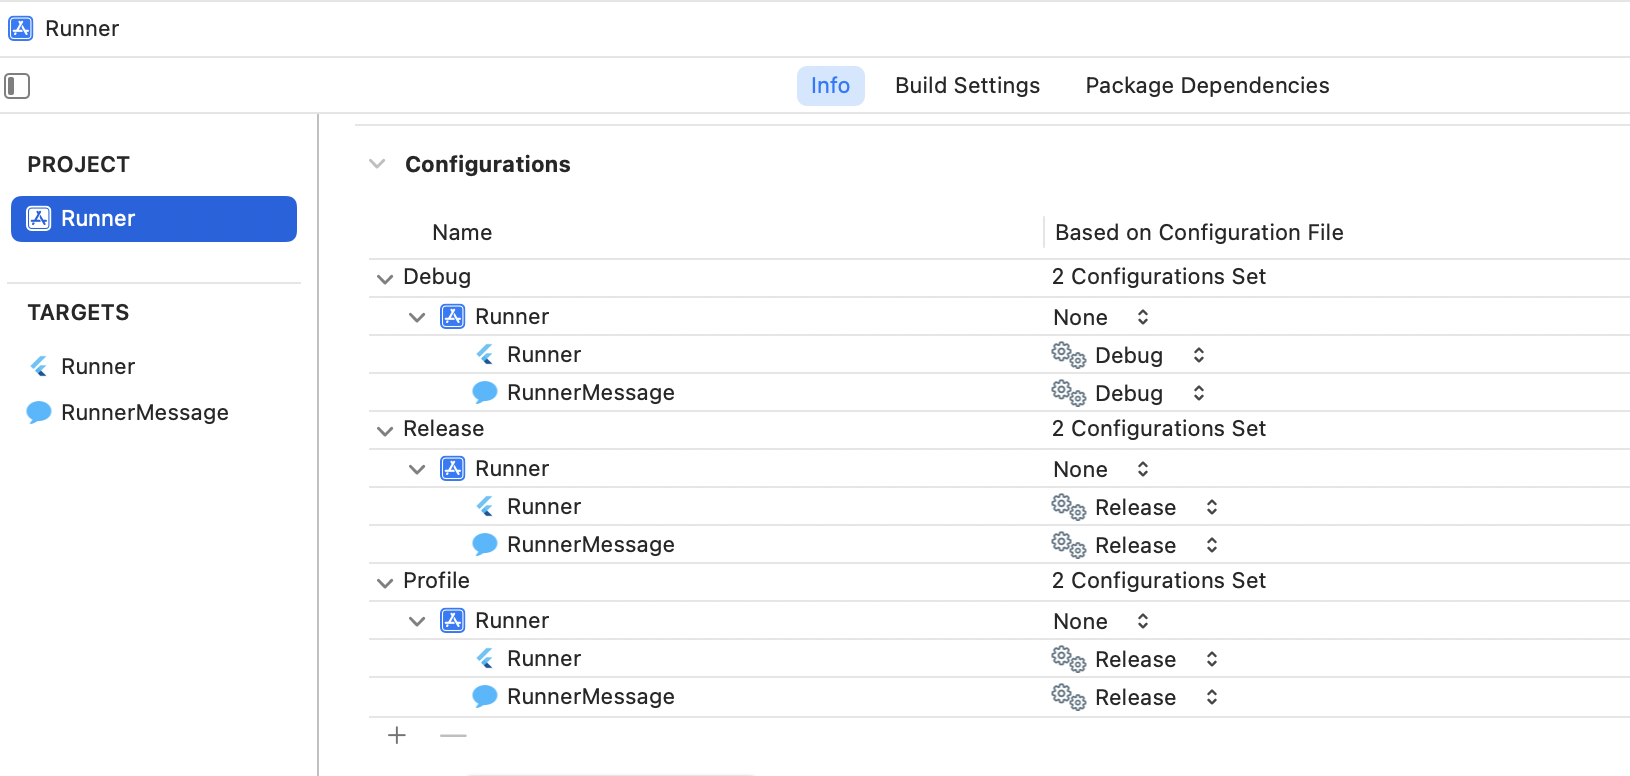
* When you are finished, make sure that the
configurations look similar to the following:
完成后,确认配置与下图类似:
1. (Optional) In Xcode, replace any storyboard files with
an extension class, if needed.
(可选)如有需要,在 Xcode 中用扩展类替换 storyboard 文件。
* Open the **project navigator**
(**View** > **Navigators** > **Project**).
打开 **项目导航器**(**View** > **Navigators** > **Project**)。
* Select **Runner** > **ShareExtension** > **Info**.
选择 **Runner** > **ShareExtension** > **Info**。
* Expand **Information Property List**.
展开 **Information Property List**。
* Delete the **NSExtensionMainStoryboard** key.
删除 **NSExtensionMainStoryboard** 键。
* Add the **NSExtensionPrincipalClass** key.
添加 **NSExtensionPrincipalClass** 键。
* Add one of these values for the
`NSExtensionPrincipalClass` key:
为 `NSExtensionPrincipalClass` 键添加以下值之一:
* (Swift) **ShareExtension.ShareViewController**
* (Objective-C) **ShareViewController**
1. In Xcode, update the `ShareViewController` to use the
`FlutterViewController`.
在 Xcode 中,将 `ShareViewController` 更新为使用 `FlutterViewController`。
* Open the **project navigator**
(**View** > **Navigators** > **Project**).
打开 **project navigator**(**View** > **Navigators** > **Project**)。
* Select **Runner** > **ShareExtension** > **ShareViewController**.
选择 **Runner** > **ShareExtension** > **ShareViewController**。
* Update `ShareViewController` to use the
`FlutterViewController` class:
将 `ShareViewController` 更新为使用 `FlutterViewController` 类:
```swift title="ShareViewController.swift"
import UIKit
import Flutter
class ShareViewController: UIViewController {
override func viewDidLoad() {
super.viewDidLoad()
showFlutter()
}
func showFlutter() {
let flutterEngine = FlutterEngine(name: "my flutter engine")
flutterEngine.run()
let flutterViewController = FlutterViewController(engine: flutterEngine, nibName: nil, bundle: nil)
addChild(flutterViewController)
view.addSubview(flutterViewController.view)
flutterViewController.view.frame = view.bounds
}
override func viewDidDisappear(_ animated: Bool) {
super.viewDidDisappear(animated)
self.extensionContext?.cancelRequest(
withError: NSError(domain: Bundle.main.bundleIdentifier!, code: 0))
}
}
```
```objc title="ShareViewController.h"
@import Flutter;
@import UIKit;
@interface ShareViewController : UIViewController
@end
```
```objc title="ShareViewController.m"
#import "ShareViewController.h"
@import Flutter;
@implementation ShareViewController
- (void)viewDidLoad {
[super viewDidLoad];
[self showFlutter];
}
- (void)showFlutter {
FlutterEngine *flutterEngine = [[FlutterEngine alloc] initWithName:@"my flutter engine"];
[flutterEngine run];
FlutterViewController *flutterViewController =
[[FlutterViewController alloc] initWithEngine:flutterEngine nibName:nil bundle:nil];
[self addChildViewController:flutterViewController];
[self.view addSubview:flutterViewController.view];
flutterViewController.view.frame = self.view.bounds;
}
- (void)viewDidDisappear:(BOOL)animated {
[super viewDidDisappear:animated];
[self.extensionContext cancelRequestWithError:[NSError errorWithDomain:NSBundle.mainBundle.bundleIdentifier code:0 userInfo:nil]];
}
@end
```
8. [Test your app with the simulator][].
8. [使用模拟器测试应用][Test your app with the simulator]。
[Add an extension to your Flutter app]: #add-extension
[Share]: https://developer.apple.com/library/archive/documentation/General/Conceptual/ExtensibilityPG/Share.html
[Test your app with the simulator]: #test-extensions
### Register plugins
### 注册插件
Use the following steps to register plugins for
an app extension. In this example, the app extension
scheme is called `ShareExtension`, the Flutter app scheme is
called `Runner`, and the Flutter app is called
`Example App With Extension`:
按以下步骤为 App Extension 注册插件。
本示例中,App Extension 的 scheme 为 `ShareExtension`,
Flutter 应用的 scheme 为 `Runner`,应用名为 `Example App With Extension`:
1. [Add an extension to your Flutter app][] if you haven't
already done so.
若尚未添加,请先 [向 Flutter 应用添加扩展][Add an extension to your Flutter app]。
1. In Xcode, add `GeneratedPluginRegistrant.m` to the
app extension target.
在 Xcode 中,将 `GeneratedPluginRegistrant.m` 添加到 App Extension target。
* Open the **project navigator**
(**View** > **Navigators** > **Project**).
打开 **project navigator**(**View** > **Navigators** > **Project**)。
* In the main window under **TARGETS**, select
**ShareExtension**.
在主窗口的 **TARGETS** 下,选择 **ShareExtension**。
* Open the **Build Phases** tab.
打开 **Build Phases** 标签页。
* Expand **Compile Sources**.
展开 **Compile Sources**。
* Click **+**.
点击 **+**。
* From the list in the
_Choose item to add_ dialog box, select
**GeneratedPluginRegistrant.m**.
在 **Choose item to add** 对话框的列表中选择 **GeneratedPluginRegistrant.m**。
* Click **Add**.
点击 **Add**。
1. (Swift only) In Xcode, update the
`SWIFT_OBJC_BRIDGING_HEADER` build setting.
(仅 Swift)在 Xcode 中,更新 `SWIFT_OBJC_BRIDGING_HEADER` 构建设置。
* Open the **project navigator**
(**View** > **Navigators** > **Project**).
打开 **项目导航器**(**View** > **Navigators** > **Project**)。
* In the main window under **TARGETS**, select
**ShareExtension**.
在主窗口的 **TARGETS** 下,选择 **ShareExtension**。
* Open the **Build Settings** tab.
打开 **Build Settings** 标签页。
* Select the **All** filter.
选择 **All** 筛选器。
* Navigate to **Swift Compiler - General** and change
the value for the **Objective-C Bridging Header**
key to **Runner/Runner-Bridging-Header.h**.
找到 **Swift Compiler - General**,将 **Objective-C Bridging Header** 的值改为 **Runner/Runner-Bridging-Header.h**。
1. In Xcode, update the code for `ShareViewController`
to register `GeneratedPluginRegistrant.h`.
在 Xcode 中,更新 `ShareViewController` 代码以注册 `GeneratedPluginRegistrant.h`。
* Open the **project navigator**
(**View** > **Navigators** > **Project**).
打开 **项目导航器**(**View** > **Navigators** > **Project**)。
* Select **Runner** > **ShareExtension** > **ShareViewController**.
选择 **Runner** > **ShareExtension** > **ShareViewController**。
* Update the `ShareViewController` file to use the
`GeneratedPluginRegistrant.h`:
更新 `ShareViewController` 文件以使用 `GeneratedPluginRegistrant.h`:
```swift title="ShareViewController.swift"
// Add this inside `showFlutter()` at the top
GeneratedPluginRegistrant.register(with: flutterEngine)
```
```objc title="ShareViewController.m"
// Add this import at the top
#import "GeneratedPluginRegistrant.h"
```
```objc title="ShareViewController.m"
// Add this after [flutterEngine run]
[GeneratedPluginRegistrant registerWithRegistry:flutterEngine];
```
5. (Xcode) [Test your app with the simulator][].
5. (Xcode) [使用模拟器测试应用][Test your app with the simulator]。
[Add an extension to your Flutter app]: #add-extension
[Share]: https://developer.apple.com/library/archive/documentation/General/Conceptual/ExtensibilityPG/Share.html
[Test your app with the simulator]: #test-extensions
## Constraints {: #constraints}
## 限制 {: #constraints}
* You must use an iOS simulator to test your extension in
debug mode.
在 debug 模式下测试扩展时,必须使用 iOS 模拟器。
* Flutter doesn't fully support running app extensions in
debug mode on physical devices when used to build
extension UIs because a physical device might run out of
memory.
在真机上以 debug 模式构建扩展 UI 时,Flutter 对 App Extension 的支持并不完整,因为真机可能内存不足。
* iOS app extensions have limited memory.
It is advisable to only modify an app extension's UI
if the app extension supports at least 100MB of memory.
iOS App Extension 内存有限。建议仅在扩展至少支持 100MB 内存时才修改其 UI。
## Call Dart code / render Flutter content in iOS app extensions
## 在 iOS App Extension 中调用 Dart 代码 / 渲染 Flutter 内容
The [home_widget][] package provides a large amount of functionality,
which includes allowing the following:
[home_widget][] 插件提供大量功能,包括:
* [Respond to user input][] in app extensions
using Dart Code.
在 App Extension 中用 Dart 代码 [响应用户输入][Respond to user input]。
* [Render Flutter widgets][] in an app extension as an image.
在 App Extension 中将 [Flutter widget 渲染][Render Flutter widgets] 为图像。
* [Save and retrieve data][] from `UserDefaults` on iOS.
在 iOS 上从 `UserDefaults` [保存和读取数据][Save and retrieve data]。
## Other resources {: #other-resources}
## 其他资源 {: #other-resources}
For step-by-step instruction for using app
extensions with your Flutter iOS app, check out the
[Adding a Home Screen Widget to your Flutter app][lab]
codelab.
要在 Flutter iOS 应用中使用 App Extension,请参阅 Codelab [向 Flutter 应用添加主屏幕 Widget][lab]。
To learn more about the various ways you can add a
Flutter Screen to an iOS app, see
[Adding a Flutter Screen to an iOS app][].
要了解将 Flutter 界面添加到 iOS 应用的各种方式,
请参阅 [向 iOS 应用添加 Flutter 界面][Adding a Flutter Screen to an iOS app]。
[Adding a Flutter Screen to an iOS app]: /add-to-app/ios/add-flutter-screen
[lab]: https://codelabs.developers.google.cn/flutter-home-screen-widgets
[home_widget]: https://pub.dev/packages/home_widget
[Save and retrieve data]: https://docs.page/abausg/home_widget/usage/sync-data
[Render Flutter widgets]: https://docs.page/abausg/home_widget/features/render-flutter-widgets
[Respond to user input]: https://docs.page/abausg/home_widget/features/interactive-widgets