# 面向插件作者的 Swift Package Manager
> 如何为 iOS 和 macOS 插件添加 Swift Package Manager 兼容性
:::note
As of the 3.44 release, Flutter uses [Swift Package Manager][]
to manage iOS and macOS native dependencies.
Flutter continues to support CocoaPods in maintenance mode,
however, the CocoaPods registry permanently becomes
[read-only on December 2, 2026][cocoapods].
自 Flutter 3.44 起,Flutter 使用 [Swift Package Manager][],
来管理 iOS 和 macOS 的原生依赖项。
CocoaPods 已正式进入维护模式,
其 registry 将 [于 2026 年 12 月 2 日永久变为只读][cocoapods]。
:::
[cocoapods]: https://blog.cocoapods.org/CocoaPods-Specs-Repo/
[Swift Package Manager]: https://www.swift.org/documentation/package-manager/
For information on how to turn SwiftPM off and on, visit
[Swift Package Manager for app developers][for-app-devs].
[for-app-devs]: /packages-and-plugins/swift-package-manager/for-app-developers
## How to add Swift Package Manager support to an existing Flutter plugin
## 如何为现有 Flutter 插件添加 Swift Package Manager 支持
This guide shows how to add Swift Package Manager support to a plugin that
already supports CocoaPods.
This ensures the plugin is usable by all Flutter projects.
本指南说明如何为已支持 CocoaPods 的插件添加 Swift Package Manager 支持,
确保所有 Flutter 项目都能使用该插件。
Flutter plugins should support _both_ Swift Package Manager and CocoaPods until
further notice.
在另行通知前,Flutter 插件应 **同时** 支持 Swift Package Manager 和 CocoaPods。
Swift Package Manager adoption will be gradual.
As of Flutter 3.44, plugins that don't support
CocoaPods aren't usable by projects that haven't
migrated to Swift Package Manager yet.
Plugins that don't support Swift Package Manager
can cause problems for projects that have migrated.
Please migrate your plugins as soon as possible.
Swift Package Manager 的采用将逐步推进。
从 Flutter 3.44 开始,
不支持 CocoaPods 的插件将无法用于尚未迁移到 Swift Package Manager 的项目。
不支持 Swift Package Manager 的插件会给已迁移的项目带来问题。
请尽快迁移你的插件。
Replace `plugin_name` throughout this guide with the name of your plugin.
The example below uses `ios`, replace `ios` with `macos` or `darwin`, as applicable.
在本指南全文将 `plugin_name` 替换为你的插件名称。
以下示例使用 `ios`,请酌情将 `ios` 替换为 `macos` 或 `darwin`。
1. Ensure that you are using Flutter 3.44 or later. This enables SwiftPM by default.
请确保你运行的是 Flutter 3.44 或更高版本。
该版本默认启用了 SwiftPM。
1. Start by creating a directory under the `ios`, `macos`, and/or `darwin`
directories.
Name this new directory the name of the platform package.
首先在 `ios`、`macos` 和/或 `darwin`
目录下创建一个目录。
将该新目录命名为平台 package 的名称。
- plugin_name/
- ios/
- ...
- **plugin_name/**
1. Within this new directory, create the following files/directories:
在此新目录中,创建以下文件/目录:
- `Package.swift` (file)
`Package.swift`(文件)
- `Sources` (directory)
`Sources`(目录)
- `Sources/plugin_name` (directory)
`Sources/plugin_name`(目录)
Your plugin should look like:
你的插件结构应如下所示:
- plugin_name/
- ios/
- ...
- plugin_name/
- **Package.swift**
- **Sources/**
- **plugin_name/**
1. Use the following template in the `Package.swift` file:
在 `Package.swift` 文件中使用以下模板:
```swift title="Package.swift"
// swift-tools-version: 5.9
// The swift-tools-version declares the minimum version of Swift required to build this package.
import PackageDescription
let package = Package(
// TODO: Update your plugin name.
name: "plugin_name",
platforms: [
// TODO: Update the platforms your plugin supports.
// If your plugin only supports iOS, remove `.macOS(...)`.
// If your plugin only supports macOS, remove `.iOS(...)`.
.iOS("13.0"),
.macOS("10.15")
],
products: [
// TODO: Update your library and target names.
// If the plugin name contains "_", replace with "-" for the library name.
.library(name: "plugin-name", targets: ["plugin_name"])
],
dependencies: [
.package(name: "FlutterFramework", path: "../FlutterFramework")
],
targets: [
.target(
// TODO: Update your target name.
name: "plugin_name",
dependencies: [
.product(name: "FlutterFramework", package: "FlutterFramework")
],
resources: [
// TODO: If your plugin requires a privacy manifest
// (e.g. if it uses any required reason APIs), update the PrivacyInfo.xcprivacy file
// to describe your plugin's privacy impact, and then uncomment this line.
// For more information, visit:
// https://developer.apple.com/documentation/bundleresources/privacy_manifest_files
// .process("PrivacyInfo.xcprivacy"),
// TODO: If you have other resources that need to be bundled with your plugin, refer to
// the following instructions to add them:
// https://developer.apple.com/documentation/xcode/bundling-resources-with-a-swift-package
]
)
]
)
```
1. Update the [supported platforms][] in your `Package.swift` file.
在 `Package.swift` 文件中更新 [支持的平台][supported platforms]。
```swift title="Package.swift"
platforms: [
// TODO: Update the platforms your plugin supports.
// If your plugin only supports iOS, remove `.macOS(...)`.
// If your plugin only supports macOS, remove `.iOS(...)`.
[!.iOS("13.0"),!]
[!.macOS("10.15")!]
],
```
[supported platforms]: https://developer.apple.com/documentation/packagedescription/supportedplatform
1. Update the package, library, and target names in your `Package.swift` file.
在 `Package.swift` 文件中更新 package、库和目标名称。
```swift title="Package.swift"
let package = Package(
// TODO: Update your plugin name.
name: [!"plugin_name"!],
platforms: [
.iOS("13.0"),
.macOS("10.15")
],
products: [
// TODO: Update your library and target names.
// If the plugin name contains "_", replace with "-" for the library name
.library(name: [!"plugin-name"!], targets: [[!"plugin_name"!]])
],
dependencies: [
.package(name: "FlutterFramework", path: "../FlutterFramework")
],
targets: [
.target(
// TODO: Update your target name.
name: [!"plugin_name"!],
dependencies: [
.product(name: "FlutterFramework", package: "FlutterFramework")
],
resources: [
// TODO: If your plugin requires a privacy manifest
// (e.g. if it uses any required reason APIs), update the PrivacyInfo.xcprivacy file
// to describe your plugin's privacy impact, and then uncomment this line.
// For more information, visit:
// https://developer.apple.com/documentation/bundleresources/privacy_manifest_files
// .process("PrivacyInfo.xcprivacy"),
// TODO: If you have other resources that need to be bundled with your plugin, refer to
// the following instructions to add them:
// https://developer.apple.com/documentation/xcode/bundling-resources-with-a-swift-package
]
)
]
)
```
:::note
If the plugin name contains `_`, the library name must be a `-` separated
version of the plugin name.
如果插件名称包含 `_`,库名称必须是插件名称用 `-` 分隔
后的形式。
:::
1. If your plugin has a [`PrivacyInfo.xcprivacy` file][], move it to
`ios/plugin_name/Sources/plugin_name/PrivacyInfo.xcprivacy` and uncomment
the resource in the `Package.swift` file.
如果你的插件有 [`PrivacyInfo.xcprivacy` 文件][`PrivacyInfo.xcprivacy` file],请将其移动到
`ios/plugin_name/Sources/plugin_name/PrivacyInfo.xcprivacy`,并在
`Package.swift` 文件中取消注释该资源。
```swift title="Package.swift"
resources: [
// TODO: If your plugin requires a privacy manifest
// (e.g. if it uses any required reason APIs), update the PrivacyInfo.xcprivacy file
// to describe your plugin's privacy impact, and then uncomment this line.
// For more information, visit:
// https://developer.apple.com/documentation/bundleresources/privacy_manifest_files
[!.process("PrivacyInfo.xcprivacy"),!]
// TODO: If you have other resources that need to be bundled with your plugin, refer to
// the following instructions to add them:
// https://developer.apple.com/documentation/xcode/bundling-resources-with-a-swift-package
],
```
1. Move any resource files from `ios/Assets` to
`ios/plugin_name/Sources/plugin_name` (or a subdirectory).
Add the resource files to your `Package.swift` file, if applicable.
For more instructions, visit
[Bundling resources with a Swift package][].
将 `ios/Assets` 中的资源文件移动到
`ios/plugin_name/Sources/plugin_name`(或其子目录)。
如适用,将资源文件添加到 `Package.swift` 文件中。
更多说明请参阅 [将资源打包到 Swift package 中][Bundling resources with a Swift package]。
1. Move all files from `ios/Classes` to `ios/plugin_name/Sources/plugin_name`.
将 `ios/Classes` 中的所有文件移动到 `ios/plugin_name/Sources/plugin_name`。
1. Add the `FlutterFramework` as a dependency.
将 `FlutterFramework` 添加为依赖。
Update `Package.swift` to include `FlutterFramework`:
在 `Package.swift` 中添加 `FlutterFramework`:
```swift title="Package.swift"
dependencies: [
[!.package(name: "FlutterFramework", path: "../FlutterFramework")!]
],
targets: [
.target(
// TODO: Update your target name.
name: "plugin_name",
dependencies: [
[!.product(name: "FlutterFramework", package: "FlutterFramework")!]
],
)
]
```
1. The `ios/Assets`, `ios/Resources`, and `ios/Classes` directories should now
be empty and can be deleted.
`ios/Assets`、`ios/Resources` 和 `ios/Classes` 目录现在应为空,可以删除。
1. If your plugin uses [Pigeon][], update your Pigeon input file.
如果你的插件使用 [Pigeon][],请更新 Pigeon 输入文件。
```dart title="pigeons/messages.dart" diff
kotlinOptions: KotlinOptions(),
javaOut: 'android/app/src/main/java/io/flutter/plugins/Messages.java',
javaOptions: JavaOptions(),
- swiftOut: 'ios/Classes/messages.g.swift',
+ swiftOut: 'ios/plugin_name/Sources/plugin_name/messages.g.swift',
swiftOptions: SwiftOptions(),
```
1. Update your `Package.swift` file with any customizations you might need.
根据需要进行自定义,更新 `Package.swift` 文件。
1. In Xcode, open the `ios/plugin_name/` directory.
在 Xcode 中打开 `ios/plugin_name/` 目录。
1. In Xcode, open your `Package.swift` file.
Verify Xcode doesn't produce any warnings or errors for this file.
在 Xcode 中打开 `Package.swift` 文件。
确认 Xcode 不会对此文件产生警告或错误。
:::tip
If Xcode doesn't show any files, quit Xcode (**Xcode > Quit Xcode**) and
reopen.
如果 Xcode 未显示任何文件,请退出 Xcode(**Xcode > Quit Xcode**)并
重新打开。
If Xcode doesn't update after you make a change, try clicking
**File > Packages > Reset Package Caches**.
如果更改后 Xcode 未更新,请尝试点击
**File > Packages > Reset Package Caches**。
:::
1. If your `ios/plugin_name.podspec` file has [CocoaPods `dependency`][]s,
add the corresponding [Swift Package Manager dependencies][] to your
`Package.swift` file.
如果 `ios/plugin_name.podspec` 文件包含 [CocoaPods `dependency`][],
请将对应的 [Swift Package Manager 依赖][Swift Package Manager dependencies] 添加到
`Package.swift` 文件。
1. If your package must be linked explicitly `static` or `dynamic`
([not recommended by Apple][]), update the [Product][] to define the
type:
如果 package 必须显式以 `static` 或 `dynamic` 链接
([Apple 不推荐][not recommended by Apple]),请更新 [Product][] 以定义
类型:
```swift title="Package.swift"
products: [
.library(name: "plugin-name", type: .static, targets: ["plugin_name"])
],
```
1. Make any other customizations. For more information on how to write a
`Package.swift` file, visit [`PackageDescription`][].
进行其他自定义。有关如何编写
`Package.swift` 文件的更多信息,请参阅
[https://developer.apple.com/documentation/packagedescription](https://developer.apple.com/documentation/packagedescription)。
:::tip
If you add targets to your `Package.swift` file, use unique names.
This avoids conflicts with targets from other packages.
如果向 `Package.swift` 文件添加目标,请使用唯一名称。
这可避免与其他 package 中的目标冲突。
:::
1. Update your `ios/plugin_name.podspec` to point to new paths.
更新 `ios/plugin_name.podspec`,使其指向新路径。
```ruby title="ios/plugin_name.podspec" diff
- s.source_files = 'Classes/**/*.swift'
- s.resource_bundles = {'plugin_name_privacy' => ['Resources/PrivacyInfo.xcprivacy']}
+ s.source_files = 'plugin_name/Sources/plugin_name/**/*.swift'
+ s.resource_bundles = {'plugin_name_privacy' => ['plugin_name/Sources/plugin_name/PrivacyInfo.xcprivacy']}
```
1. Update loading of resources from bundle to use [`Bundle.module`][].
更新从 bundle 加载资源的方式,改用 [`Bundle.module`][]。
```swift
#if SWIFT_PACKAGE
let settingsURL = Bundle.module.url(forResource: "image", withExtension: "jpg")
#else
let settingsURL = Bundle(for: Self.self).url(forResource: "image", withExtension: "jpg")
#endif
```
:::note
`Bundle.module` only works if there are resources
[defined in the `Package.swift` file][Bundling resources] or
[automatically included by Xcode][Xcode resource detection].
Otherwise, using `Bundle.module` results in an error.
仅当存在资源时,`Bundle.module` 才有效
(在 [`Package.swift` 文件中定义][Bundling resources] 或
[由 Xcode 自动包含][Xcode resource detection])。
否则,使用 `Bundle.module` 会导致错误。
:::
1. If your `.gitignore` doesn't include `.build/` and `.swiftpm/` directories,
you'll want to update your `.gitignore` to include:
如果 `.gitignore` 未包含 `.build/` 和 `.swiftpm/` 目录,
你需要更新 `.gitignore` 以包含:
```text title=".gitignore"
.build/
.swiftpm/
```
Commit your plugin's changes to your version control system.
将插件的更改提交到版本控制系统。
1. Verify the plugin still works with CocoaPods.
验证插件在 CocoaPods 下仍能正常工作。
1. Turn off Swift Package Manager.
关闭 Swift Package Manager:
```sh
flutter config --no-enable-swift-package-manager
```
1. Navigate to the plugin's example app.
进入插件的示例应用目录。
```sh
cd path/to/plugin/example/
```
1. Ensure the plugin's example app builds and runs.
确保插件的示例应用能构建并运行。
```sh
flutter run
```
1. Navigate to the plugin's top-level directory.
进入插件的顶层目录。
```sh
cd path/to/plugin/
```
1. Run CocoaPods validation lints.
运行 CocoaPods 验证 lint:
```sh
pod lib lint ios/plugin_name.podspec --configuration=Debug --skip-tests --use-modular-headers --use-libraries
```
```sh
pod lib lint ios/plugin_name.podspec --configuration=Debug --skip-tests --use-modular-headers
```
1. Verify the plugin works with Swift Package Manager.
验证插件在 Swift Package Manager 下能正常工作。
1. Turn on Swift Package Manager.
开启 Swift Package Manager:
```sh
flutter config --enable-swift-package-manager
```
1. Navigate to the plugin's example app.
进入插件的示例应用目录。
```sh
cd path/to/plugin/example/
```
1. Ensure the plugin's example app builds and runs.
确保插件的示例应用能构建并运行。
```sh
flutter run
```
:::note
Using the Flutter CLI to run the plugin's example app with the
Swift Package Manager feature turned on migrates the project to add
Swift Package Manager integration.
在开启 Swift Package Manager 功能的情况下,
使用 Flutter CLI 运行插件的示例应用会迁移项目以添加 Swift Package Manager 集成。
This raises the example app's Flutter SDK requirement to version 3.24 or
higher.
这会将示例应用的 Flutter SDK 要求提高到 3.24 或更高版本。
If you'd like to run the example app using an older Flutter SDK version,
do not commit the migration's changes to your version control system.
If needed, you can always
[undo the Swift Package Manager migration][removeSPM].
如果你想使用较旧的 Flutter SDK 版本运行示例应用,
请勿将迁移产生的更改提交到版本控制系统。
如有需要,你始终可以
[撤销 Swift Package Manager 迁移][removeSPM]。
:::
1. In Xcode, open the plugin's example app.
Ensure that **Package Dependencies** shows in the left
**Project Navigator**.
在 Xcode 中打开插件的示例应用。
确保左侧 **Project Navigator**(项目导航器)中显示 **Package Dependencies**(Package 依赖)。
1. Verify tests pass.
验证测试通过。
* **If your plugin has native unit tests (XCTest), make sure you also
[update unit tests in the plugin's example app][].**
**如果你的插件有原生单元测试(XCTest),请确保你也
[更新了插件示例应用中的单元测试][update unit tests in the plugin's example app]。**
* Follow instructions for [testing plugins][].
按照 [测试插件][testing plugins] 说明操作。
[`PrivacyInfo.xcprivacy` file]: https://developer.apple.com/documentation/bundleresources/privacy_manifest_files
[Pigeon]: https://pub.dev/packages/pigeon
[CocoaPods `dependency`]: https://guides.cocoapods.org/syntax/podspec.html#dependency
[Swift Package Manager dependencies]: https://developer.apple.com/documentation/packagedescription/package/dependency
[not recommended by Apple]: https://developer.apple.com/documentation/packagedescription/product/library(name:type:targets:)
[Product]: https://developer.apple.com/documentation/packagedescription/product
[`Bundle.module`]: https://developer.apple.com/documentation/xcode/bundling-resources-with-a-swift-package#Access-a-resource-in-code
[Bundling resources]: https://developer.apple.com/documentation/xcode/bundling-resources-with-a-swift-package#Explicitly-declare-or-exclude-resources
[Xcode resource detection]: https://developer.apple.com/documentation/xcode/bundling-resources-with-a-swift-package#:~:text=Xcode%20detects%20common%20resource%20types%20for%20Apple%20platforms%20and%20treats%20them%20as%20a%20resource%20automatically
[removeSPM]: /packages-and-plugins/swift-package-manager/for-app-developers#how-to-remove-swift-package-manager-integration
[update unit tests in the plugin's example app]: /packages-and-plugins/swift-package-manager/for-plugin-authors/#how-to-update-unit-tests-in-a-plugins-example-app
[testing plugins]: /testing/testing-plugins
[Bundling resources with a Swift package]: https://developer.apple.com/documentation/xcode/bundling-resources-with-a-swift-package
[`PackageDescription`]: https://developer.apple.com/documentation/packagedescription
Replace `plugin_name` throughout this guide with the name of your plugin.
The example below uses `ios`, replace `ios` with `macos` or `darwin`, as applicable.
在本指南全文将 `plugin_name` 替换为你的插件名称。
以下示例使用 `ios`,请酌情将 `ios` 替换为 `macos` 或 `darwin`。
1. Ensure that you are running Flutter 3.44 or later. This enables SwiftPM by default.
请确保你运行的是 Flutter 3.44 或更高版本。
该版本默认启用了 SwiftPM。
1. Start by creating a directory under the `ios`, `macos`, and/or `darwin`
directories.
Name this new directory the name of the platform package.
首先在 `ios`、`macos` 和/或 `darwin`
目录下创建一个目录。
将该新目录命名为平台 package 的名称。
- plugin_name/
- ios/
- ...
- **plugin_name/**
1. Within this new directory, create the following files/directories:
在此新目录中,创建以下文件/目录:
- `Package.swift` (file)
`Package.swift`(文件)
- `Sources` (directory)
`Sources`(目录)
- `Sources/plugin_name` (directory)
`Sources/plugin_name`(目录)
- `Sources/plugin_name/include` (directory)
`Sources/plugin_name/include`(目录)
- `Sources/plugin_name/include/plugin_name` (directory)
`Sources/plugin_name/include/plugin_name`(目录)
- `Sources/plugin_name/include/plugin_name/.gitkeep` (file)
`Sources/plugin_name/include/plugin_name/.gitkeep`(文件)
- This file ensures the directory is committed.
You can remove the `.gitkeep` file if other files are added to the
directory.
此文件确保目录会被提交。
如果向该目录添加了其他文件,可以删除 `.gitkeep` 文件。
Your plugin should look like:
你的插件结构应如下所示:
- plugin_name/
- ios/
- ...
- plugin_name/
- **Package.swift**
- **Sources/plugin_name/include/plugin_name/**
- **.gitkeep/**
1. Use the following template in the `Package.swift` file:
在 `Package.swift` 文件中使用以下模板:
```swift title="Package.swift"
// swift-tools-version: 5.9
// The swift-tools-version declares the minimum version of Swift required to build this package.
import PackageDescription
let package = Package(
// TODO: Update your plugin name.
name: "plugin_name",
platforms: [
// TODO: Update the platforms your plugin supports.
// If your plugin only supports iOS, remove `.macOS(...)`.
// If your plugin only supports macOS, remove `.iOS(...)`.
.iOS("13.0"),
.macOS("10.15")
],
products: [
// TODO: Update your library and target names.
// If the plugin name contains "_", replace with "-" for the library name
.library(name: "plugin-name", targets: ["plugin_name"])
],
dependencies: [
.package(name: "FlutterFramework", path: "../FlutterFramework")
],
targets: [
.target(
// TODO: Update your target name.
name: "plugin_name",
dependencies: [
.product(name: "FlutterFramework", package: "FlutterFramework")
],
resources: [
// TODO: If your plugin requires a privacy manifest
// (in other words, if it uses any required reason APIs),
// update the PrivacyInfo.xcprivacy file
// to describe your plugin's privacy impact, and then uncomment this line.
// For more information, visit:
// https://developer.apple.com/documentation/bundleresources/privacy_manifest_files
// .process("PrivacyInfo.xcprivacy"),
// TODO: If you have other resources that need to be bundled with your plugin, refer to
// the following instructions to add them:
// https://developer.apple.com/documentation/xcode/bundling-resources-with-a-swift-package
],
cSettings: [
// TODO: Update your plugin name.
.headerSearchPath("include/plugin_name")
]
)
]
)
```
1. Update the [supported platforms][] in your `Package.swift` file.
在 `Package.swift` 文件中更新 [支持的平台][supported platforms]。
```swift title="Package.swift"
platforms: [
// TODO: Update the platforms your plugin supports.
// If your plugin only supports iOS, remove `.macOS(...)`.
// If your plugin only supports macOS, remove `.iOS(...)`.
[!.iOS("13.0"),!]
[!.macOS("10.15")!]
],
```
[supported platforms]: https://developer.apple.com/documentation/packagedescription/supportedplatform
1. Update the package, library, and target names in your `Package.swift` file.
在 `Package.swift` 文件中更新 package、库和目标名称。
```swift title="Package.swift"
let package = Package(
// TODO: Update your plugin name.
name: [!"plugin_name"!],
platforms: [
.iOS("13.0"),
.macOS("10.15")
],
products: [
// TODO: Update your library and target names.
// If the plugin name contains "_", replace with "-" for the library name
.library(name: [!"plugin-name"!], targets: [[!"plugin_name"!]])
],
dependencies: [
.package(name: "FlutterFramework", path: "../FlutterFramework")
],
targets: [
.target(
// TODO: Update your target name.
name: [!"plugin_name"!],
dependencies: [
.product(name: "FlutterFramework", package: "FlutterFramework")
],
resources: [
// TODO: If your plugin requires a privacy manifest
// (for example, if it uses any required reason APIs),
// update the PrivacyInfo.xcprivacy file
// to describe your plugin's privacy impact, and then uncomment this line.
// For more information, visit:
// https://developer.apple.com/documentation/bundleresources/privacy_manifest_files
// .process("PrivacyInfo.xcprivacy"),
// TODO: If you have other resources that need to be bundled with your plugin, refer to
// the following instructions to add them:
// https://developer.apple.com/documentation/xcode/bundling-resources-with-a-swift-package
],
cSettings: [
// TODO: Update your plugin name.
.headerSearchPath("include/[!plugin_name!]")
]
)
]
)
```
:::note
If the plugin name contains `_`, the library name must be a `-` separated
version of the plugin name.
如果插件名称包含 `_`,库名称必须是插件名称用 `-` 分隔
后的形式。
:::
1. If your plugin has a [`PrivacyInfo.xcprivacy` file][], move it to
`ios/plugin_name/Sources/plugin_name/PrivacyInfo.xcprivacy` and uncomment
the resource in the `Package.swift` file.
如果你的插件有 [`PrivacyInfo.xcprivacy` 文件][`PrivacyInfo.xcprivacy` file],请将其移动到
`ios/plugin_name/Sources/plugin_name/PrivacyInfo.xcprivacy`,并在
`Package.swift` 文件中取消注释该资源。
```swift title="Package.swift"
resources: [
// TODO: If your plugin requires a privacy manifest
// (for example, if it uses any required reason APIs),
// update the PrivacyInfo.xcprivacy file
// to describe your plugin's privacy impact, and then uncomment this line.
// For more information, visit:
// https://developer.apple.com/documentation/bundleresources/privacy_manifest_files
[!.process("PrivacyInfo.xcprivacy"),!]
// TODO: If you have other resources that need to be bundled with your plugin, refer to
// the following instructions to add them:
// https://developer.apple.com/documentation/xcode/bundling-resources-with-a-swift-package
],
```
1. Move any resource files from `ios/Assets` to
`ios/plugin_name/Sources/plugin_name` (or a subdirectory).
Add the resource files to your `Package.swift` file, if applicable.
For more instructions, visit
[https://developer.apple.com/documentation/xcode/bundling-resources-with-a-swift-package](https://developer.apple.com/documentation/xcode/bundling-resources-with-a-swift-package).
将 `ios/Assets` 中的资源文件移动到
`ios/plugin_name/Sources/plugin_name`(或其子目录)。
如适用,将资源文件添加到 `Package.swift` 文件中。
更多说明请参阅
[https://developer.apple.com/documentation/xcode/bundling-resources-with-a-swift-package](https://developer.apple.com/documentation/xcode/bundling-resources-with-a-swift-package)。
1. Move any public headers from `ios/Classes` to
`ios/plugin_name/Sources/plugin_name/include/plugin_name`.
将 `ios/Classes` 中的公共头文件移动到
`ios/plugin_name/Sources/plugin_name/include/plugin_name`。
* If you're unsure which headers are public, check your `podspec` file's
[`public_header_files`][] attribute.
If this attribute isn't specified, all of your headers were public.
You should consider whether you want all of your headers to be public.
如果不确定哪些头文件是公共的,请检查 `podspec` 文件中的
[`public_header_files`][] 属性。
如果未指定该属性,则所有头文件都是公共的。
你应斟酌是否希望所有头文件都是公共的。
* The `pluginClass` defined in your `pubspec.yaml` file must be public and
within this directory.
在 `pubspec.yaml` 文件中定义的 `pluginClass` 必须是公共的,且
位于此目录中。
1. Handling `modulemap`.
处理 `modulemap`。
Skip this step if your plugin does not have a `modulemap`.
如果你的插件没有 `modulemap`,请跳过此步骤。
If you're using a `modulemap` for CocoaPods to create a Test submodule,
consider removing it for Swift Package Manager.
Note that this makes all public headers available through the module.
如果你为 CocoaPods 使用 `modulemap` 来创建 Test 子模块,
请考虑为 Swift Package Manager 将其移除。
请注意,这会使所有公共头文件通过该模块可用。
To remove the `modulemap` for Swift Package Manager but keep it for
CocoaPods, exclude the `modulemap` and umbrella header in the plugin's
`Package.swift` file.
若要为 Swift Package Manager 移除 `modulemap` 但为
CocoaPods 保留,请在插件的
`Package.swift` 文件中排除 `modulemap` 和 umbrella 头文件。
The example below assumes the `modulemap` and umbrella header are located
in the `ios/plugin_name/Sources/plugin_name/include` directory.
以下示例假定 `modulemap` 和 umbrella 头文件位于
`ios/plugin_name/Sources/plugin_name/include` 目录。
```swift title="Package.swift" diff
.target(
name: "plugin_name",
dependencies: [],
+ exclude: ["include/cocoapods_plugin_name.modulemap", "include/plugin_name-umbrella.h"],
```
If you want to keep your unit tests compatible with both CocoaPods and
Swift Package Manager, you can try the following:
如果你希望单元测试同时兼容 CocoaPods 和
Swift Package Manager,可以尝试以下做法:
```objc title="Tests/TestFile.m" diff
@import plugin_name;
- @import plugin_name.Test;
+ #if __has_include()
+ @import plugin_name.Test;
+ #endif
```
If you would like to use a custom `modulemap` with your Swift package,
refer to [Swift Package Manager's documentation][].
如果你希望将自定义 `modulemap` 用于 Swift package,
请参阅 [Swift Package Manager 文档][Swift Package Manager's documentation]。
1. Move all remaining files from `ios/Classes` to
`ios/plugin_name/Sources/plugin_name`.
将 `ios/Classes` 中所有剩余文件移动到
`ios/plugin_name/Sources/plugin_name`。
1. The `ios/Assets`, `ios/Resources`, and `ios/Classes` directories should now
be empty and can be deleted.
`ios/Assets`、`ios/Resources` 和 `ios/Classes` 目录现在应
为空,可以删除。
1. Add the `FlutterFramework` as a dependency.
添加 `FlutterFramework` 为依赖项。
Update `Package.swift` to include `FlutterFramework`:
在 `Package.swift` 中添加 `FlutterFramework`:
```swift title="Package.swift"
dependencies: [
[!.package(name: "FlutterFramework", path: "../FlutterFramework")!]
],
targets: [
.target(
// TODO: Update your target name.
name: "plugin_name",
dependencies: [
[!.product(name: "FlutterFramework", package: "FlutterFramework")!]
]
)
]
```
1. If your header files are no longer in the same directory as your
implementation files, you should update your import statements.
如果头文件不再与实现文件位于同一目录,你应更新 import 语句。
For example, imagine the following migration:
例如,假设进行以下迁移:
* Before:
迁移前:
```plaintext
ios/Classes/
├── PublicHeaderFile.h
└── ImplementationFile.m
```
* After:
迁移后:
```plaintext highlightLines=2
ios/plugin_name/Sources/plugin_name/
└── include/plugin_name/
└── PublicHeaderFile.h
└── ImplementationFile.m
```
In this example, the import statements in `ImplementationFile.m`
should be updated:
在此示例中,应更新 `ImplementationFile.m` 中的
import 语句:
```objc title="Sources/plugin_name/ImplementationFile.m" diff
- #import "PublicHeaderFile.h"
+ #import "./include/plugin_name/PublicHeaderFile.h"
```
1. If your plugin uses [Pigeon][], update your Pigeon input file.
如果你的插件使用 [Pigeon][],请更新 Pigeon 输入文件。
```dart title="pigeons/messages.dart" diff
javaOptions: JavaOptions(),
- objcHeaderOut: 'ios/Classes/messages.g.h',
- objcSourceOut: 'ios/Classes/messages.g.m',
+ objcHeaderOut: 'ios/plugin_name/Sources/plugin_name/messages.g.h',
+ objcSourceOut: 'ios/plugin_name/Sources/plugin_name/messages.g.m',
copyrightHeader: 'pigeons/copyright.txt',
```
If your `objcHeaderOut` file is no longer within the same directory as the
`objcSourceOut`, you can change the `#import` using
`ObjcOptions.headerIncludePath`:
如果 `objcHeaderOut` 文件不再与
`objcSourceOut` 位于同一目录,可以使用
`ObjcOptions.headerIncludePath` 更改 `#import`:
```dart title="pigeons/messages.dart" diff
javaOptions: JavaOptions(),
- objcHeaderOut: 'ios/Classes/messages.g.h',
- objcSourceOut: 'ios/Classes/messages.g.m',
+ objcHeaderOut: 'ios/plugin_name/Sources/plugin_name/include/plugin_name/messages.g.h',
+ objcSourceOut: 'ios/plugin_name/Sources/plugin_name/messages.g.m',
+ objcOptions: ObjcOptions(
+ headerIncludePath: './include/plugin_name/messages.g.h',
+ ),
copyrightHeader: 'pigeons/copyright.txt',
```
Run Pigeon to re-generate its code with the latest configuration.
运行 Pigeon,以最新配置重新生成代码。
1. Update your `Package.swift` file with any customizations you might need.
根据需要进行自定义,更新 `Package.swift` 文件。
1. In Xcode, open the `ios/plugin_name/` directory.
在 Xcode 中打开 `ios/plugin_name/` 目录。
1. In Xcode, open your `Package.swift` file.
Verify that Xcode doesn't produce any warnings or errors for this file.
在 Xcode 中打开 `Package.swift` 文件。
确认 Xcode 不会对此文件产生警告或错误。
:::tip
If Xcode doesn't show any files, quit Xcode (**Xcode > Quit Xcode**) and
reopen.
如果 Xcode 未显示任何文件,请退出 Xcode(**Xcode > Quit Xcode**)并
重新打开。
If Xcode doesn't update after you make a change, try clicking
**File > Packages > Reset Package Caches**.
如果更改后 Xcode 未更新,请尝试点击
**File > Packages > Reset Package Caches**。
:::
1. If your `ios/plugin_name.podspec` file has [CocoaPods `dependency`][]s,
add the corresponding [Swift Package Manager dependencies][] to your
`Package.swift` file.
如果 `ios/plugin_name.podspec` 文件包含 [CocoaPods `dependency`][],
请将对应的 [Swift Package Manager 依赖][Swift Package Manager dependencies] 添加到
`Package.swift` 文件。
1. If your package must be linked explicitly `static` or `dynamic`
([not recommended by Apple][]), update the [Product][] to define the
type:
如果 package 必须显式以 `static` 或 `dynamic` 链接
([Apple 不推荐][not recommended by Apple]),请更新 [Product][] 以定义
类型:
```swift title="Package.swift"
products: [
.library(name: "plugin-name", type: .static, targets: ["plugin_name"])
],
```
1. Make any other customizations. For more information on how to write a
`Package.swift` file, visit
[https://developer.apple.com/documentation/packagedescription](https://developer.apple.com/documentation/packagedescription).
进行其他自定义。有关如何编写
`Package.swift` 文件的更多信息,请参阅
[https://developer.apple.com/documentation/packagedescription](https://developer.apple.com/documentation/packagedescription)。
:::tip
If you add targets to your `Package.swift` file, use unique names.
This avoids conflicts with targets from other packages.
如果向 `Package.swift` 文件添加目标,请使用唯一名称。
这可避免与其他 package 中的目标冲突。
:::
1. Update your `ios/plugin_name.podspec` to point to new paths.
更新 `ios/plugin_name.podspec`,使其指向新路径。
```ruby title="ios/plugin_name.podspec" diff
- s.source_files = 'Classes/**/*.{h,m}'
- s.public_header_files = 'Classes/**/*.h'
- s.module_map = 'Classes/cocoapods_plugin_name.modulemap'
- s.resource_bundles = {'plugin_name_privacy' => ['Resources/PrivacyInfo.xcprivacy']}
+ s.source_files = 'plugin_name/Sources/plugin_name/**/*.{h,m}'
+ s.public_header_files = 'plugin_name/Sources/plugin_name/include/**/*.h'
+ s.module_map = 'plugin_name/Sources/plugin_name/include/cocoapods_plugin_name.modulemap'
+ s.resource_bundles = {'plugin_name_privacy' => ['plugin_name/Sources/plugin_name/PrivacyInfo.xcprivacy']}
```
1. Update loading of resources from bundle to use `SWIFTPM_MODULE_BUNDLE`:
更新从 bundle 加载资源的方式,改用 `SWIFTPM_MODULE_BUNDLE`:
```objc
#if SWIFT_PACKAGE
NSBundle *bundle = SWIFTPM_MODULE_BUNDLE;
#else
NSBundle *bundle = [NSBundle bundleForClass:[self class]];
#endif
NSURL *imageURL = [bundle URLForResource:@"image" withExtension:@"jpg"];
```
:::note
`SWIFTPM_MODULE_BUNDLE` only works if there are actual resources
(either [defined in the `Package.swift` file][Bundling resources] or
[automatically included by Xcode][Xcode resource detection]).
Otherwise, using `SWIFTPM_MODULE_BUNDLE` results in an error.
仅当存在实际资源时,`SWIFTPM_MODULE_BUNDLE` 才有效
(在 [`Package.swift` 文件中定义][Bundling resources] 或
[由 Xcode 自动包含][Xcode resource detection])。
否则,使用 `SWIFTPM_MODULE_BUNDLE` 会导致错误。
:::
1. If your `ios/plugin_name/Sources/plugin_name/include` directory only
contains a `.gitkeep`, you'll want to update your `.gitignore` to
include the following:
如果 `ios/plugin_name/Sources/plugin_name/include` 目录仅
包含 `.gitkeep`,你需要更新 `.gitignore` 以包含
以下内容:
```text title=".gitignore"
!.gitkeep
```
Run `flutter pub publish --dry-run` to ensure the `include` directory
is published.
运行 `flutter pub publish --dry-run`,确保 `include` 目录
会被发布。
1. Commit your plugin's changes to your version control system.
将插件的更改提交到版本控制系统。
1. Verify the plugin still works with CocoaPods.
验证插件在 CocoaPods 下仍能正常工作。
1. Turn off Swift Package Manager:
关闭 Swift Package Manager:
```sh
flutter config --no-enable-swift-package-manager
```
1. Navigate to the plugin's example app.
进入插件的示例应用目录。
```sh
cd path/to/plugin/example/
```
1. Ensure the plugin's example app builds and runs.
确保插件的示例应用能构建并运行。
```sh
flutter run
```
1. Navigate to the plugin's top-level directory.
进入插件的顶层目录。
```sh
cd path/to/plugin/
```
1. Run CocoaPods validation lints:
运行 CocoaPods 验证 lint:
```sh
pod lib lint ios/plugin_name.podspec --configuration=Debug --skip-tests --use-modular-headers --use-libraries
```
```sh
pod lib lint ios/plugin_name.podspec --configuration=Debug --skip-tests --use-modular-headers
```
1. Verify the plugin works with Swift Package Manager.
验证插件在 Swift Package Manager 下能正常工作。
1. Turn on Swift Package Manager:
开启 Swift Package Manager:
```sh
flutter config --enable-swift-package-manager
```
1. Navigate to the plugin's example app.
进入插件的示例应用目录。
```sh
cd path/to/plugin/example/
```
1. Ensure the plugin's example app builds and runs.
确保插件的示例应用能构建并运行。
```sh
flutter run
```
:::note
Using the Flutter CLI to run the plugin's example app with the
Swift Package Manager feature turned on migrates the project to add
Swift Package Manager integration.
在开启 Swift Package Manager 功能的情况下,
使用 Flutter CLI 运行插件的示例应用会迁移项目以添加 Swift Package Manager 集成。
This raises the example app's Flutter SDK requirement to version 3.24 or
higher.
这会将示例应用的 Flutter SDK 要求提高到 3.24 或更高版本。
If you'd like to run the example app using an older Flutter SDK version,
do not commit the migration's changes to your version control system.
If needed, you can always
[undo the Swift Package Manager migration][removeSPM].
如果你想使用较旧的 Flutter SDK 版本运行示例应用,
请勿将迁移产生的更改提交到版本控制系统。
如有需要,你始终可以
[撤销 Swift Package Manager 迁移][removeSPM]。
:::
1. In Xcode, open the plugin's example app.
Ensure that **Package Dependencies** shows in the left
**Project Navigator**.
在 Xcode 中打开插件的示例应用。
确保左侧 **Project Navigator**(项目导航器)中显示 **Package Dependencies**(Package 依赖)。
1. Verify tests pass.
验证测试通过。
* **If your plugin has native unit tests (XCTest), make sure you also
[update unit tests in the plugin's example app][].**
**如果你的插件有原生单元测试(XCTest),请确保你也
[更新了插件示例应用中的单元测试][update unit tests in the plugin's example app]。**
* Follow instructions for [testing plugins][].
按照 [测试插件][testing plugins] 说明操作。
[`PrivacyInfo.xcprivacy` file]: https://developer.apple.com/documentation/bundleresources/privacy_manifest_files
[`public_header_files`]: https://guides.cocoapods.org/syntax/podspec.html#public_header_files
[Swift Package Manager's documentation]: https://github.com/apple/swift-package-manager/blob/main/Documentation/Usage.md#creating-c-language-targets
[Pigeon]: https://pub.dev/packages/pigeon
[CocoaPods `dependency`]: https://guides.cocoapods.org/syntax/podspec.html#dependency
[Swift Package Manager dependencies]: https://developer.apple.com/documentation/packagedescription/package/dependency
[not recommended by Apple]: https://developer.apple.com/documentation/packagedescription/product/library(name:type:targets:)
[Product]: https://developer.apple.com/documentation/packagedescription/product
[Bundling resources]: https://developer.apple.com/documentation/xcode/bundling-resources-with-a-swift-package#Explicitly-declare-or-exclude-resources
[Xcode resource detection]: https://developer.apple.com/documentation/xcode/bundling-resources-with-a-swift-package#:~:text=Xcode%20detects%20common%20resource%20types%20for%20Apple%20platforms%20and%20treats%20them%20as%20a%20resource%20automatically
[removeSPM]: /packages-and-plugins/swift-package-manager/for-app-developers#how-to-remove-swift-package-manager-integration
[update unit tests in the plugin's example app]: /packages-and-plugins/swift-package-manager/for-plugin-authors/#how-to-update-unit-tests-in-a-plugins-example-app
[testing plugins]: https://docs.flutter.dev/testing/testing-plugins
## (Optional, but recommended) Add plugin as local package in example app
## (可选但推荐)在示例应用中将插件添加为本地 package
If your plugin includes an example,
it is recommended to add the plugin as a local package in the example app.
This is not required, but provides better Xcode support when editing
the plugin's source code in the example app.
Visit [issue #179032](https://github.com/flutter/flutter/issues/179032).
若插件包含示例,建议在示例应用中将插件添加为本地 package。
非必须,但在示例应用中编辑插件源码时能提供更好的 Xcode 支持。
请参阅 [issue #179032](https://github.com/flutter/flutter/issues/179032)。
### Add plugin as local package
### 将插件添加为本地 package
1. In a terminal navigate to `my_plugin`.
在终端中进入 `my_plugin`。
1. In Xcode, run the following command to open the example app's workspace,
(replace `ios` with `macos` as appropriate):
在 Xcode 中运行以下命令打开示例应用的工作区
(若插件面向 macOS,将 `ios` 替换为 `macos`):
```bash
open example/ios/Runner.xcworkspace
```
1. Right click **Flutter** > **Add Files to "Runner"**.
右键 **Flutter** > **Add Files to "Runner"**(添加文件到 Runner)。
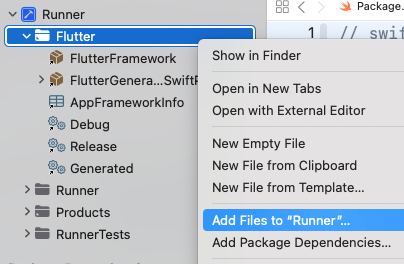
1. Select `my_plugin/ios/my_plugin`
(or `macos` or `darwin`, as appropriate).
选择 `my_plugin/ios/my_plugin`(或根据插件支持的平台选择 `macos` 或 `darwin`)。
1. Make sure “Reference files in place” is selected
(it should be the default), and click **Finish**.
确保选中「Reference files in place」(引用文件位置,通常为默认),
然后点击 **Finish**(完成)。
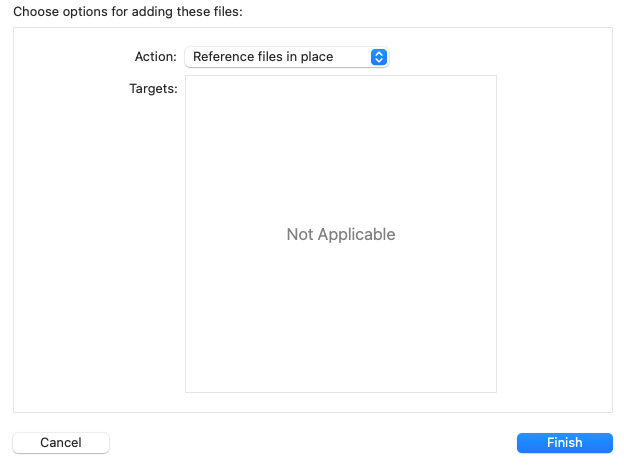
This adds the plugin as a local package,
but it's referenced by absolute path,
which isn't desirable for distribution.
To change it to a relative path, use the following instructions.
这样会将插件添加为本地 package,但会以绝对路径引用,不利于分发。要改为相对路径,请按以下步骤操作。
### Change to relative path
### 改为相对路径
1. Copy "Full Path" for plugin from the File Inspector.
从文件检查器复制插件的「Full Path」(完整路径)。

1. In terminal:
`open -a Xcode example/ios/Runner.xcodeproj/project.pbxproj`
在终端执行:
`open -a Xcode example/ios/Runner.xcodeproj/project.pbxproj`
1. Find the following:
找到以下内容:
```text
path = [COPIED FULL PATH]; sourceTree = ""
```
For example:
例如:
```text
path = /Users/username/path/to/my_plugin/ios/my_plugin; sourceTree = ""
```
1. And replace with relative path:
并替换为相对路径:
```text
path = ../../ios/my_plugin; sourceTree = ""
```
(Adjust `ios` to `macos` or `darwin` as needed).
(按需将 `ios` 调整为 `macos` 或 `darwin`)。
## How to update unit tests in a plugin's example app
## 如何更新插件示例应用中的单元测试
If your plugin has native XCTests,
you might need to update them to work with
Swift Package Manager if one of the following is true:
若插件有原生 XCTests,在以下任一情况下可能需要更新它们以配合 Swift Package Manager:
* You're using a CocoaPod dependency for the test.
测试使用了 CocoaPod 依赖。
* Your plugin is explicitly set to `type: .dynamic` in its `Package.swift` file.
插件在 `Package.swift` 中显式设为 `type: .dynamic`。
To update your unit tests:
要更新单元测试:
1. In Xcode, open your `example/ios/Runner.xcworkspace`.
在 Xcode 中打开 `example/ios/Runner.xcworkspace`。
1. If you were using a CocoaPod dependency for tests, such as `OCMock`,
you'll want to remove it from your `Podfile` file.
若测试曾使用 CocoaPod 依赖(如 `OCMock`),请从 `Podfile` 中移除。
```ruby title="ios/Podfile" diff
target 'RunnerTests' do
inherit! :search_paths
- pod 'OCMock', '3.5'
end
```
Then in the terminal, run `pod install` in the `plugin_name_ios/example/ios`
directory.
然后在终端于 `plugin_name_ios/example/ios` 目录运行 `pod install`。
1. Navigate to **Package Dependencies** for the project.
导航到项目的 **Package Dependencies**(package 依赖)。
1. Click the **+** button and add any test-only dependencies by searching for
them in the top right search bar.
点击 **+** 按钮,在右上角搜索栏搜索并添加仅用于测试的依赖。
:::note
OCMock uses unsafe build flags and can only be used if targeted by commit.
`fe1661a3efed11831a6452f4b1a0c5e6ddc08c3d` is the commit for the 3.9.3
version.
OCMock 使用不安全的构建标志,只能通过指定 commit 使用。
`fe1661a3efed11831a6452f4b1a0c5e6ddc08c3d` 为 3.9.3 版本对应的 commit。
:::
1. Ensure the dependency is added to the `RunnerTests` Target.
确保依赖已添加到 `RunnerTests` Target。
1. Click the **Add Package** button.
点击 **Add Package**(添加 package)按钮。
1. If you've explicitly set your plugin's library type to `.dynamic` in its
`Package.swift` file
([not recommended by Apple][library type recommendations]),
you'll also need to add it as a dependency to the `RunnerTests` target.
若在 `Package.swift` 中将插件库类型显式设为 `.dynamic`
([Apple 不推荐][library type recommendations]),
还需将其添加为 `RunnerTests` target 的依赖。
1. Ensure `RunnerTests` **Build Phases** has a **Link Binary With Libraries**
build phase:
确保 `RunnerTests` 的 **Build Phases**(构建阶段)包含
**Link Binary With Libraries**(链接二进制与库)构建阶段:
If the build phase doesn't exist already, create one.
Click the button and
then click **New Link Binary With Libraries Phase**.
若尚无该构建阶段,请创建:
点击 按钮,
再点击 **New Link Binary With Libraries Phase**。
1. Navigate to **Package Dependencies** for the project.
导航到项目的 **Package Dependencies**。
1. Click the button.
点击 按钮。
1. In the dialog that opens, click the **Add Local...** button.
在打开的对话框中点击 **Add Local...** 按钮。
1. Navigate to `plugin_name/plugin_name_ios/ios/plugin_name_ios` and click
the **Add Package** button.
导航到 `plugin_name/plugin_name_ios/ios/plugin_name_ios` 并点击 **Add Package** 按钮。
1. Ensure that it's added to the `RunnerTests` target and click the
**Add Package** button.
确保已添加到 `RunnerTests` target 并点击 **Add Package** 按钮。
1. Ensure tests pass **Product > Test**.
确保 **Product > Test**(测试)通过。
[library type recommendations]: https://developer.apple.com/documentation/packagedescription/product/library(name:type:targets:)