# 为 Android 配置 flavor
> 如何使用 flavor 配置多渠道构建。
This guide shows you how to create Flutter flavors for an
Android app.
本指南将向你展示如何为 Android 应用创建 Flutter flavor。
## Overview
## 概览
A Flutter flavor when used with Android represents a unified
term for various platform-specific features. For example, a
flavor could determine which icon, app name, API key,
feature flag, and logging level is associated with a
specific version of your app.
Flutter flavor 用于 Android 时,是各种平台特定特性的统一称呼。
例如,一个 flavor 可以决定应用某个特定版本所关联的图标、应用名称、
API key、功能开关 (feature flag) 以及日志级别。
If you want to create Flutter flavors for an Android app,
you can do this in Flutter. In Android, a Flutter flavor is
referred to as a [_product flavor_][].
如果你想为 Android 应用创建 Flutter flavor,可以在 Flutter 中完成。
在 Android 中,Flutter flavor 被称为 [**产品 flavor (product flavor)**][_product flavor_]。
The following illustrates an example of the Android
[_build variants_] that are created when an Android app has
two product flavors (`staging`, `production`) and two build
types (`debug`, `release`):
下面演示了一个示例:当 Android 应用拥有两个产品 flavor(`staging`、`production`)
和两种构建类型(`debug`、`release`)时,所生成的 Android
[**构建变体 (build variants)**][_build variants_]:
Product flavors产品 flavor
Build types构建类型
Resulting build variants生成的构建变体
staging
debug
stagingDebug
stagingRelease
production
release
productionDebug
productionRelease
[_product flavor_]: https://developer.android.com/build/build-variants#product-flavors
[_build variants_]: https://developer.android.com/build/build-variants
## Configure your product flavors {: #using-flavors-in-android }
## 配置你的产品 flavor
Complete the following steps to add two Android product
flavors called `staging` and `production` to a new Flutter
project called `flavors_example`, and then test your project
to make sure that the flavors work as expected.
完成以下步骤,向一个名为 `flavors_example` 的新 Flutter 项目添加两个名为
`staging` 和 `production` 的 Android 产品 flavor,然后测试你的项目,
确保这些 flavor 按预期工作。
1. Create a new Flutter project called `flavors_example`
with Kotlin as the preferred Android language. By
default, the project includes the `debug` and
`release` Android build types.
创建一个名为 `flavors_example` 的新 Flutter 项目,
并将 Kotlin 作为首选的 Android 语言。默认情况下,
该项目包含 `debug` 和 `release` 两种 Android 构建类型。
```console title="console"
$ flutter create --android-language kotlin flavors_example
```
1. Add the product flavors called `staging` and
`production` to the `flavors_example` project.
将名为 `staging` 和 `production` 的产品 flavor 添加到
`flavors_example` 项目中。
* In the `flavors_example` project, navigate to the
`android/app/` directory and open `build.gradle.kts`.
在 `flavors_example` 项目中,进入 `android/app/`
目录并打开 `build.gradle.kts`。
* Add the `flavorsDimension` property and the
`productFlavors` properties inside of the
`android {} block`. Make sure that the `android {}`
block also contains the default
`debug` and `release` build types:
在 `android {}` 块内添加 `flavorsDimension` 属性和
`productFlavors` 属性。确保 `android {}` 块同时包含默认的
`debug` 和 `release` 构建类型:
```kotlin title="build.gradle.kts"
android {
...
buildTypes {
getByName("debug") {...}
getByName("release") {...}
}
...
flavorDimensions += "default"
productFlavors {
create("staging") {
dimension = "default"
applicationIdSuffix = ".staging"
}
create("production") {
dimension = "default"
applicationIdSuffix = ".production"
}
}
}
```
1. To make sure that you've set up everything correctly,
run your app on the Android product flavors. You won't
see any differences because the configuration settings
haven't changed, but you do want to make sure that the
app can run.
为确保一切设置正确,请在这些 Android 产品 flavor 上运行你的应用。
由于配置设置尚未改变,你不会看到任何差异,但你需要确认应用可以正常运行。
* Start an Android emulator or connect a physical device
with developer options enabled.
启动一个 Android 模拟器,或连接一台已启用开发者选项的真机。
* In the console, navigate to the `flavors_example`
directory and enter the following command to test the
`staging` flavor:
在控制台中,进入 `flavors_example` 目录并输入以下命令来测试
`staging` flavor:
```console title="console"
$ flutter run --flavor staging
```
* Repeat the previous step for the `production` flavor.
对 `production` flavor 重复上一步骤。
1. If everything runs, you're ready to customize your
configurations. For more information, see
[Customize configurations][].
如果一切都能运行,你就可以开始自定义配置了。更多信息请参阅
[自定义配置][Customize configurations]。
[Customize configurations]: #customize-configurations
## Launch a flavor {: #launching-your-app-flavors }
## 启动某个 flavor
After you've created the product flavors for an Android app,
you can launch a specific product flavor through Flutter.
为 Android 应用创建产品 flavor 后,你可以通过 Flutter 启动某个特定的产品 flavor。
You can launch a product flavor with the Flutter CLI using
the following steps:
你可以通过以下步骤使用 Flutter CLI 启动某个产品 flavor:
1. Start an Android emulator or connect a physical device
with developer options enabled.
启动一个 Android 模拟器,或连接一台已启用开发者选项的真机。
1. In the console, navigate to the `flavors_example`
directory and enter the following command:
在控制台中,进入 `flavors_example` 目录并输入以下命令:
```console title="console"
$ flutter (run | build ) --flavor
```
* `(run | build )`: Replace this with one of the following:
* `run`: Runs the app in debug mode.
* `build`: Builds either an APK or an appbundle.
* ``: Either `apk` or `appbundle`.
`(run | build )`:替换为以下之一:
* `run`:以 debug 模式运行应用。
* `build`:构建 APK 或 appbundle。
* ``:`apk` 或 `appbundle`。
* ``: Replace this with the name of your Android
product flavor (for example: `staging`, `production`).
``:替换为你的 Android 产品 flavor 名称(例如:`staging`、`production`)。
Example:
例如:
```console title="console"
$ flutter build apk --flavor staging
```
## Use flavors in Flutter code
## 在 Flutter 代码中使用 flavor
After you've configured your product flavors, you can change your app's behavior—such as pointing to different API endpoints or changing the theme—based on the active flavor.
配置好产品 flavor 后,你可以根据当前生效的 flavor 来改变应用的行为——
例如指向不同的 API 端点或更换主题。
The Flutter framework provides the `appFlavor` constant, which retrieves the name of the current flavor as a `String`. This value matches the flavor name passed to the `--flavor` flag during the `flutter run` or `flutter build` process.
Flutter 框架提供了 `appFlavor` 常量,它以 `String` 形式获取当前 flavor 的名称。
该值与 `flutter run` 或 `flutter build` 过程中传给 `--flavor` 参数的 flavor 名称一致。
### Access the current flavor
### 访问当前 flavor
1. **Import the services library:**
To access the `appFlavor` constant, add the following import to your Dart file:
**导入 services 库:**
要访问 `appFlavor` 常量,请在你的 Dart 文件中添加以下导入:
```dart
import 'package:flutter/services.dart';
```
1. **Check the flavor value:**
Use the `appFlavor` constant in your application logic (often in `main()`) to handle flavor-specific configurations:
**检查 flavor 的值:**
在你的应用逻辑中(通常在 `main()` 内)使用 `appFlavor` 常量来处理特定于 flavor 的配置:
```dart
void main() {
// appFlavor will match the flavor name from build.gradle.kts
if (appFlavor == 'production') {
// Logic for production environment
Config.apiUrl = 'https://api.flavors_example.com';
} else if (appFlavor == 'staging') {
// Logic for staging environment
Config.apiUrl = 'https://staging.api.flavors_example.com';
}
runApp(const MyApp());
}
```
:::note
The value of `appFlavor` matches the name of the product flavor you defined in your `build.gradle.kts` file (for example, `staging` or `production`). If no flavor is specified during the build, `appFlavor` returns `null`.
`appFlavor` 的值与你在 `build.gradle.kts` 文件中定义的产品 flavor 名称一致
(例如 `staging` 或 `production`)。如果构建时未指定 flavor,`appFlavor` 返回 `null`。
:::
## Customize configurations
## 自定义配置
After you've added product flavors, you can customize them
for your Android app.
添加产品 flavor 后,你可以为 Android 应用对它们进行自定义。
### Create a distinct app display name
### 创建独特的应用显示名称
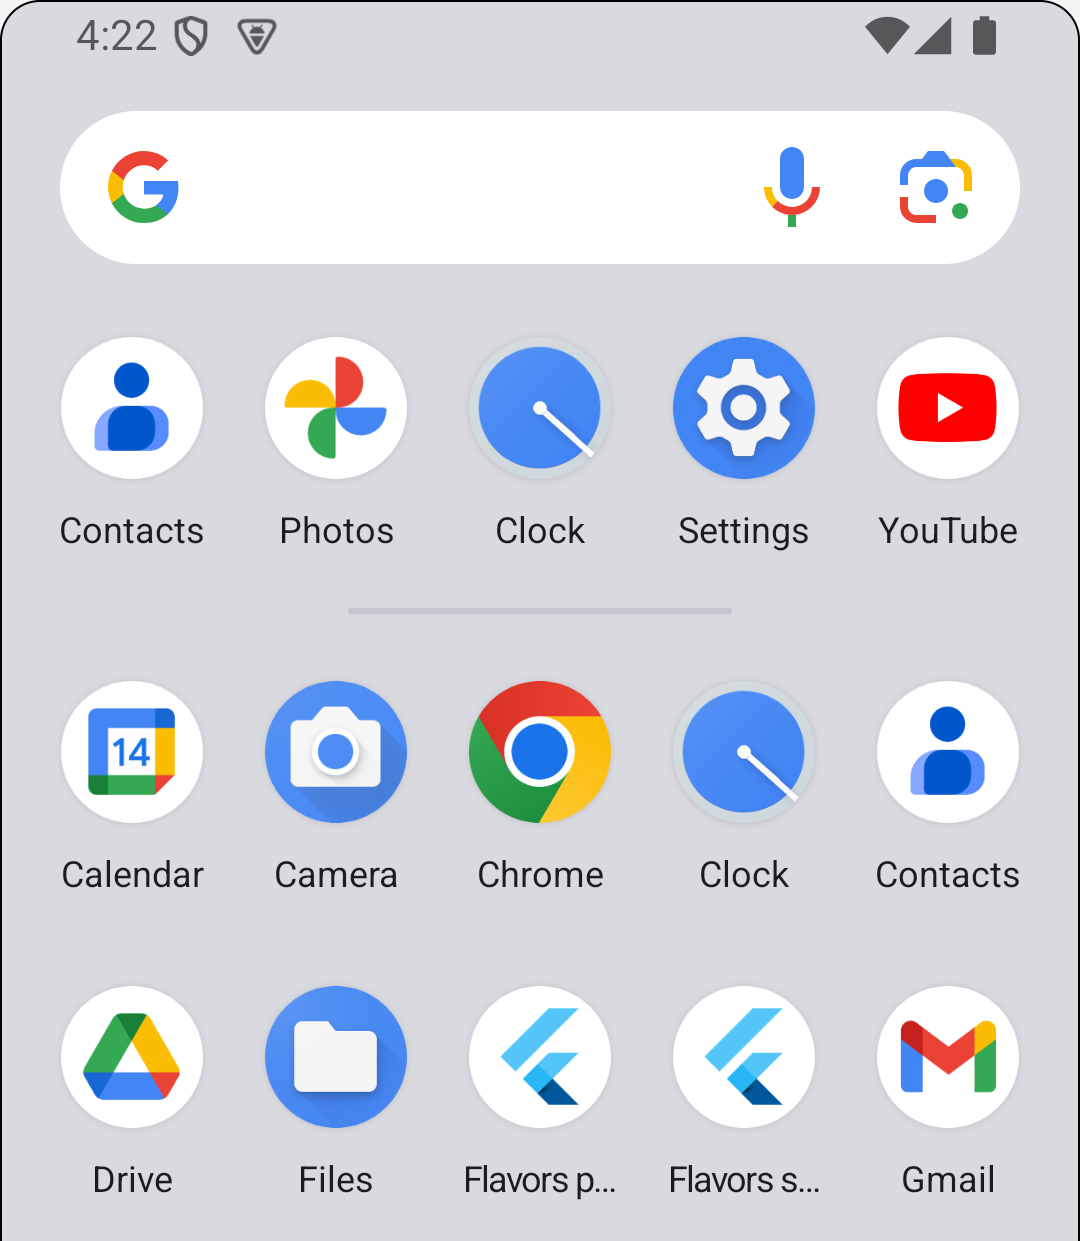
If you have multiple product flavors, a distinct app name
can quickly identify which flavor your deployed app is
using.
如果你有多个产品 flavor,一个独特的应用名称能让你快速识别已部署的应用使用的是哪个 flavor。
{:width="40%"}
The following steps show how to add distinct app display
names for two product flavors called `staging` and
`production` in a project called `flavors_example`.
以下步骤演示如何在名为 `flavors_example` 的项目中,为 `staging` 和
`production` 两个产品 flavor 添加独特的应用显示名称。
1. Update `build.gradle.kts` in your IDE:
在你的 IDE 中更新 `build.gradle.kts`:
* In the `flavors_example` project, navigate to the
`android/app/` directory and open `build.gradle.kts`.
在 `flavors_example` 项目中,进入 `android/app/`
目录并打开 `build.gradle.kts`。
* In the `flavorsDimension` block, add a `resValue()`
property called `app_name` to the `staging` and
`production` flavors:
在 `flavorsDimension` 块中,为 `staging` 和 `production`
flavor 添加一个名为 `app_name` 的 `resValue()` 属性:
```kotlin title="build.gradle.kts"
android {
...
flavorDimensions += "default"
productFlavors {
create("staging") {
dimension = "default"
resValue(
type = "string",
name = "app_name",
value = "Flavors staging")
applicationIdSuffix = ".staging"
}
create("production") {
dimension = "default"
resValue(
type = "string",
name = "app_name",
value = "Flavors production")
applicationIdSuffix = ".production"
}
}
```
1. Update `AndroidManifest.xml` in your IDE:
在你的 IDE 中更新 `AndroidManifest.xml`:
* In the `flavors_example` project, navigate to
`android/app/src/main` and open `AndroidManifest.xml`.
在 `flavors_example` 项目中,进入 `android/app/src/main`
并打开 `AndroidManifest.xml`。
* Replace the value for `android:label` with
`@string/app_name`.
将 `android:label` 的值替换为 `@string/app_name`。
```xml title="AndroidManifest.xml"
/>
```
1. Launch the app for each product flavor (`staging`,
`production`) and check to make sure that the
app display name has changed for each.
为每个产品 flavor(`staging`、`production`)启动应用,
确认每个 flavor 的应用显示名称都已改变。
* To launch a product flavor, see the steps in
[Launch a flavor][].
要启动某个产品 flavor,请参阅 [启动某个 flavor][Launch a flavor] 中的步骤。
* In the Android App Emulator, go to the list of apps.
You should see one for `Flavors p...` and
`Flavors s...`.
在 Android 应用模拟器中,进入应用列表。你应该会看到一个
`Flavors p...` 和一个 `Flavors s...`。
* To see more information for `Flavors p...` or
`Flavors s...`, long-press the icon for one of them
and select `App info`.
要查看 `Flavors p...` 或 `Flavors s...` 的更多信息,
长按其中一个的图标并选择 `App info`。
[Launch a flavor]: #launching-your-app-flavors
### Create distinct icons
### 创建独特的图标
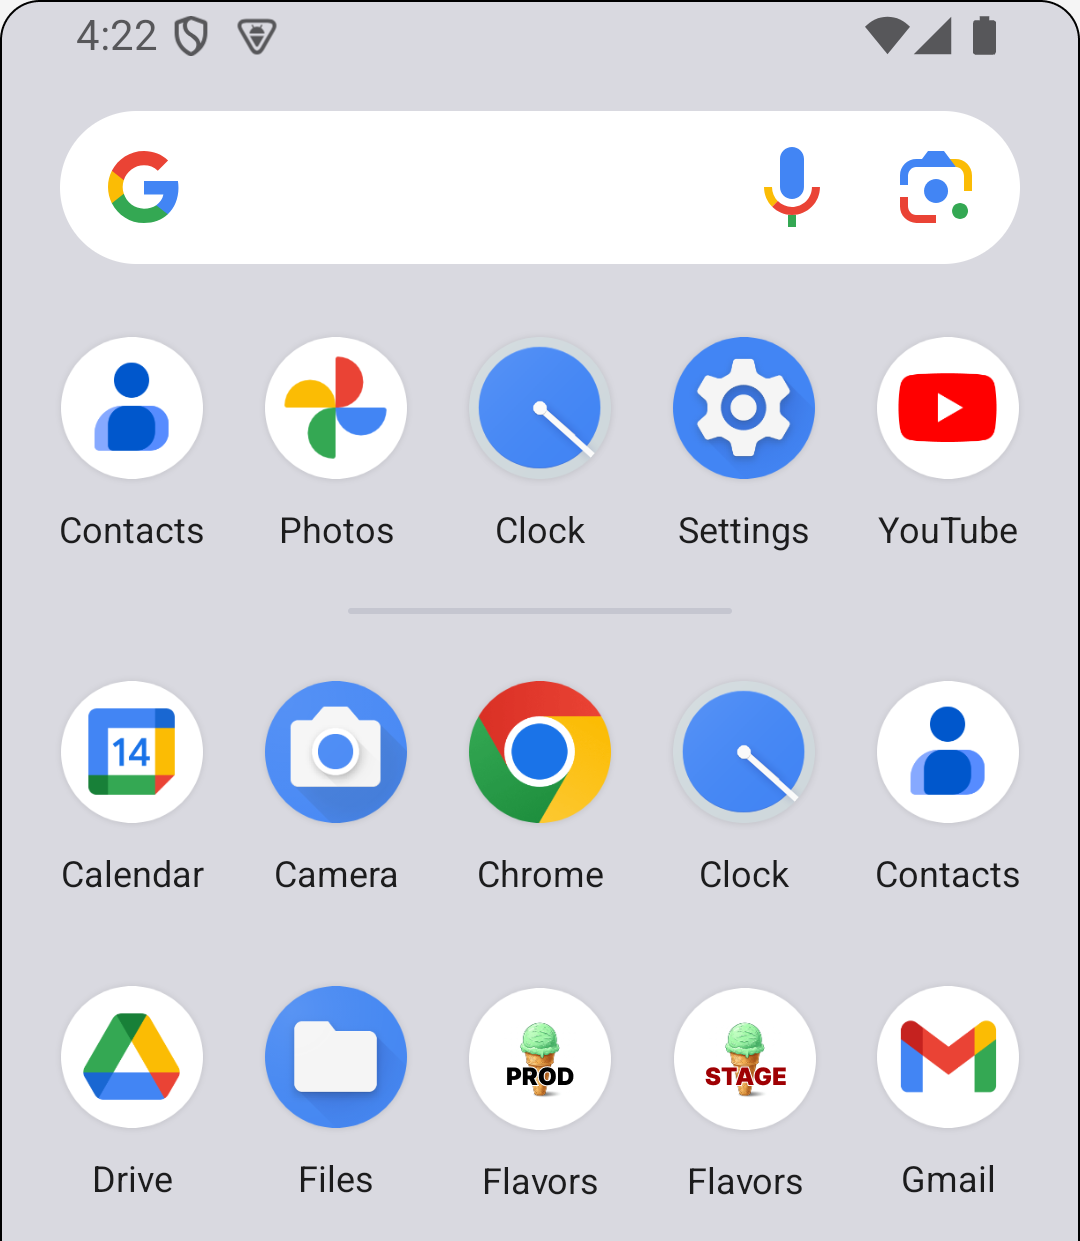
If you have multiple product flavors, a distinct icon for
each configuration can help you quickly identify which
flavor your deployed app is using.
如果你有多个产品 flavor,为每种配置准备一个独特的图标,
能帮你快速识别已部署的应用使用的是哪个 flavor。
{:width="40%"}
The following steps show how to add a distinct icon for two
product flavors called `staging` and `production` in a
project called `flavors_example`.
以下步骤演示如何在名为 `flavors_example` 的项目中,为 `staging` 和
`production` 两个产品 flavor 添加独特的图标。
1. Prepare your icons:
准备你的图标:
* Design your `staging` icon and `production` icon in
the design tool of your choice.
用你喜欢的设计工具设计 `staging` 图标和 `production` 图标。
* Generate versions of the `staging` icon and
`production` icon in the following sizes and them in
`PNG` format:
以 `PNG` 格式生成以下尺寸的 `staging` 图标和 `production` 图标:
* mipmap-mdpi (48x48 pixels)
mipmap-mdpi(48x48 像素)
* mipmap-hdpi (72x72 pixels)
mipmap-hdpi(72x72 像素)
* mipmap-xhdpi (96x96 pixels)
mipmap-xhdpi(96x96 像素)
* mipmap-xxhdpi (144x144 pixels)
mipmap-xxhdpi(144x144 像素)
* mipmap-xxxhdpi (192x192 pixels)
mipmap-xxxhdpi(192x192 像素)
:::note
You can use a tool like [App Icon Generator][]
to generate the versions of your icons.
你可以使用 [App Icon Generator][] 这类工具来生成各种尺寸的图标。
:::
1. Create flavor-specific resource directories:
创建特定于 flavor 的资源目录:
* Navigate to the `android/app/src` directory.
进入 `android/app/src` 目录。
* Create a directory called `staging/res`.
创建一个名为 `staging/res` 的目录。
* Navigate to the `staging/res` directory.
进入 `staging/res` 目录。
* Create the following `mipmap` directories and move the
versions of the `staging` icon into them:
创建以下 `mipmap` 目录,并将各尺寸的 `staging` 图标移入其中:
* `mipmap-mdpi/48x48_staging.png`
* `mipmap-hdpi/72x72_staging.png`
* `mipmap-xhdpi/96x96_staging.png`
* `mipmap-xxhdpi/144x144_staging.png`
* `mipmap-xxxhdpi/192x192_staging.png`
* Repeat the previous steps for the `production` flavor
directories and icons.
对 `production` flavor 的目录和图标重复上述步骤。
* Rename all of the icons to `ic_launcher.png`.
将所有图标重命名为 `ic_launcher.png`。
1. Double-check the configurations in `AndroidManifest.xml`
in your IDE:
在你的 IDE 中再次检查 `AndroidManifest.xml` 中的配置:
* In the `flavors_example` project, navigate to
`android/app/src/main` and open `AndroidManifest.xml`.
在 `flavors_example` 项目中,进入 `android/app/src/main`
并打开 `AndroidManifest.xml`。
* Make sure that the value for `android:icon` is
`@mipmap/ic_launcher`.
确保 `android:icon` 的值为 `@mipmap/ic_launcher`。
1. Launch the app for each product flavor (`staging`,
`production`) and check to make sure that the app icon
has changed for each. To launch a product flavor, see
the steps in [Launch a flavor][].
为每个产品 flavor(`staging`、`production`)启动应用,
确认每个 flavor 的应用图标都已改变。要启动某个产品 flavor,
请参阅 [启动某个 flavor][Launch a flavor] 中的步骤。
[Launch a flavor]: #launching-your-app-flavors
[App Icon Generator]: https://www.appicon.co/
### Bundle assets
### 打包资源 (assets)
If you have assets that are only used in a specific flavor
in your app, you can configure them to only be bundled into
your app when launching that flavor. This prevents your
app bundle size from being bloated by unused assets. To
bundle assets for each flavor, add the `flavors` subfield
to the `assets` field in your project's pubspec. To learn
more, see the [`assets` field][] in
[Flutter pubspec options][].
如果你的应用中有些资源 (assets) 只在特定 flavor 中使用,你可以配置它们
仅在启动该 flavor 时才被打包进应用。这能避免未使用的资源使应用包体积膨胀。
要为每个 flavor 打包资源,请在项目 pubspec 的 `assets` 字段中添加 `flavors` 子字段。
要了解更多,请参阅 [Flutter pubspec 选项][Flutter pubspec options] 中的
[`assets` 字段][`assets` field]。
[`assets` field]: /tools/pubspec#assets
[Flutter pubspec options]: /tools/pubspec
### Set a default flavor
### 设置默认 flavor
You can have your app use a specific flavor when you
launch your app without specifying a flavor. To do this,
you need to add the `default-flavor` field to your project's
pubspec. To learn more, see the [`default-flavor` field][]
in [Flutter pubspec options][].
你可以让应用在启动时未指定 flavor 的情况下使用某个特定的 flavor。
为此,你需要在项目的 pubspec 中添加 `default-flavor` 字段。要了解更多,
请参阅 [Flutter pubspec 选项][Flutter pubspec options] 中的
[`default-flavor` 字段][`default-flavor` field]。
[`default-flavor` field]: /tools/pubspec#default-flavor-field
### Add unique build settings
### 添加独特的构建设置
If you have additional build settings that you would like to
configure for a specific Android product flavor, see
Android's [Configure build variants][].
如果你想为某个特定的 Android 产品 flavor 配置额外的构建设置,
请参阅 Android 的 [配置构建变体][Configure build variants]。
While it is possible to set `abiFilters` in product flavors, it is not
recommended. Prefer configuring `abiFilters` in `defaultConfig` when possible.
When setting `abiFilters` in product flavors, pass
`-Pdisable-abi-filtering=true` when running `flutter build` or `flutter run`.
虽然可以在产品 flavor 中设置 `abiFilters`,但并不推荐这样做。
更建议在 `defaultConfig` 中设置 `abiFilters`。
如果在产品 flavor 中设置了 `abiFilters`,
请在运行 `flutter build` 或 `flutter run` 时必须使用 `-Pdisable-abi-filtering=true` 参数。
[Configure build variants]: https://developer.android.com/build/build-variants
## More information
## 更多信息
For more information on creating and using flavors, check out
the following resources:
要了解更多关于创建和使用 flavor 的信息,请查看以下资源:
* [Build flavors in Flutter (Android and iOS) with Firebase][]
[在 Flutter(Android 与 iOS)中使用 Firebase 构建 flavor (Build flavors in Flutter (Android and iOS) with Firebase)][Build flavors in Flutter (Android and iOS) with Firebase]
* [How to Setup Flutter & Firebase with Multiple Flavors using the FlutterFire CLI][flutterfireCLI]
[如何使用 FlutterFire CLI 为 Flutter 与 Firebase 配置多个 flavor (How to Setup Flutter & Firebase with Multiple Flavors using the FlutterFire CLI)][flutterfireCLI]
[Build flavors in Flutter (Android and iOS) with Firebase]: https://medium.com/@animeshjain/build-flavors-in-flutter-android-and-ios-with-different-firebase-projects-per-flavor-27c5c5dac10b
[flutterfireCLI]: https://codewithandrea.com/articles/flutter-firebase-multiple-flavors-flutterfire-cli/